新規記事の投稿を行うことで、非表示にすることが可能です。
2014年12月29日
Ubuntu 14.04 USBメモリ等のexFATを使えるようにする
USBメモリ等のexFATを使えるようにする
$ sudo apt-add-repository ppa:relan/exfat
$ sudo apt-get update
$ sudo apt-get install exfat-fuse exfat-utils
以上
2.5インチのSSD等を3.5インチの大きさに変換するアダプタです。
万能!!・・ではありませんが、結構使えます。
まず、フレームは金属なので、耐久性はあります。
同じセンチュリーの 楽ラック に IN 出来ます。
(ただし、アクセスランプは常時点きっぱなしになります)
*下側から止めるためのネジ穴が無いので、下部からネジ止めするタイプのマウンタには取り付けられません。
*横側からならネジ止め可能です。
 |
新品価格 |
【このカテゴリーの最新記事】
-
no image
-
no image
-
no image
-
no image
-
no image
-
no image
2014年12月26日
エンコードメモ
エンコードメモ(自分のために残すメモです)
MP4のTSファイルのソースをそのまま読み込む
エンコード
インターレス解除のところで、自動シールドシフトにチェックして、これでインターレス解除を行います。
自動シールドシフト設定で、動き重視にして、スムージングにチェック
チェックする項目、シャープ、透過、クリッピングリサイズ、NNEDI3フィルタ、リサイズフィルタ、音量の最大化
*シャープフィルタは無くても良いと思う、逆にシャープを掛ける場合は、ノイズ除去を2段で掛けたほうが綺麗な気がする。
*シャープフィルタを掛けると、ノイズ部が目立って出てくるので・・
これでエンコ
エンコメモ
24分のソースを21分でエンコード出来た
MP4のTSファイルのソースをそのまま読み込む
エンコード
インターレス解除のところで、自動シールドシフトにチェックして、これでインターレス解除を行います。
自動シールドシフト設定で、動き重視にして、スムージングにチェック
チェックする項目、シャープ、透過、クリッピングリサイズ、NNEDI3フィルタ、リサイズフィルタ、音量の最大化
*シャープフィルタは無くても良いと思う、逆にシャープを掛ける場合は、ノイズ除去を2段で掛けたほうが綺麗な気がする。
*シャープフィルタを掛けると、ノイズ部が目立って出てくるので・・
これでエンコ
エンコメモ
24分のソースを21分でエンコード出来た
posted by Sun at 20:20| 動画関連 for Windows
2014年12月16日
AviUtlのx264vfw ビデオの圧縮コーディックを更新する
AviUtlのx264vfw ビデオの圧縮コーディックを更新する
せっかくなので、古いままのコーディックを更新しようと思いました。
64Bitなのでね、最新のものにと
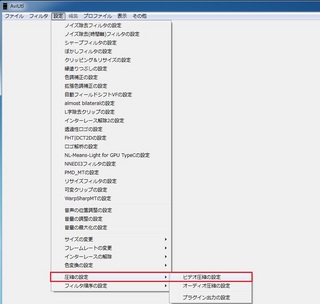
図のようにx264vfwを選びますこれでMP4のコーディックが選択されます
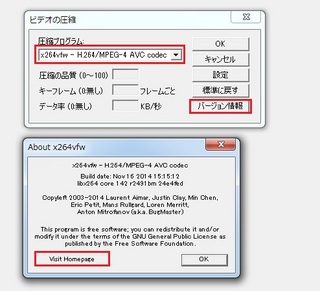
図のように圧縮プログラムを x264vfwに選択して、バージョン情報をクリック、Visit HomePage をクリックします。
HPが現れますので、ここから最新のバージョンをダウンロードして下さい。
以下からも取得できます
x264vfw_full_40_2491bm_40895.exe
これを実行することで、x264vfwが最新のものに置き換わります。これでMP4のコーディックが最新のものになりました
生産が中止になるそうです、欲しい人は今のうちに買っておきましょう。 e-tax(国税電子申告・納税システム)等に必要ですよ

せっかくなので、古いままのコーディックを更新しようと思いました。
64Bitなのでね、最新のものにと

図のようにx264vfwを選びますこれでMP4のコーディックが選択されます

図のように圧縮プログラムを x264vfwに選択して、バージョン情報をクリック、Visit HomePage をクリックします。
HPが現れますので、ここから最新のバージョンをダウンロードして下さい。
以下からも取得できます
x264vfw_full_40_2491bm_40895.exe
これを実行することで、x264vfwが最新のものに置き換わります。これでMP4のコーディックが最新のものになりました
生産が中止になるそうです、欲しい人は今のうちに買っておきましょう。 e-tax(国税電子申告・納税システム)等に必要ですよ
 |
NTTコミュニケーションズ 接触型ICカードリーダー・ライター e-Tax Win&Mac対応 SCR3310-NTTCom 新品価格 |
posted by Sun at 20:55| 動画関連 for Windows
「AviUtl と Xmedia Recode と MyMP4Box」で分割されたMP4を連結してみる
「AviUtl と Xmedia Recode と MyMP4Box」で分割されたMP4を連結してみる
MyMP4Box
まず、音声のないMP4のファイルを用意します
(これはAviUtlで、映像、音声の入ったプロジェクトファイルを作成し、音声なしで出力します)
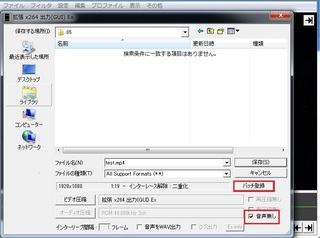
この時に、先にAviUtlのWAV出力で、音声を作成しておきます。
たとえば、映像を3つに分けた場合、音声も3つ作成されると言うことです。
作成された音声のない映像ををMyMP4Boxに順々にドラッグ&ドロップします。
次に、MyMP4Boxでそれらのファイルを連結します。
順番は、以下の図のように
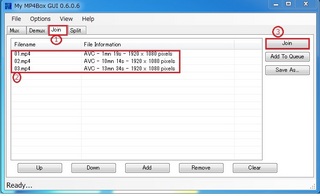
次に、音声ファイルの結合です。
まず、音声と、映像に分離した「音声ファイル(Wave)」をAviUtlで結合します。
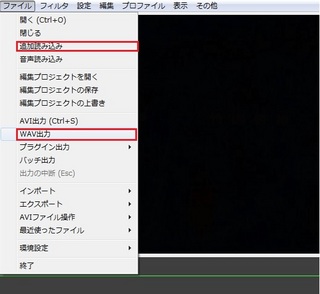
1番目のWaveファイルはAviUtlにドラッグ&ドロップして、次のファイルはファイルから「追加読み込み」で次々追加していきます。

その時に気をつけるのは、AviUtlのフィルタで、音声の最大化にチェックをつける事です。
これで、音声ファイルがノーマライズされて、適切な音量になります。
ファイルから、Wave出力で音声を出力すれば、ノーマライズされたWaveファイルが作成されます。
次にAACへの変換です
Xmedia Recodeを使って、WaveからACCに変換します。
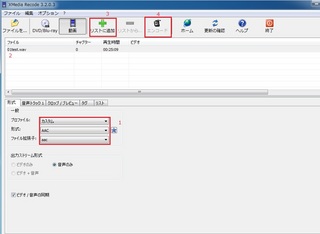
次にMyMP4Boxを使って映像と音声を結合します。
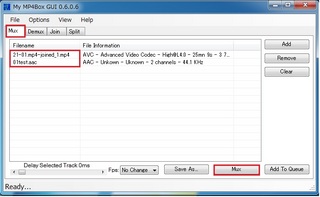
以上で、MP4の連結作業が終了します。
作成されたファイルは、元のファイルのカレントフォルダーへ作成されます
Free Video Joiner というソフトもありますが、ファイルを3つ24分分連結するのに24分かかります。
少し大きいですが、充電機も付属していて良いですね。ポートも2つあるのが魅力的、
iPhoneとガラケーの両方で充電できます

MyMP4Box
まず、音声のないMP4のファイルを用意します
(これはAviUtlで、映像、音声の入ったプロジェクトファイルを作成し、音声なしで出力します)

この時に、先にAviUtlのWAV出力で、音声を作成しておきます。
たとえば、映像を3つに分けた場合、音声も3つ作成されると言うことです。

作成された音声のない映像ををMyMP4Boxに順々にドラッグ&ドロップします。
次に、MyMP4Boxでそれらのファイルを連結します。
順番は、以下の図のように

次に、音声ファイルの結合です。
まず、音声と、映像に分離した「音声ファイル(Wave)」をAviUtlで結合します。
1番目のWaveファイルはAviUtlにドラッグ&ドロップして、次のファイルはファイルから「追加読み込み」で次々追加していきます。

その時に気をつけるのは、AviUtlのフィルタで、音声の最大化にチェックをつける事です。
これで、音声ファイルがノーマライズされて、適切な音量になります。
ファイルから、Wave出力で音声を出力すれば、ノーマライズされたWaveファイルが作成されます。
次にAACへの変換です
Xmedia Recodeを使って、WaveからACCに変換します。

次にMyMP4Boxを使って映像と音声を結合します。

以上で、MP4の連結作業が終了します。
作成されたファイルは、元のファイルのカレントフォルダーへ作成されます
Free Video Joiner というソフトもありますが、ファイルを3つ24分分連結するのに24分かかります。
少し大きいですが、充電機も付属していて良いですね。ポートも2つあるのが魅力的、
iPhoneとガラケーの両方で充電できます
 |
新品価格 |
posted by Sun at 00:45| 動画関連 for Windows
2014年12月10日
Xmedia Recode で分割できないMP4.TSファイルに出会ったので その3
Xmedia Recode で分割できないMP4.TSファイルに出会ったので
Xmedia Recode で分割できないMP4.TSファイルにまたまた遭遇、前回書いた方法でも上手くエンコード出来ずにいたので調べてみた
思い立ったのがMP4 Splitterだ
使い方やインストールの方法は、K本的に無料ソフト に記述してあるが、それを紹介
MP4 Splitter はここからダウンロードします
現在のファイル名は
MPC-HC_standalone_filters.1.6.9.7502.x64.7z 64Bit用
MPC-HC_standalone_filters.1.6.9.7502.x86.7z 32Bit用
であり、私は64Bitを使用しているので、「MPC-HC_standalone_filters.1.6.9.7502.x64.7z」をダウンロードしました。
このファイルを解凍し、中に入っている MP4Splitter.ax をコピーします
使用OSはWindows7であり、64Bitなので、この MP4Splitter.ax を 「C:¥Windows¥SysWOW64」にコピーします
次に 「Regist_MP4 Splitter.ba」をダウンロードして 右クリック管理者権限で起動します。
「MP4Splitter.ax の DllRegisterServer は成功しました。」と表示されたらインストール完了です。
後は、ffdshow のビデオデコーダー設定画面、コーディックで、「H.264/AVC」と「Other MPEG4」を、「libavcodec」に変更すればOK です。
以上で、Xmedia Recodeで分割できなかったMP4.tsが分割できるようになります。
これでAviUtlでもエンコード可能なファイルを生成することが出来ました。
MP4ファイルって一筋縄ではいかないですね・・・
posted by Sun at 23:48| 動画関連 for Windows
Xmedia Recode で分割できないMP4.TSファイルに出会ったので その2
Xmedia Recode で分割できないMP4.TSファイルに出会ったので
Xmedia Recode で分割できないMP4.TSファイルに出会ったので、色々方法を考えてみました。
1.My MP4Box CUIで分割してみる。
My MP4Box CUIで分割したところ、再生出来ない音声と、再生出来ない映像が出来上がりました。
それをAviUtlにドロップしたところ、画像は表示できましたので、音声を追加、要らない部分をカットして、プロジェクトファイルを作成
しかし・・・音が遅れる?結果に というか、映像がカットできませんでした(音声のみカットされている為滅茶苦茶な音声状態に)
ということでこの方法は駄目だったということに
2.FFmpegで分割してみる。
FFmpegを使ってコマンドラインで分割してみました。
結果 1KbのMP4ファイルが出来上がった
ということでこの方法も駄目
3.コーディックを確認してみる
MediaInfoというソフトを使ってコーディックを確認してみました。
コンテナと全般情報
MPEG-TS:1.24GiB OBEモード:VBRモード
1 ビデオストリーム オーバールビットレート:8218Kbps
2 オーディオストリーム 最大:35Mbps
これで、ファイルの情報がわかりました。
4.Xmedia Recodeで再エンコード
とりあえず、Xmedia Recode で再エンコードして、AviUtlで扱える形にしようと考えてみました。
音声は取り出せますので、まずは映像だけを再エンコードします。
映像の部分は変換のまま、変更したのはビデオのビットレートを先ほどの「8218Kbps」にするため、ビットレートの部分に8218と入力してエンコードしました。
形式: mp4
出力ストリーム形:、映像のみ
ビデオ:(一般) モード:変換 ビットレート:8218
以上でエンコードを開始
じっと待つこと17分 完成しました。
音声も Xmedia Recodeでwavで出力して、AviUtlにドロップ
35分程度でエンコード完了
ちゃんと再生できましたが・・・・遅いです。 最エンコに17分+エンコードに35分もっと速くしてみる方法はないだろうか
5、AviUtlにそのまま入れちゃえばどうなんだろう??
ということで、MP4ファイルをそのままドロップ しかし、表示されるまで時間がかかります。
1、再生は出来る
2、音声は出る (本来、AviUtlはAACはそのままでは、無理なはずなのですが、mp4ファイルをそのままドロップした状態では再生できるようです。)
と、ここまでは良かったのですが、思うようにエンコ出来ない状態に・・映像は乱れる、音声はついてこない(映像が乱れるために遅れます)
なので、色々と見直しをしてみました。
AviUtlで様々なコーディックを読み込めるというプラグイン
POP@4bit L-SMASH Works r733
L-SMASH_Works_r717_plugin-set.zipを導入
Rutice
AACをFAW化して読み込むプラグイン aacfaw.aui の導入
MediaInfoで出てくるこのビデオのコーディックであるところのVideoLAN X264コーディックをインストール
VideoLan のページの
http://download.videolan.org/pub/videolan/x264/binaries/ から
http://download.videolan.org/pub/videolan/x264/binaries/win32/
http://download.videolan.org/pub/videolan/x264/binaries/win64/
でWindowsの32Bit環境 64Bit環境に合わせてコーディックをDLします。
私は64Bitなので、64Bitのリンクから x264-10b-r2345-f0c1c53.exe を取得しました。
そしてインストール
この際なので、幾つか見直そうと、出力プラグインのMP4Boxを最新版にしました
MP4Boxのページ
から、現在の最新版 MP4Box 0.5.1 5542 Dev (direct link) (18.5MB) を取得してインストール
ちなみにMP4Boxは、C:\Program Files\GPACにあります。
AviUtlの出力プラグインから「ビデオ圧縮」をクリックして、MP4Box.exeの指定を「C:\Program Files\GPAC\mp4box.exe」に変更
そしてマシーンを再起動
AviUtlを起動して、そのままmp4ファイルをドロップしましたら、少し時間がかかりますが、ちゃんと表示されました
シークもOKエラーが出ることはありません。
音声もOK 遅れたりすることはありませんでした。
そして、要らない部分をカットして、エンコード 2重化、NNEDI3、インターレス解除2、を使用してるので少し遅いですが、
24分のファイルを 40分弱でエンコード出来ました。
MP4のソースをそのまま読み込む
エンコード
インターレス解除の設定で、自動シールドシフトにチェックを入れる。
自動シールドシフトの設定で、動き重視にして、スムージングにチェック
チェックする項目、クリッピングリサイズ、NNEDI3フィルタ、リサイズフィルタ、音量の最大化
これでエンコ
24分のファイルを21分でエンコ終了
使用環境
Windows7 i7-4770K OC-4.1GHz
メモリ 32GB
最後に、色々試した結果を纏めて書いたものです。
書きもれなどありまして、同じ結果が出ない場合は御了承くださいませ。
今のところ、順調に動いています。
5ポートもあるので、ホテル、移動先、などで重宝します。
但し、モバイルバッテリー等の充電には向いていないかもしれません。
大容量の電気を出力するのは苦手なようです。 レビューより参照

Xmedia Recode で分割できないMP4.TSファイルに出会ったので、色々方法を考えてみました。
1.My MP4Box CUIで分割してみる。
My MP4Box CUIで分割したところ、再生出来ない音声と、再生出来ない映像が出来上がりました。
それをAviUtlにドロップしたところ、画像は表示できましたので、音声を追加、要らない部分をカットして、プロジェクトファイルを作成
しかし・・・音が遅れる?結果に というか、映像がカットできませんでした(音声のみカットされている為滅茶苦茶な音声状態に)
ということでこの方法は駄目だったということに
2.FFmpegで分割してみる。
FFmpegを使ってコマンドラインで分割してみました。
結果 1KbのMP4ファイルが出来上がった
ということでこの方法も駄目
3.コーディックを確認してみる
MediaInfoというソフトを使ってコーディックを確認してみました。
コンテナと全般情報
MPEG-TS:1.24GiB OBEモード:VBRモード
1 ビデオストリーム オーバールビットレート:8218Kbps
2 オーディオストリーム 最大:35Mbps
これで、ファイルの情報がわかりました。
4.Xmedia Recodeで再エンコード
とりあえず、Xmedia Recode で再エンコードして、AviUtlで扱える形にしようと考えてみました。
音声は取り出せますので、まずは映像だけを再エンコードします。
映像の部分は変換のまま、変更したのはビデオのビットレートを先ほどの「8218Kbps」にするため、ビットレートの部分に8218と入力してエンコードしました。
形式: mp4
出力ストリーム形:、映像のみ
ビデオ:(一般) モード:変換 ビットレート:8218
以上でエンコードを開始
じっと待つこと17分 完成しました。
音声も Xmedia Recodeでwavで出力して、AviUtlにドロップ
35分程度でエンコード完了
ちゃんと再生できましたが・・・・遅いです。 最エンコに17分+エンコードに35分もっと速くしてみる方法はないだろうか
5、AviUtlにそのまま入れちゃえばどうなんだろう??
ということで、MP4ファイルをそのままドロップ しかし、表示されるまで時間がかかります。
1、再生は出来る
2、音声は出る (本来、AviUtlはAACはそのままでは、無理なはずなのですが、mp4ファイルをそのままドロップした状態では再生できるようです。)
と、ここまでは良かったのですが、思うようにエンコ出来ない状態に・・映像は乱れる、音声はついてこない(映像が乱れるために遅れます)
なので、色々と見直しをしてみました。
AviUtlで様々なコーディックを読み込めるというプラグイン
POP@4bit L-SMASH Works r733
L-SMASH_Works_r717_plugin-set.zipを導入
Rutice
AACをFAW化して読み込むプラグイン aacfaw.aui の導入
MediaInfoで出てくるこのビデオのコーディックであるところのVideoLAN X264コーディックをインストール
VideoLan のページの
http://download.videolan.org/pub/videolan/x264/binaries/ から
http://download.videolan.org/pub/videolan/x264/binaries/win32/
http://download.videolan.org/pub/videolan/x264/binaries/win64/
でWindowsの32Bit環境 64Bit環境に合わせてコーディックをDLします。
私は64Bitなので、64Bitのリンクから x264-10b-r2345-f0c1c53.exe を取得しました。
そしてインストール
この際なので、幾つか見直そうと、出力プラグインのMP4Boxを最新版にしました
MP4Boxのページ
から、現在の最新版 MP4Box 0.5.1 5542 Dev (direct link) (18.5MB) を取得してインストール
ちなみにMP4Boxは、C:\Program Files\GPACにあります。
AviUtlの出力プラグインから「ビデオ圧縮」をクリックして、MP4Box.exeの指定を「C:\Program Files\GPAC\mp4box.exe」に変更
そしてマシーンを再起動
AviUtlを起動して、そのままmp4ファイルをドロップしましたら、少し時間がかかりますが、ちゃんと表示されました
シークもOKエラーが出ることはありません。
音声もOK 遅れたりすることはありませんでした。
24分のファイルを 40分弱でエンコード出来ました。
MP4のソースをそのまま読み込む
エンコード
インターレス解除の設定で、自動シールドシフトにチェックを入れる。
自動シールドシフトの設定で、動き重視にして、スムージングにチェック
チェックする項目、クリッピングリサイズ、NNEDI3フィルタ、リサイズフィルタ、音量の最大化
これでエンコ
24分のファイルを21分でエンコ終了
使用環境
Windows7 i7-4770K OC-4.1GHz
メモリ 32GB
最後に、色々試した結果を纏めて書いたものです。
書きもれなどありまして、同じ結果が出ない場合は御了承くださいませ。
今のところ、順調に動いています。
5ポートもあるので、ホテル、移動先、などで重宝します。
但し、モバイルバッテリー等の充電には向いていないかもしれません。
大容量の電気を出力するのは苦手なようです。 レビューより参照
 |
新品価格 |
posted by Sun at 20:35| 動画関連 for Windows
Xmedia Recode で分割できないMP4.TSファイルに出会ったので sono2
Xmedia Recode で分割できないMP4.TSファイルに出会ったので
Xmedia Recode で分割できないMP4.TSファイルに出会ったので、色々方法を考えてみました。
1.My MP4Box CUIで分割してみる。
My MP4Box CUIで分割したところ、再生出来ない音声と、再生出来ない映像が出来上がりました。
それをAviUtlにドロップしたところ、画像は表示できましたので、音声を追加、要らない部分をカットして、プロジェクトファイルを作成
しかし・・・音が遅れる?結果に というか、映像がカットできませんでした(音声のみカットされている為滅茶苦茶な音声状態に)
ということでこの方法は駄目だったということに
2.FFmpegで分割してみる。
FFmpegを使ってコマンドラインで分割してみました。
結果 1KbのMP4ファイルが出来上がった
ということでこの方法も駄目
3.コーディックを確認してみる
MediaInfoというソフトを使ってコーディックを確認してみました。
コンテナと全般情報
MPEG-TS:1.24GiB OBEモード:VBRモード
1 ビデオストリーム オーバールビットレート:8218Kbps
2 オーディオストリーム 最大:35Mbps
これで、ファイルの情報がわかりました。
4.Xmedia Recodeで再エンコード
とりあえず、Xmedia Recode で再エンコードして、AviUtlで扱える形にしようと考えてみました。
音声は取り出せますので、まずは映像だけを再エンコードします。
映像の部分は変換のまま、変更したのはビデオのビットレートを先ほどの「8218Kbps」にするため、ビットレートの部分に8218と入力してエンコードしました。
形式: mp4
出力ストリーム形:、映像のみ
ビデオ:(一般) モード:変換 ビットレート:8218
以上でエンコードを開始
じっと待つこと17分 完成しました。
音声も Xmedia Recodeでwavで出力して、AviUtlにドロップ
35分程度でエンコード完了
ちゃんと再生できましたが・・・・遅いです。 最エンコに17分+エンコードに35分もっと速くしてみる方法はないだろうか
5、AviUtlにそのまま入れちゃえばどうなんだろう??
ということで、MP4ファイルをそのままドロップ しかし、表示されるまで時間がかかります。
1、再生は出来る
2、音声は出る (本来、AviUtlはAACはそのままでは、無理なはずなのですが、mp4ファイルをそのままドロップした状態では再生できるようです。)
と、ここまでは良かったのですが、思うようにエンコ出来ない状態に・・映像は乱れる、音声はついてこない(映像が乱れるために遅れます)
なので、色々と見直しをしてみました。
AviUtlで様々なコーディックを読み込めるというプラグイン
POP@4bit http://pop.4-bit.jp/
L-SMASH_Works_r717_plugin-set.zipを導入
Rutice http://www.rutice.net/
AACをFAW化して読み込むプラグイン aacfaw.aui の導入
MediaInfoで出てくるこのビデオのコーディックであるところのVideoLAN X264コーディックをインストール
http://www.videolan.org/developers/x264.html のページの
http://download.videolan.org/pub/videolan/x264/binaries/ から
http://download.videolan.org/pub/videolan/x264/binaries/win32/
http://download.videolan.org/pub/videolan/x264/binaries/win64/
でWindowsの32Bit環境 64Bit環境に合わせてコーディックをDLします。
私は64Bitなので、64Bitのリンクから x264-10b-r2345-f0c1c53.exe を取得しました。
そしてインストール
この際なので、幾つか見直そうと、出力プラグインのMP4Boxを最新版にしました
MP4Boxのページ http://www.videohelp.com/tools/mp4box
から、現在の最新版 MP4Box 0.5.1 5542 Dev (direct link) (18.5MB) を取得してインストール
ちなみにMP4Boxは、C:\Program Files\GPACにあります。
AviUtlの出力プラグインから「ビデオ圧縮」をクリックして、MP4Box.exeの指定を「C:\Program Files\GPAC\mp4box.exe」に変更
そしてマシーンを再起動
AviUtlを起動して、そのままmp4ファイルをドロップしましたら、少し時間がかかりますが、ちゃんと表示されました
シークもOKエラーが出ることはありません。
音声もOK 遅れたりすることはありませんでした。
そして、要らない部分をカットして、エンコード 2重化、NNEDI3、インターレス解除2、を使用してるので少し遅いですが、
24分のファイルを 40分弱でエンコード出来ました。
使用環境
Windows7 i7-4770K OC-4.1GHz
メモリ 32GB
最後に、色々試した結果を纏めて書いたものです。
書きもれなどありまして、同じ結果が出ない場合は御了承くださいませ。
posted by Sun at 15:34| 動画関連 for Windows
2014年12月03日
H264のMP4.STファイルを音声、映像に分割、エンコする方法を考えてみたが・・・
H264のMP4.STファイルを音声、映像に分割、エンコする方法
Ultimate-Codecs をダウンロードしてインストール
これで、XMedeia Recode で音声と映像を分割できるようになります
追記
一時的には(OSを再インストールするまでは、よかったのですが、クリーンインストールをしなおしたら)分割できなくなりましたので、インストールはしないほうが良いです。
さらにいうと、Ultimate-Codecs自体が、アドウエア認定されました(Aviraにて)
分割の詳しい方法はこのブログの「雑記」、「XMedia Recode で、MP4のTSファイルを音声と映像に分離する AC3 AAC MP3 でも可」を参照してください
分割した、映像と音声をAviUtlにドラック&ドロップする。
AviUtlの設定で自動24ではなくて、2重化を選択し、NNEDI3フィルタとインタレ解除2を使うとシマが消えるようになります
http://www.geocities.jp/w_bean17/
nnedi3 for AviUtl
http://homepage2.nifty.com/GNB/aviutl_alpha.htm
インターレース解除2プラグイン
追記です
Aviraウイルススキャンでスキャンしたところ、6個のアドウェアが発見されました
上記ファイルをインストールした人は検査してください
Cドライブの検査を実行してください、2回ほどしたほうが良いです
C:\Windows\SoftwareDistribution\Download\279aa81fde54a5290cd8a5c52c6030f6c5ac6892
C:\$Recycle.Bin\S-1-5-21-477284783-1478721882-3961995527-1000\$RFXRM2R
上記2つのファイルはメモリ不足ということで、検査できませんでしたが、エクスプローラーで、検索して、Aviraでスキャンしたところ、不審なファイルは見当たりませんでした(報告です)
Aviraウイルススキャンフリーソフト
もっと良いコーディックがあれば教えてくださいよろしくお願いします
安くて割合高品質なライトニングケーブルです。
充電用、モバイルバッテリー用、データ転送用、車内用等、使う場所によって、それぞれのケーブルが欲しくなるものです。
格安を何本も買って、無駄にするより経済的かもしれませんよ。
現在使っていますが、今のところ不具合なしです。
コネクターの付け根が折れたり、切れそうになることが有る場合を解消する方法に、ボールペンのバネをはめ込むという方法があります。試してみましたが、なかなかいい感じです。
バネを使って補強する、の参照ページ
 |
Hanwha iPhone6/6 Plus/5/5S/5C ライトニングUSBケーブル [MFI認証/Made for iPhone取得][iOS 8対応] UMA-USBLTN10CW 新品価格 |
2014年11月13日
ubuntu 14.04 server でIP固定とソフトRAIDを組んでみた
ubuntu 14.04 server でIP固定とソフトRAIDを組んでみた
Ubuntu 14.041 server ubuntu-14.04.1-server-i386.iso
PCが古いので、i386を選んでみた
64Bit がいい方は ubuntu-14.04.1-server-amd64からどうぞ
ubuntu 14.04 server のインストール
インストールには、こちらを参照 http://webkaru.net/linux/ubuntu-14-04-lts-install/
ちなみにネットワークの設定は自動で行われました。(LANを繋いでおくことが前提)
インストールが終わり 登録したユーザー名とパスワードを入力する
ログインが終わったら、 $ sudo tasksel で Ubuntu desktop を↓で選択 「スペースキーで選択」して、「tab キー」を押して、OKを反転させて、「エンター」を押す
http://www.server-world.info/query?os=Ubuntu_14.04&p=x こちらを参照
これで Ubuntu 14.041 server に Ubuntu desktop環境が入ります
45分ぐらい掛かるので、気長に待ちましょう ちなみに Ubuntu 14.045 server では Ubuntu desktop環境は入りませんでした。
Ubuntu desktop環境 が起動したら パスワードを入力してログインしてください。
まずは日本語環境の設定です。
システム設定を開いて、言語サポートをクリックして開きます。多分言語サポートが完全にインストールされていないので、そこで、インストールが始まります。 『システム全体に適用』 をクリック、終わったら再起動、これで、完全に日本語になります。
コマンドラインからしたい人ははこちら(上記でした人はしなくて良い)
$ sudo aptitude install language-pack-ja
$ sudo dpkg-reconfigure locales
また、これだけだとターミナル上から日本語入力が行えないためロケールの環境変数を適応させます
$ nano ~/.bashrc
nanoを使い慣れてない場合は少し戸惑うでしょうが、カーソルでコンソールを移動してキーボードで打ち込んで終わりです。
後は、Ctrl+Oで保存します。
以下設定
export LC_MESSAGES=ja_JP.UTF-8
export LC_IDENTIFICATION=ja_JP.UTF-8
export LC_COLLATE=ja_JP.UTF-8
export LANG=ja_JP.UTF-8
export LC_MEASUREMENT=ja_JP.UTF-8
export LC_CTYPE=ja_JP.UTF-8
export LC_TIME=ja_JP.UTF-8
export LC_NAME=ja_JP.UTF-8
次は、日本語入力の設定です
$ sudo apt-get install ibus-mozc
これで、日本語にならない場合は
$ sudo add-apt-repository ppa:japanese-testers/ppa
$ sudo apt-get update
$ sudo apt-get install im-setup-helper ibus-mozc
ログアウト 又は 再起動
右上のタスクバーの jp の部分をクリックして、Anthyを探してクリックすれば、一応日本語が打てるようになります。

次に IPアドレスの固定化です、インストールしたままでは、非固定化なので、再起動ごとに変動します。
それを防ぐために、IPアドレスを固定化する事をおすすめします。
$ sudo nano /etc/network/interfaces
interface
auto eth0
#iface eth0 inet dhcp ←コメントアウト #
iface eth0 static ←dhcpをstaticに変更する
address 192.168.5.10 ←固定するIPアドレス
netmask 255.255.255.0
network 192.168.5.0
broadcast 192.168.5.255
gateway 192.168.5.1
上記のように記述します。
nanoを使い慣れてない場合は少し戸惑うでしょうが、カーソルでコンソールを移動してキーボードで打ち込んで終わりです。
後は、Ctrl+Oで保存します。
次に nameservers を書きます。これを書かないと繋がりません
$ sudo nano /etc/resolvconf/resolv.conf.d/base
nameserver 192.168.5.1 と記載する
$ sudo resolvconf -u このコマンドで適用
再起動する。 これで、IPアドレスが 192.168.5.10 に固定化されました。
さて、次にRAIDを組んでみます。
$ ls /dev/sd* でドライブの確認、 /dev/md1のように番号が付いてないのがマウントされていないドライブです
ただし、 /dev/sda はOSの入っているドライブなのでくれぐれもRAIDに使用しないように
$ ls /dev/sd* で出た結果が以下のようなものだと、
/dev/sda /dev/sda2 /dev/sdb /dev/sdd /dev/sdf /dev/sda1 /dev/sda5 /dev/sdc /dev/sd
/dev/sdb /dev/sdc /dev/sdd /dev/sde /dev/sdf がRAIDに使えるHDDになります。
そこで、どのデバイスにHDDがつながっているか確認するために、ディスクツールを使います。
コンピューターとオンラインリソースを検索(左上の一番上のアイコンです)をクリックして『ディスク』で検索します
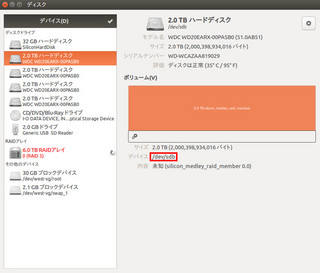
そして、RAIDにしたいデバイスを指定します
例 $ mdadm -C -v /dev/md0 -l5 -n4 /dev/sdb /dev/sdd /dev/sde /dev/sdf
-l5 RAIDのモード この場合は RAID5 を選択しました
-n4 RAIDにするHDDの数を書きます この場合は 4個を選択しました。
ここまで上手くいくと、
Continue creating array? と聞かれたはず。
y と打ち込めば、
mdadm: array /dev/md0 started. と出て、
RAIDが構築されたはず。
ディスク・ユーティリティーで確認すると「デグレード状態」となっているはず。
そこで、
$ watch -n 1 cat /proc/mdstat
このコマンドで、RAID構築の%が見れます
今回は2TBのHDDを4つ構成してるので、まる一日程度掛るはず。
RAIDを暗号化してみる
$ sudo apt-get install cryptsetup をまず実行
先ほどの ディスク で、歯車のアイコンから 初期化を選択、 暗号化を選択
ディスク名と パスフレーズを入力して、OKを選択すればフォーマットしながら暗号化を始める
パスフレーズは必ず覚えておきましょう
Ubuntu 14.041 server ubuntu-14.04.1-server-i386.iso
PCが古いので、i386を選んでみた
64Bit がいい方は ubuntu-14.04.1-server-amd64からどうぞ
ubuntu 14.04 server のインストール
インストールには、こちらを参照 http://webkaru.net/linux/ubuntu-14-04-lts-install/
ちなみにネットワークの設定は自動で行われました。(LANを繋いでおくことが前提)
インストールが終わり 登録したユーザー名とパスワードを入力する
ログインが終わったら、 $ sudo tasksel で Ubuntu desktop を↓で選択 「スペースキーで選択」して、「tab キー」を押して、OKを反転させて、「エンター」を押す
http://www.server-world.info/query?os=Ubuntu_14.04&p=x こちらを参照
これで Ubuntu 14.041 server に Ubuntu desktop環境が入ります
45分ぐらい掛かるので、気長に待ちましょう ちなみに Ubuntu 14.045 server では Ubuntu desktop環境は入りませんでした。
Ubuntu desktop環境 が起動したら パスワードを入力してログインしてください。
まずは日本語環境の設定です。
システム設定を開いて、言語サポートをクリックして開きます。多分言語サポートが完全にインストールされていないので、そこで、インストールが始まります。 『システム全体に適用』 をクリック、終わったら再起動、これで、完全に日本語になります。
コマンドラインからしたい人ははこちら(上記でした人はしなくて良い)
$ sudo aptitude install language-pack-ja
$ sudo dpkg-reconfigure locales
また、これだけだとターミナル上から日本語入力が行えないためロケールの環境変数を適応させます
$ nano ~/.bashrc
nanoを使い慣れてない場合は少し戸惑うでしょうが、カーソルでコンソールを移動してキーボードで打ち込んで終わりです。
後は、Ctrl+Oで保存します。
以下設定
export LC_MESSAGES=ja_JP.UTF-8
export LC_IDENTIFICATION=ja_JP.UTF-8
export LC_COLLATE=ja_JP.UTF-8
export LANG=ja_JP.UTF-8
export LC_MEASUREMENT=ja_JP.UTF-8
export LC_CTYPE=ja_JP.UTF-8
export LC_TIME=ja_JP.UTF-8
export LC_NAME=ja_JP.UTF-8
次は、日本語入力の設定です
$ sudo apt-get install ibus-mozc
これで、日本語にならない場合は
$ sudo add-apt-repository ppa:japanese-testers/ppa
$ sudo apt-get update
$ sudo apt-get install im-setup-helper ibus-mozc
ログアウト 又は 再起動
右上のタスクバーの jp の部分をクリックして、Anthyを探してクリックすれば、一応日本語が打てるようになります。

次に IPアドレスの固定化です、インストールしたままでは、非固定化なので、再起動ごとに変動します。
それを防ぐために、IPアドレスを固定化する事をおすすめします。
$ sudo nano /etc/network/interfaces
interface
auto eth0
#iface eth0 inet dhcp ←コメントアウト #
iface eth0 static ←dhcpをstaticに変更する
address 192.168.5.10 ←固定するIPアドレス
netmask 255.255.255.0
network 192.168.5.0
broadcast 192.168.5.255
gateway 192.168.5.1
上記のように記述します。
nanoを使い慣れてない場合は少し戸惑うでしょうが、カーソルでコンソールを移動してキーボードで打ち込んで終わりです。
後は、Ctrl+Oで保存します。
次に nameservers を書きます。これを書かないと繋がりません
$ sudo nano /etc/resolvconf/resolv.conf.d/base
nameserver 192.168.5.1 と記載する
$ sudo resolvconf -u このコマンドで適用
再起動する。 これで、IPアドレスが 192.168.5.10 に固定化されました。
さて、次にRAIDを組んでみます。
$ ls /dev/sd* でドライブの確認、 /dev/md1のように番号が付いてないのがマウントされていないドライブです
ただし、 /dev/sda はOSの入っているドライブなのでくれぐれもRAIDに使用しないように
$ ls /dev/sd* で出た結果が以下のようなものだと、
/dev/sda /dev/sda2 /dev/sdb /dev/sdd /dev/sdf /dev/sda1 /dev/sda5 /dev/sdc /dev/sd
/dev/sdb /dev/sdc /dev/sdd /dev/sde /dev/sdf がRAIDに使えるHDDになります。
そこで、どのデバイスにHDDがつながっているか確認するために、ディスクツールを使います。
コンピューターとオンラインリソースを検索(左上の一番上のアイコンです)をクリックして『ディスク』で検索します

そして、RAIDにしたいデバイスを指定します
例 $ mdadm -C -v /dev/md0 -l5 -n4 /dev/sdb /dev/sdd /dev/sde /dev/sdf
-l5 RAIDのモード この場合は RAID5 を選択しました
-n4 RAIDにするHDDの数を書きます この場合は 4個を選択しました。
ここまで上手くいくと、
Continue creating array? と聞かれたはず。
y と打ち込めば、
mdadm: array /dev/md0 started. と出て、
RAIDが構築されたはず。
ディスク・ユーティリティーで確認すると「デグレード状態」となっているはず。
そこで、
$ watch -n 1 cat /proc/mdstat
このコマンドで、RAID構築の%が見れます
今回は2TBのHDDを4つ構成してるので、まる一日程度掛るはず。
RAIDを暗号化してみる
$ sudo apt-get install cryptsetup をまず実行
先ほどの ディスク で、歯車のアイコンから 初期化を選択、 暗号化を選択
ディスク名と パスフレーズを入力して、OKを選択すればフォーマットしながら暗号化を始める
パスフレーズは必ず覚えておきましょう
2014年11月09日
Ubuntu 14.04でMP770を動かす、でも駄目だった話
プリンタードライバに標準で入っている 「Canon iP4200 series 」を選択したら動きました
ちなみに MP770のドライバでは動かなかった(半分しか印刷されなかったので)
以上
テスト印刷ではうまく行ったのに、いざ使ってみるとエラー頻発、PXSUX IP4100のドライバーが使えるらしいけど、
古いので、足りないものが多数あり、それをごまかすためのものを入れたりと、難しそうなので見送りです
結局 VB からWindowsを起動して使ってます面倒だけど、それが一番簡単?
いよいよ寒くなってきました、オススメの敷マットです、肌触りも良くて暖かいですよー
私はシングルベッドですが、セミダブルの大きさで丁度いい感じです

そして、この毛布、発熱加工とだけあって、ホッカホカに眠れますこの2つがあれば冬は乗り切れます
(布団から出たくなくなるかも)
シングルベッドなので、ちょっと大きいかな?と思いますが、体をくるむ感じにするなら絶対こっちですw

ちなみに MP770のドライバでは動かなかった(半分しか印刷されなかったので)
以上
テスト印刷ではうまく行ったのに、いざ使ってみるとエラー頻発、PXSUX IP4100のドライバーが使えるらしいけど、
古いので、足りないものが多数あり、それをごまかすためのものを入れたりと、難しそうなので見送りです
結局 VB からWindowsを起動して使ってます面倒だけど、それが一番簡単?
いよいよ寒くなってきました、オススメの敷マットです、肌触りも良くて暖かいですよー
私はシングルベッドですが、セミダブルの大きさで丁度いい感じです
 |
mofua モフア プレミアム マイクロファイバー 敷パッド セミダブル ブラック 50010210 新品価格 |
そして、この毛布、発熱加工とだけあって、ホッカホカに眠れますこの2つがあれば冬は乗り切れます
(布団から出たくなくなるかも)
シングルベッドなので、ちょっと大きいかな?と思いますが、体をくるむ感じにするなら絶対こっちですw
 |
Heat Warm 発熱 あったか2枚合わせ 毛布 ダブル ブラウン 40220306 新品価格 |
