2020年11月18日
[Unity]GoogleAdmobの導入方法 - Unity2020.1.3f - Admob5.4.0
動作環境
・Unity2019.3.11f1
・GoogleMobileAds-v5.3.0
・Unity2020.1.3f
・GoogleMobileAds-v5.4.0
インポートから実機で広告表示まで動作確認済み。
導入手順
・【超重要】最初に
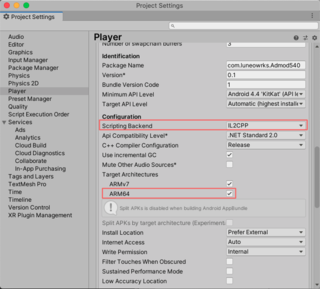
Player Setting -> Other Settings -> Scripting BackendをIL2CPPに変更。
ARM64にチェックをつける。
・GoogleMobileAds-v5.4.0をインポート
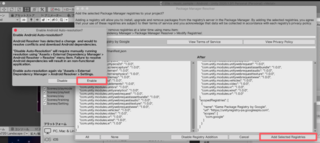
・"Enable Android Auto-Resolution?"ダイアログでEnableボタン
・"Package Manager Resolver"ダイアログでAdd Selected Registries →次のダイアログでApply
・Asset -> Google Mobile Ads -> SettingでEnableにチェックしてアプリID記入。
・Asset -> External Dependency Manager -> Android Resolver -> Resolveを実行
(Succesfulを確認)
・オブジェクトにスクリプトをアタッチ
using System.Collections;
using System.Collections.Generic;
using UnityEngine;
using GoogleMobileAds.Api;

public class Admod : MonoBehaviour
{
    private BannerView bannerView;

    // Start is called before the first frame update
    void Start()
    {
        //MobileAds.Initialize(initStatus => { });
        MobileAds.Initialize(InitializationStatus => { });

        RequestBanner();
    }

    private void RequestBanner()
    {
#if UNITY_ANDROID
        //ANDROID
        //string adUnitId = "ca-app-pub-xxxx"
#elif UNITY_IPHONE
        //iOS
       /string adUnitId = "ca-app-pub-xxxxx"
#else
            string appId = "unexpected_platform";
#endif

        // Create a 320x50 banner at the top of the screen.
        this.bannerView = new BannerView(adUnitId, AdSize.Banner, AdPosition.Top);

        // Create an empty ad request.
        AdRequest request = new AdRequest.Builder().Build();

        // Load the banner with the request.
        bannerView.LoadAd(request);
    }

    void OnDestroy()
    {
        bannerView.Destroy();
    }
}
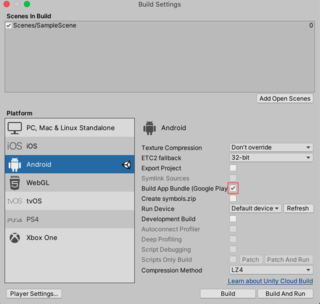
・Build App Bundleにチェック入れてBuild and Runで実機テスト
(チェックを入れるとまた依存関係の処理が走ります)
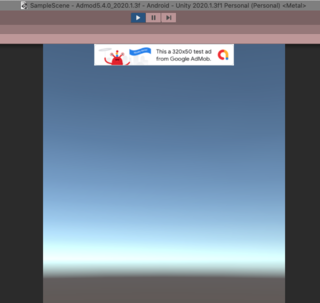
v5.4.0はUnityエディタ上でも広告が表示される。
■自分メモ
新規アプリリリース時、player settingsの画面回転の設定を縦横固定にするのを忘れないように
【このカテゴリーの最新記事】
-
no image
-
no image
-
no image
-
no image
この記事へのコメント
コメントを書く
この記事へのトラックバックURL
https://fanblogs.jp/tb/10346569
※ブログオーナーが承認したトラックバックのみ表示されます。
この記事へのトラックバック
