新規記事の投稿を行うことで、非表示にすることが可能です。
2018年05月16日
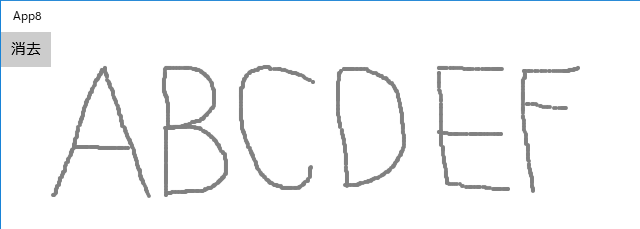
《その387》ドラッグによる描画(1)
ドラッグによる描画(1)
今回のアプリは、ドラッグで線を描きます。
Page と同じサイズの Canvas上に描画する仕様です。「消去」ボタンで、画面をクリアします。
以下は、MainPage.xaml.cpp です。
//
// MainPage.xaml.cpp
// MainPage クラスの実装。
//

#include "pch.h"
#include "MainPage.xaml.h"

using namespace App8;

using namespace Platform;
using namespace Windows::Foundation;
using namespace Windows::Foundation::Collections;
using namespace Windows::UI::Xaml;
using namespace Windows::UI::Xaml::Controls;
using namespace Windows::UI::Xaml::Controls::Primitives;
using namespace Windows::UI::Xaml::Data;
using namespace Windows::UI::Xaml::Input;
using namespace Windows::UI::Xaml::Media;
using namespace Windows::UI::Xaml::Navigation;


MainPage::MainPage()
{
    InitializeComponent();
}


// ポインタが押されていれば 1
//           押されていなければ 0
int f = 0;


void App8::MainPage::
page_PointerPressed(Platform::Object^ sender,
    Windows::UI::Xaml::Input::PointerRoutedEventArgs^ e)
{
    // ポインタが押されたので f を 1 にします。
    f = 1;
}


void App8::MainPage::
page_PointerMoved(Platform::Object^ sender,
    Windows::UI::Xaml::Input::PointerRoutedEventArgs^ e)
{
    if (f) {
        // ポインタの位置取得
        auto pt = e->GetCurrentPoint(this);
        float x = pt->Position.X;     // x座標
        float y = pt->Position.Y;     // y座標

        // ペンの仕様
        Shapes::Ellipse^ pen;
        pen= ref new Shapes::Ellipse();
                pen->Width = 4;  pen->Height = 4; // ペンの太さ
        // ペンを Gray にします。
        pen->Fill
            = ref new SolidColorBrush(Windows::UI::Colors::Gray);
        // 点の中心がクリック位置になるように調整します。
        pen->Margin = Thickness(x - 2, y - 2, 0, 0);
        // 点を連続して配置することで、線を描きます。
        canvas->Children->Append(pen);
    }
}


void App8::MainPage::
page_PointerReleased(Platform::Object^ sender,
    Windows::UI::Xaml::Input::PointerRoutedEventArgs^ e)
{
    // ポインタが解放されたので f を 0 にします。
    f = 0;
}


void App8::MainPage::
button_Click(Platform::Object^ sender,
    Windows::UI::Xaml::RoutedEventArgs^ e)
{
    // ボタンが押されたので、キャンバスをクリアします。
    canvas->Children->Clear();
}
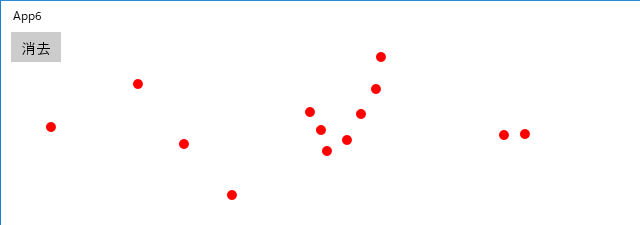
《その386》クリックによる点(Point)の描画
点(Point)の描画
今回のアプリは、クリックした位置に点を描画します。
Page と同じサイズの Canvas上に描画する仕様です。「消去」ボタンで、画面をクリアします。
以下は、MainPage.xaml.cpp です。
//
// MainPage.xaml.cpp
// MainPage クラスの実装。
//

#include "pch.h"
#include "MainPage.xaml.h"

using namespace App6;

using namespace Platform;
using namespace Windows::Foundation;
using namespace Windows::Foundation::Collections;
using namespace Windows::UI::Xaml;
using namespace Windows::UI::Xaml::Controls;
using namespace Windows::UI::Xaml::Controls::Primitives;
using namespace Windows::UI::Xaml::Data;
using namespace Windows::UI::Xaml::Input;
using namespace Windows::UI::Xaml::Media;
using namespace Windows::UI::Xaml::Navigation;


MainPage::MainPage()
{
    InitializeComponent();
}


void App6::MainPage::
page_PointerPressed(Platform::Object^ sender,
    Windows::UI::Xaml::Input::PointerRoutedEventArgs^ e)
{
    // クリック位置の取得
    auto pt = e->GetCurrentPoint(this);
    float x = pt->Position.X;     // x座標
    float y = pt->Position.Y;     // y座標

    // 点の仕様
    Shapes::Ellipse^ point;
    point = ref new Shapes::Ellipse();
    point->Width = 10;            // 点の幅
    point->Height = 10;           // 点の高さ
    // 点を Red にします。
    point->Fill
        = ref new SolidColorBrush(Windows::UI::Colors::Red);
    // 点の中心がクリック位置になるように調整します。
    point->Margin = Thickness(x - 5, y - 5, 0, 0);
    canvas->Children->Append(point);    // 点を配置
}


void App6::MainPage::
button_Click(Platform::Object^ sender,
    Windows::UI::Xaml::RoutedEventArgs^ e)
{
    canvas->Children->Clear();  // Canvas をクリア
}
2018年05月14日
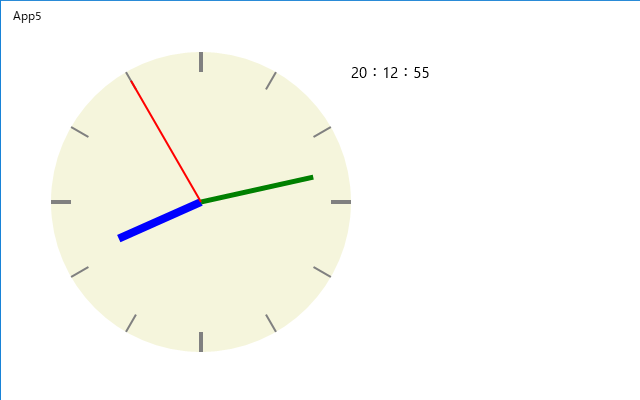
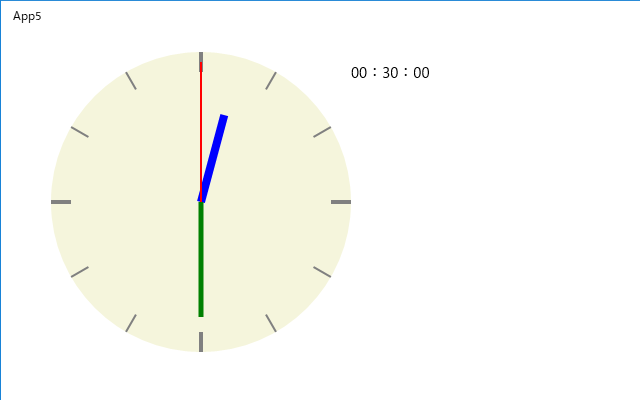
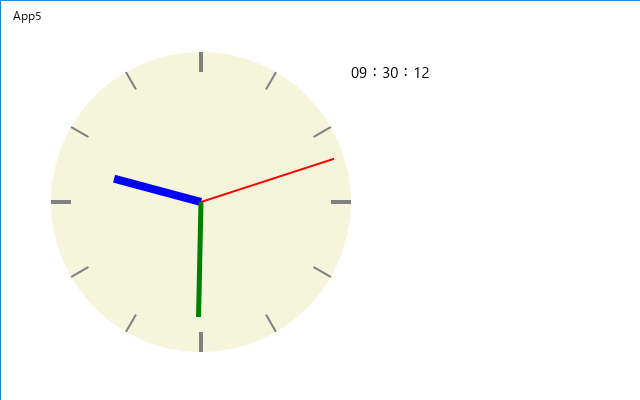
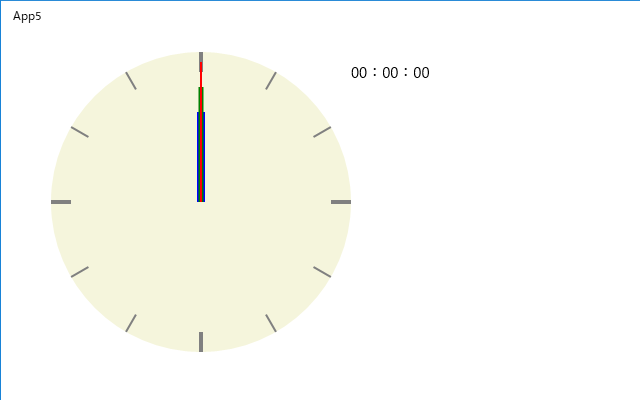
《その385》時計の作成
時計の作成
本ブログの《383》《384》で、時計作成のための準備は完了しているので、今回は、実際に 時計の形にまとめてみました。
以下は、MainPage.xaml.cpp です。
//
// MainPage.xaml.cpp
// MainPage クラスの実装。
//

#include "pch.h"
#include "MainPage.xaml.h"

using namespace App5;

using namespace Platform;
using namespace Windows::Foundation;
using namespace Windows::Foundation::Collections;
using namespace Windows::UI::Xaml;
using namespace Windows::UI::Xaml::Controls;
using namespace Windows::UI::Xaml::Controls::Primitives;
using namespace Windows::UI::Xaml::Data;
using namespace Windows::UI::Xaml::Input;
using namespace Windows::UI::Xaml::Media;
using namespace Windows::UI::Xaml::Navigation;


float pi = 3.1416f;
int s = 0; int m = 0; int h = 0;    // 秒,分,時
float len_s = 140;                  // 秒針の長さ
float len_m = 115;                  // 分針の長さ
float len_h =  90;                  // 時針の長さ

// 秒針・分針・時針 先端の x座標と y座標
float xs = 0; float ys = 0;
float xm = 0; float ym = 0;
float xh = 0; float yh = 0;

// 時計中心の x座標と y座標
float xc = 150; float yc = 150;


MainPage::MainPage() {
    InitializeComponent();

    // 文字盤
    Shapes::Ellipse^ circle;
    circle = ref new Shapes::Ellipse();
    circle->Width = 300;
    circle->Height = 300;
    circle->Fill
        = ref new SolidColorBrush(Windows::UI::Colors::Beige);
    canvas1->Children->Append(circle);

    // 時間目盛り
    for (int i = 0; i < 12; i++) {
        auto line = ref new Shapes::Line();
        line->Stroke
            = ref new SolidColorBrush(Windows::UI::Colors::Gray);
        if (i % 3)
            line->StrokeThickness = 2;
        else
            line->StrokeThickness = 4;
        line->X1 = 150 + 130 * cos((90 - 30 * i) * pi / 180);
        line->Y1 = 150 - 130 * sin((90 - 30 * i) * pi / 180);
        line->X2 = 150 + 150 * cos((90 - 30 * i) * pi / 180);
        line->Y2 = 150 - 150 * sin((90 - 30 * i) * pi / 180);
        canvas1->Children->Append(line);
    }

    // Canvas 位置
    canvas1->Margin = Thickness(50, 20, 0, 0);
    canvas2->Margin = Thickness(50, 20, 0, 0);
    canvas3->Margin = Thickness(50, 20, 0, 0);
    canvas4->Margin = Thickness(50, 20, 0, 0);

    StartTimer();
}


// 時・分・秒の取得
void func() {
    int temp = s;
    do {
        time_t timeUTC = time(NULL);
        struct tm local;
        localtime_s(&local, &timeUTC);
        s = local.tm_sec;
        m = local.tm_min;
        h = local.tm_hour;
    } while (s == temp);
}


// 秒針・分針・時針 の描画、時刻のデジタル表示
void MainPage::f() {
    // 時針
    auto line_h = ref new Shapes::Line();
    line_h->Stroke
        = ref new SolidColorBrush(Windows::UI::Colors::Blue);
    line_h->StrokeThickness = 8;
    line_h->X1 = xh; line_h->Y1 = yh;
    line_h->X2 = xc; line_h->Y2 = yc;
    canvas2->Children->Clear();
    canvas2->Children->Append(line_h);

    // 分針
    auto line_m = ref new Shapes::Line();
    line_m->Stroke
        = ref new SolidColorBrush(Windows::UI::Colors::Green);
    line_m->StrokeThickness = 5;
    line_m->X1 = xm; line_m->Y1 = ym;
    line_m->X2 = xc; line_m->Y2 = yc;
    canvas3->Children->Clear();
    canvas3->Children->Append(line_m);

    // 秒針
    auto line_s = ref new Shapes::Line();
    line_s->Stroke
        = ref new SolidColorBrush(Windows::UI::Colors::Red);
    line_s->StrokeThickness = 2;
    line_s->X1 = xs; line_s->Y1 = ys;
    line_s->X2 = xc; line_s->Y2 = yc;
    canvas4->Children->Clear();
    canvas4->Children->Append(line_s);

    // 時刻のデジタル表示
    String^ str_s;
    str_s = s.ToString();
    if (s < 10)
        str_s = "0" + str_s;
    String^ str_m;
    str_m = m.ToString();
    if (m < 10)
        str_m = "0" + str_m;
    String^ str_h;
    str_h = h.ToString();
    if (h < 10)
        str_h = "0" + str_h;
    block->Text = str_h + ":" + str_m + ":" + str_s;
}


// タイマーのスタート
void MainPage::StartTimer() {
    auto timer = ref new Windows::UI::Xaml::DispatcherTimer();

    TimeSpan span;
    span.Duration = 1000000;
    timer->Interval = span;

    timer->Start();
    auto rcpt
        = timer->Tick +=
        ref new EventHandler<Object^>(this, &MainPage::OnTick);
}


// タイマー ON のときの作業
void MainPage::OnTick(Object^ sender, Object^ e) {
    func();
    xs = 150 + len_s * cos((90 - 6 * s) * pi / 180);
    ys = 150 - len_s * sin((90 - 6 * s) * pi / 180);
    xm = 150 + len_m * cos((90 - 6 * m - 0.1f * s) * pi / 180);
    ym = 150 - len_m * sin((90 - 6 * m - 0.1f * s) * pi / 180);
    xh = 150 + len_h * cos((90 - 30 * h - 0.5f * m) * pi / 180);
    yh = 150 - len_h * sin((90 - 30 * h - 0.5f * m) * pi / 180);
    f();
}
2018年05月13日
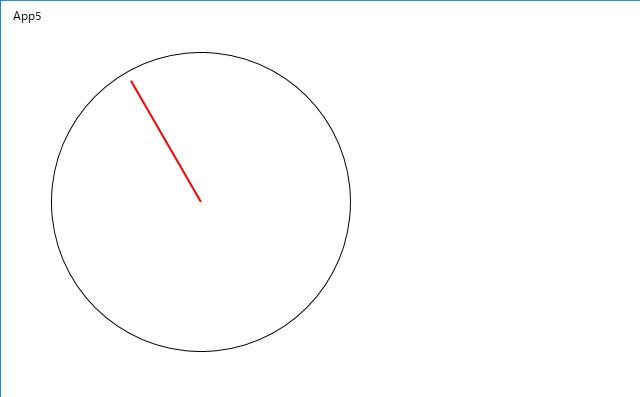
《その384》時計の秒針(2)
時計の秒針(2)
前回《383》の秒針時計を動くようにしました。
秒針との対比ができるように、秒のデジタル表示も加えてあります。
DispatcherTimer の span.Duration = 1000000; は、約0.1秒ですが、もっと遅くてもいいと思います(本ブログの《376》をご参照ください)。
直前の秒針を消す Clear関数以外は、既出のものばかりです。Clear関数が無いと、円の中が秒針だらけになってしまいます。
以下は、MainPage.xaml.cpp です。
//
//
// MainPage.xaml.cpp
// MainPage クラスの実装。
//

#include "pch.h"
#include "MainPage.xaml.h"

using namespace App5;

using namespace Platform;
using namespace Windows::Foundation;
using namespace Windows::Foundation::Collections;
using namespace Windows::UI::Xaml;
using namespace Windows::UI::Xaml::Controls;
using namespace Windows::UI::Xaml::Controls::Primitives;
using namespace Windows::UI::Xaml::Data;
using namespace Windows::UI::Xaml::Input;
using namespace Windows::UI::Xaml::Media;
using namespace Windows::UI::Xaml::Navigation;


float pi = (float)3.1416;
int s = 0;              // 秒
float len_s = 140;      // 秒針の長さ

// 秒針先端の x座標
float x01 = 150;

// 秒針先端の y座標
float y01 = 10;


MainPage::MainPage() {
    InitializeComponent();

    // 外側の円
    Shapes::Ellipse^ circle;
    circle = ref new Shapes::Ellipse();
    circle->Width = 300;
    circle->Height = 300;
    circle->Stroke
        = ref new SolidColorBrush(Windows::UI::Colors::Black);
    circle->StrokeThickness = 1;
    canvas1->Children->Append(circle);

    // Canvas の位置
    canvas1->Margin = Thickness(50, 20, 0, 0);
    canvas2->Margin = Thickness(50, 20, 0, 0);

    StartTimer();
}


// 秒の取得
void func() {
    int temp = s;
    do {
        time_t timeUTC = time(NULL);
        struct tm local;
        localtime_s(&local, &timeUTC);
        s = local.tm_sec;
    } while (s == temp);
}


// 秒針の描画
void MainPage::f() {
    // 秒針
    auto line = ref new Shapes::Line();
    line->Stroke
        = ref new SolidColorBrush(Windows::UI::Colors::Red);
    line->StrokeThickness = 2;
    line->X1 = x01;
    line->Y1 = y01;
    line->X2 = 150;
    line->Y2 = 150;
    canvas2->Children->Clear();
    canvas2->Children->Append(line);

    if (s < 10)
        block->Text = "0" + s.ToString() + "秒";
    else
        block->Text = s.ToString() + "秒";
}


// タイマーをスタート
void MainPage::StartTimer() {
    auto timer = ref new Windows::UI::Xaml::DispatcherTimer();

    TimeSpan span;
    span.Duration = 1000000;
    timer->Interval = span;

    timer->Start();
    auto rcpt
        = timer->Tick +=
        ref new EventHandler<Object^>(this, &MainPage::OnTick);
}


// タイマー ON のときの動作
void MainPage::OnTick(Object^ sender, Object^ e) {
    func();
    x01 = 150 + len_s * cos((90 - 6 * s) * pi / 180);
    y01 = 150 - len_s * sin((90 - 6 * s) * pi / 180);
    f();
}
以下は、MainPage.xaml.h です。
//
// MainPage.xaml.h
// MainPage クラスの宣言。
//

#pragma once

#include "MainPage.g.h"

namespace App5
{
    /// <summary>
    /// それ自体で使用できる空白ページまたはフレーム内に移動できる空白ページ。
    /// </summary>
    public ref class MainPage sealed
    {
    public:
        MainPage();

        void f();
        void StartTimer();
        void OnTick(Object^ sender, Object^ e);
    };
}
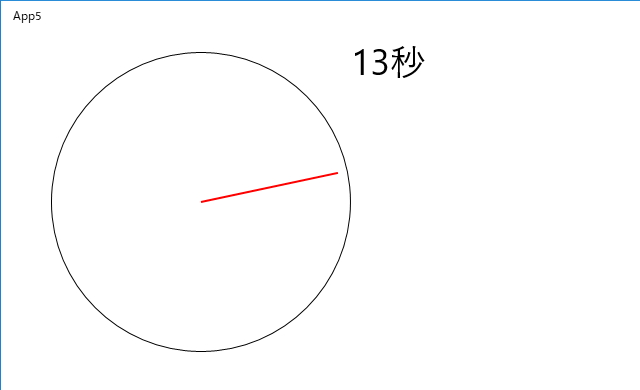
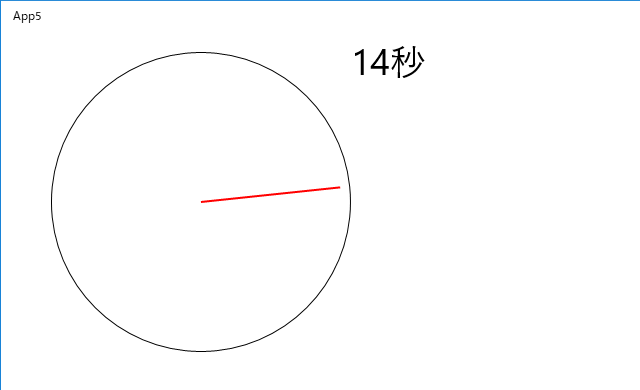
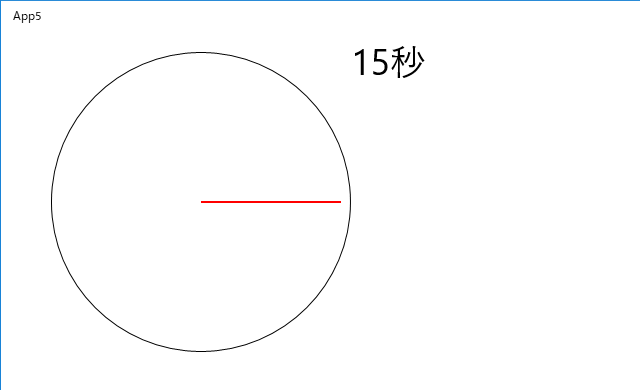
《その383》時計の秒針(1)
時計の秒針(1)
今回と次回で、秒を刻む時計の秒針を作成してみます。長針と短針も、これとまったく同様にして作成できますから、すべての針を重ね合わせれることで時計を完成させることも可能です。
前回《381》と前々回《382》の方法で、円と直線を用意します。
円は canvas1上、直線は canvas2上です。
次回に、この直線が秒針として秒を刻むように改造します。
下の画像の秒針は 55秒の位置になっています(下記の MainPage.xaml.cpp をご覧ください)。
以下は、MainPage.xaml.cpp です。
//
// MainPage.xaml.cpp
// MainPage クラスの実装。
//

#include "pch.h"
#include "MainPage.xaml.h"

using namespace App5;

using namespace Platform;
using namespace Windows::Foundation;
using namespace Windows::Foundation::Collections;
using namespace Windows::UI::Xaml;
using namespace Windows::UI::Xaml::Controls;
using namespace Windows::UI::Xaml::Controls::Primitives;
using namespace Windows::UI::Xaml::Data;
using namespace Windows::UI::Xaml::Input;
using namespace Windows::UI::Xaml::Media;
using namespace Windows::UI::Xaml::Navigation;


float pi = (float)3.1416;
int s = 0;              // 秒
float len_s = 140;      // 秒針の長さ

// 秒針先端の x座標
float x01 = 150;

// 秒針先端の y座標
float y01 = 10;


MainPage::MainPage()
{
    InitializeComponent();

    // 外側の円
    Shapes::Ellipse^ circle;
    circle = ref new Shapes::Ellipse();
    circle->Width = 300;
    circle->Height = 300;
    circle->Stroke
        = ref new SolidColorBrush(Windows::UI::Colors::Black);
    circle->StrokeThickness = 1;
    canvas1->Children->Append(circle);

    // Canvas の位置
    canvas1->Margin = Thickness(50, 20, 0, 0);
    canvas2->Margin = Thickness(50, 20, 0, 0);


    // 今回は とりあえず、秒針を 55秒の位置にします。
    //       次回に、秒針が時を刻むように改造します。
    s = 55;
    x01 = 150 + len_s * cos((90 - 6 * s) * pi / 180);
    y01 = 150 - len_s * sin((90 - 6 * s) * pi / 180);
    f();
}


// 秒針の描画
void MainPage::f() {
    // 秒針
    auto line = ref new Shapes::Line();
    line->Stroke
        = ref new SolidColorBrush(Windows::UI::Colors::Red);
    line->StrokeThickness = 2;
    line->X1 = x01;
    line->Y1 = y01;
    line->X2 = 150;
    line->Y2 = 150;
    canvas2->Children->Append(line);
}
2018年05月12日
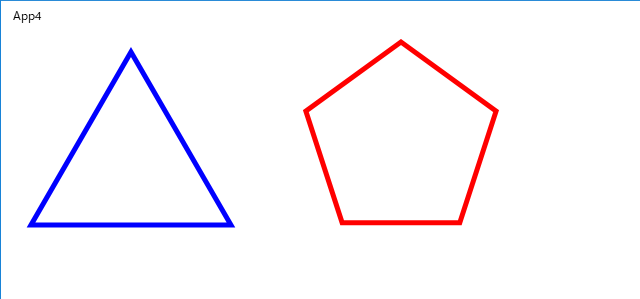
《その382》三角形,五角形 の表示
三角形,五角形 の表示
今回は、三角形,五角形 の表示です。
Polygonクラスを利用すれば、何角形でも作ることができます。
以下は、MainPage.xaml.cpp です。
//
//
// MainPage.xaml.cpp
// MainPage クラスの実装。
//
#include "pch.h"
#include "MainPage.xaml.h"
using namespace App4;
using namespace Platform;
using namespace Windows::Foundation;
using namespace Windows::Foundation::Collections;
using namespace Windows::UI::Xaml;
using namespace Windows::UI::Xaml::Controls;
using namespace Windows::UI::Xaml::Controls::Primitives;
using namespace Windows::UI::Xaml::Data;
using namespace Windows::UI::Xaml::Input;
using namespace Windows::UI::Xaml::Media;
using namespace Windows::UI::Xaml::Navigation;
// 正五角形の頂点の座標 (x01, y01) 〜 (x05, y05)
const float pi = (float)3.1416;
float x01 = 200 + 100 * cos(pi * 54 / 180);
float y01 = 100 + 100 * sin(pi * 54 / 180);
float x02 = 200 + 100 * cos(pi * 126 / 180);
float y02 = 100 + 100 * sin(pi * 126 / 180);
float x03 = 200 + 100 * cos(pi * 198 / 180);
float y03 = 100 + 100 * sin(pi * 198 / 180);
float x04 = 200 + 100 * cos(pi * 270 / 180);
float y04 = 100 + 100 * sin(pi * 270 / 180);
float x05 = 200 + 100 * cos(pi * 342 / 180);
float y05 = 100 + 100 * sin(pi * 342 / 180);
MainPage::MainPage()
{
InitializeComponent();
// 正三角形
auto triangle = ref new Shapes::Polygon();
auto points1 = ref new PointCollection();
points1->Append(Point(110, 10));
points1->Append(Point( 10, 183));
points1->Append(Point(210, 183));
triangle->Points = points1;
triangle->Stroke
= ref new SolidColorBrush(Windows::UI::Colors::Blue);
triangle->StrokeThickness = 5;
canvas1->Margin = Thickness(20, 10, 0, 0);
canvas1->Children->Append(triangle);
// 正五角形
auto pentagon = ref new Shapes::Polygon();
auto points2 = ref new PointCollection();
points2->Append(Point(x01, y01));
points2->Append(Point(x02, y02));
points2->Append(Point(x03, y03));
points2->Append(Point(x04, y04));
points2->Append(Point(x05, y05));
pentagon->Points = points2;
pentagon->Stroke
= ref new SolidColorBrush(Windows::UI::Colors::Red);
pentagon->StrokeThickness = 5;
canvas2->Margin = Thickness(200, 10, 0, 0);
canvas2->Children->Append(pentagon);
}
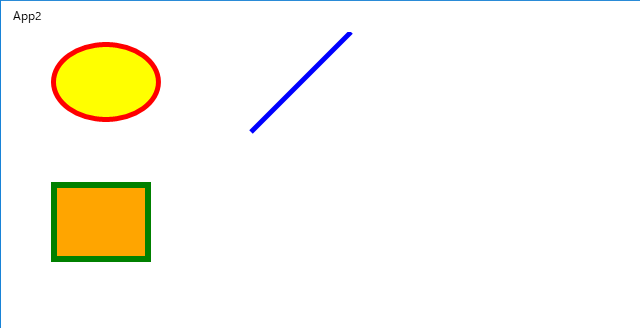
《その381》楕円,直線,四角形 の表示
楕円,直線,四角形 の表示
今回は、楕円,直線,四角形 の表示についてだけの内容です。
Canvas を3つ用意してそれぞれの図形を独立させているので、クリックによる移動(本ブログの《379》)やドラッグによる移動(本ブログの《380》)等も個別に行えます。
また、タイマー(本ブログの《373》〜《378》)を利用して、図形を自動的に動かすこともできるので、例えば、直線を回転させて時計の針に利用するなど、いろいろと応用できると思います。
以下は、MainPage.xaml.cpp です。
//
// MainPage.xaml.cpp
// MainPage クラスの実装。
//

#include "pch.h"
#include "MainPage.xaml.h"

using namespace App2;

using namespace Platform;
using namespace Windows::Foundation;
using namespace Windows::Foundation::Collections;
using namespace Windows::UI::Xaml;
using namespace Windows::UI::Xaml::Controls;
using namespace Windows::UI::Xaml::Controls::Primitives;
using namespace Windows::UI::Xaml::Data;
using namespace Windows::UI::Xaml::Input;
using namespace Windows::UI::Xaml::Media;
using namespace Windows::UI::Xaml::Navigation;


MainPage::MainPage()
{
    InitializeComponent();

    Shapes::Ellipse^ circle;
    circle = ref new Shapes::Ellipse();
    circle->Width = 110;
    circle->Height = 80;
    circle->Stroke
        = ref new SolidColorBrush(Windows::UI::Colors::Red);
    circle->Fill
        = ref new SolidColorBrush(Windows::UI::Colors::Yellow);
    circle->StrokeThickness = 5;
    canvas1->Margin = Thickness(50, 10, 0, 0);
    canvas1->Children->Append(circle);

    Shapes::Line^ line;
    line = ref new Shapes::Line();
    line->Stroke
        = ref new SolidColorBrush(Windows::UI::Colors::Blue);
    line->StrokeThickness = 5;
    line->X1 = 50;
    line->Y1 = 100;
    line->X2 = 150;
    line->Y2 = 0;
    canvas2->Margin = Thickness(200, 0, 0, 0);
    canvas2->Children->Append(line);

    Shapes::Rectangle^ rectangle;
    rectangle = ref new Shapes::Rectangle();
    rectangle->Width = 100;
    rectangle->Height = 80;
    rectangle->Stroke
        = ref new SolidColorBrush(Windows::UI::Colors::Green);
    rectangle->Fill
        = ref new SolidColorBrush(Windows::UI::Colors::Orange);
    rectangle->StrokeThickness = 6;
    canvas3->Margin = Thickness(50, 150, 0, 0);
    canvas3->Children->Append(rectangle);
}
2018年05月11日
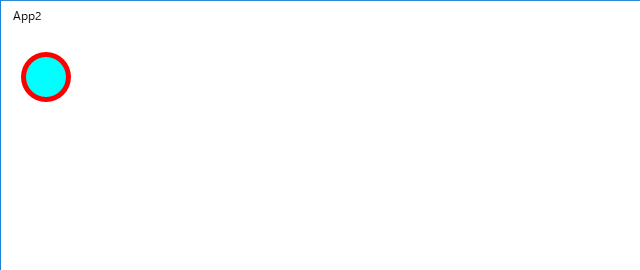
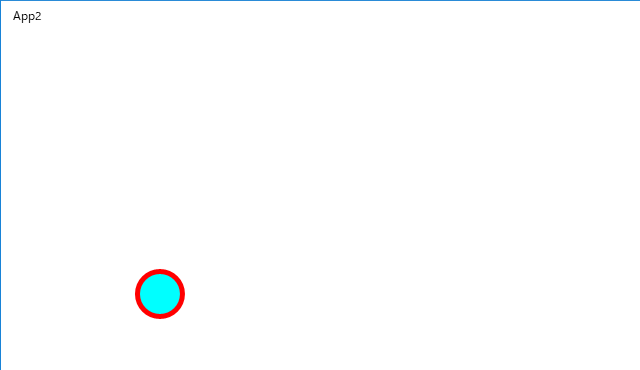
《その380》ドラッグ操作によるコントロールの移動
ドラッグ操作によるコントロールの移動
今回は、フォーム上に作成した円を、マウスドラッグで動かせるようにするプログラムです。
画面上のコントロールをマウスドラックで移動させる方法は、いろいろな場面で利用できると思います。
アプリのスタート画面です。
画面上の円をドラッグして移動させます。
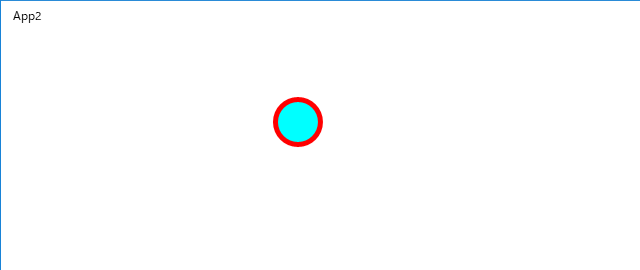
画面上の円をドラッグして移動させます。
以下は、プログラムの説明です。
◆まず、ツールボックスから Canvas を選択してフォーム上に配置します。
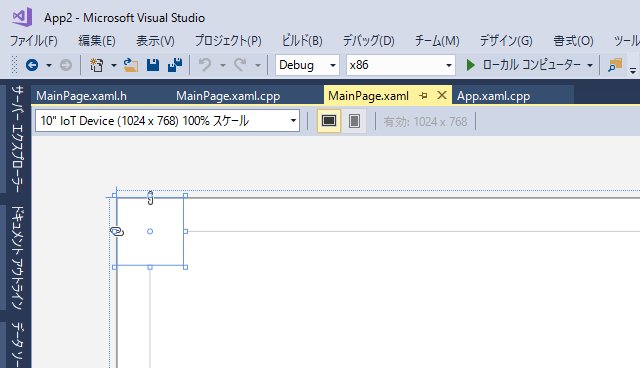
◆楕円クラスEllipse の circleオブジェクトを作成して、Canvas上に描画します。
Shapes::Ellipse^ circle;
circle = ref new Shapes::Ellipse();
circle->Width = 50;
circle->Height = 50;
// Arua色で塗りつぶします。
circle->Fill = ref new SolidColorBrush(Windows::UI::Colors::Aqua);
// 円の外周は Red色です。
circle->Stroke = ref new SolidColorBrush(Windows::UI::Colors::Red);
// 外周の線の太さは 5 です。
circle->StrokeThickness = 5;
circle->Margin = Thickness(20, 20, 0, 0);
canvas->Children->Append(circle);
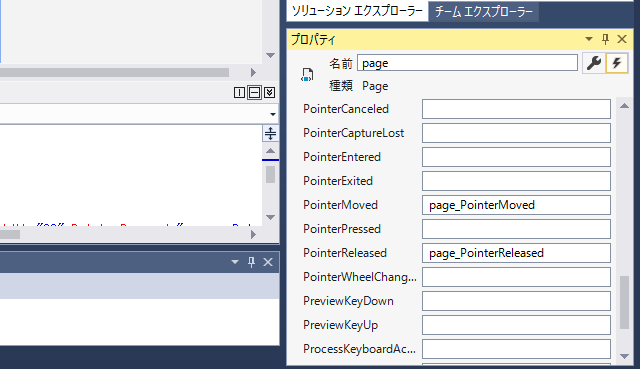
◆以下は、各ハンドラについての説明になります。
楕円がクリックされると、canvas_PointerPressedハンドラが、楕円の位置を取得し、マウスボタンが押されている状態を表すフラグ f を 1 にします(MainPage.xaml.cpp のコードを参照してください)。
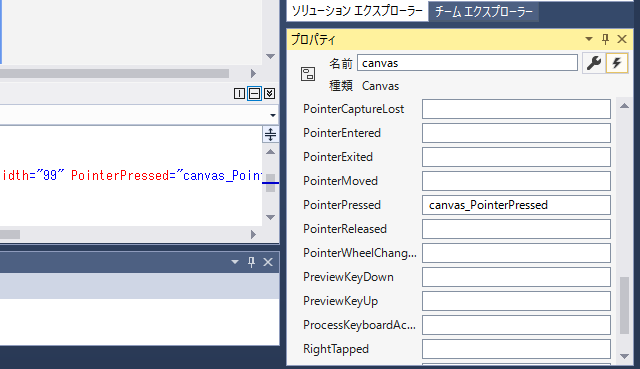
Page上をポインターが移動すると、
・f = 1 であれば、page_PointerMovedハンドラがポインタ位置を取得し、それに合わせて楕円を移動させます(MainPage.xaml.cpp のコードを参照してください)。
・f = 0 であれば、何もしません。
マウスボタンが解放されると、page_PointerReleasedハンドラは、その時点のポインタ位置を記録し、フラグ f を 0 にします(MainPage.xaml.cpp のコードを参照してください)。
◆変数の説明です。
x_, y_ はマウスがクリックされる直前の楕円の位置です。
x, y は移動中の楕円の位置です。
dx, dy は、マウスクリック時における、クリック位置と楕円の位置の差です。
MainPage.xaml.cpp です。
//
// MainPage.xaml.cpp
// MainPage クラスの実装。
//

#include "pch.h"
#include "MainPage.xaml.h"

using namespace App2;

using namespace Platform;
using namespace Windows::Foundation;
using namespace Windows::Foundation::Collections;
using namespace Windows::UI::Xaml;
using namespace Windows::UI::Xaml::Controls;
using namespace Windows::UI::Xaml::Controls::Primitives;
using namespace Windows::UI::Xaml::Data;
using namespace Windows::UI::Xaml::Input;
using namespace Windows::UI::Xaml::Media;
using namespace Windows::UI::Xaml::Navigation;


Shapes::Ellipse^ circle;
float x_ = 20; float y_ = 20;
float x = 0; float y = 0;
float dx = 0; float dy = 0;
int f = 0;

MainPage::MainPage()
{
    InitializeComponent();

    circle = ref new Shapes::Ellipse();
    circle->Width = 50;
    circle->Height = 50;
    circle->Fill = ref new SolidColorBrush(Windows::UI::Colors::Aqua);
    circle->Stroke = ref new SolidColorBrush(Windows::UI::Colors::Red);
    circle->StrokeThickness = 5;
    circle->Margin = Thickness(20, 20, 0, 0);

    canvas->Children->Append(circle);
}


void App2::MainPage::
canvas_PointerPressed(Platform::Object^ sender,
    Windows::UI::Xaml::Input::PointerRoutedEventArgs^ e)
{
    f = 1;

    auto pt = e->GetCurrentPoint(this);
    dx = pt->Position.X - x_;
    dy = pt->Position.Y - y_;
}


void App2::MainPage::
page_PointerMoved(Platform::Object^ sender,
    Windows::UI::Xaml::Input::PointerRoutedEventArgs^ e)
{
    if (f) {
        auto pt = e->GetCurrentPoint(this);
        x = pt->Position.X - dx;
        y = pt->Position.Y - dy;
        circle->Margin = Windows::UI::Xaml::Thickness(x, y, 0, 0);
    }
}


void App2::MainPage::
page_PointerReleased(Platform::Object^ sender,
    Windows::UI::Xaml::Input::PointerRoutedEventArgs^ e)
{
    f = 0;

    auto pt = e->GetCurrentPoint(this);
    x_ = pt->Position.X - dx;
    y_ = pt->Position.Y - dy;
}
2018年05月09日
《その379》クリック位置の取得
クリック位置の取得
今回のプログラムは、非常に短いコードですが、クリック位置を取得する方法はいろいろな場面で利用できる重要事項です。
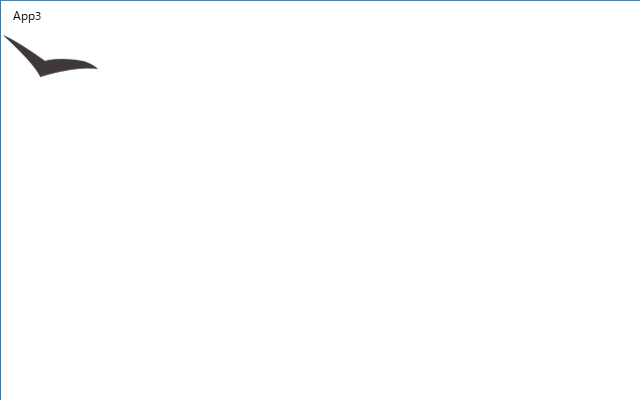
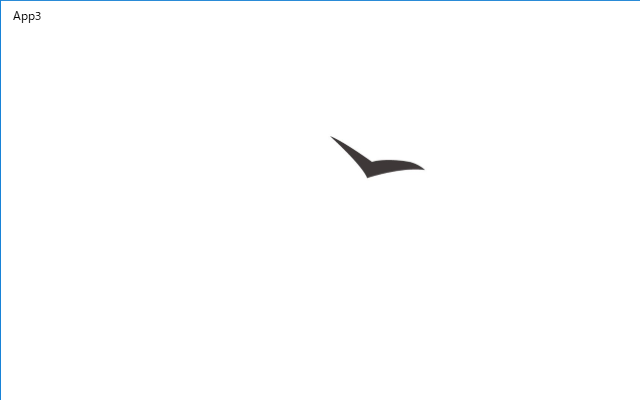
プログラムの開始時には、鳥が一羽、左上の位置にいます。
画面をクリックすると、鳥はクリックした位置に移動します。今回は、クリック位置を取得する方法だけの確認なので、余計なコードを省略してあります。そのため、鳥は瞬間移動しますが、ゆっくり移動させたいのであれば、前々回《377》の手法を応用することで実現できます。
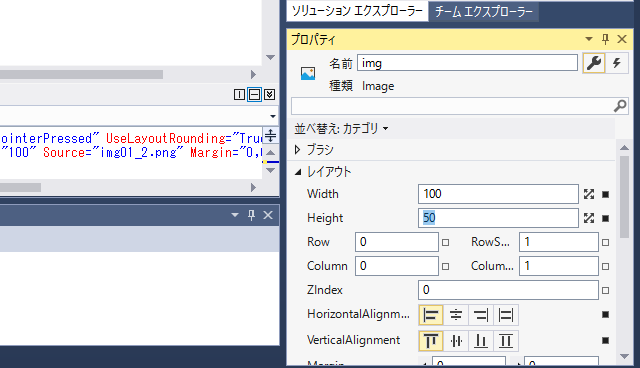
鳥の画像を配置します。
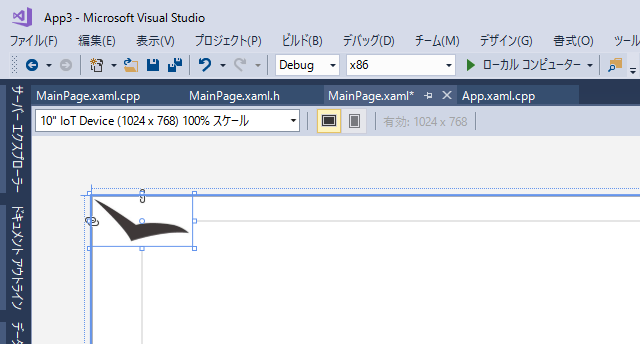
Image の Width を 100、Height を 50 にしました。
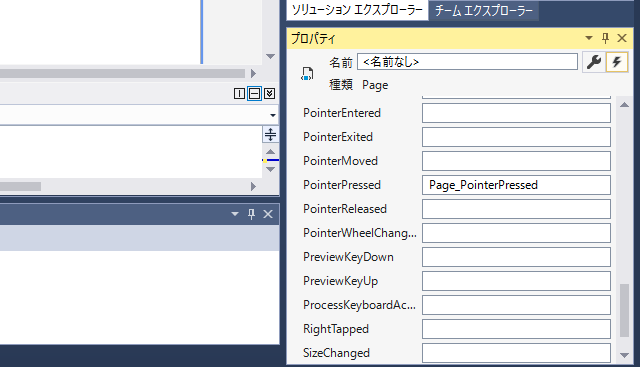
Page のプロパティで PointerPressed をダブルクリックして、Page_PointerPressedイベントハンドラを編集します。
MainPage.xaml.cpp です。
//
// MainPage.xaml.cpp
// MainPage クラスの実装。
//

#include "pch.h"
#include "MainPage.xaml.h"

using namespace App3;

using namespace Platform;
using namespace Windows::Foundation;
using namespace Windows::Foundation::Collections;
using namespace Windows::UI::Xaml;
using namespace Windows::UI::Xaml::Controls;
using namespace Windows::UI::Xaml::Controls::Primitives;
using namespace Windows::UI::Xaml::Data;
using namespace Windows::UI::Xaml::Input;
using namespace Windows::UI::Xaml::Media;
using namespace Windows::UI::Xaml::Navigation;

MainPage::MainPage()
{
    InitializeComponent();
}

void App3::MainPage::
Page_PointerPressed(Platform::Object^ sender,
	Windows::UI::Xaml::Input::PointerRoutedEventArgs^ e)
{
	auto pt = e->GetCurrentPoint(this);

	float x = pt->Position.X - 50;
	float y = pt->Position.Y - 25;
	img->Margin = Windows::UI::Xaml::Thickness(x, y, 0, 0);
}
アプリのスタート画面です。
画面をクリックすると、鳥はその位置に移動します。
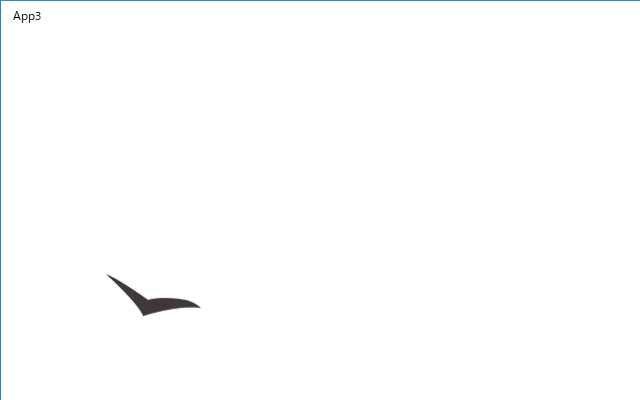
画面をクリックすると、鳥はその位置に移動します。
2018年05月08日
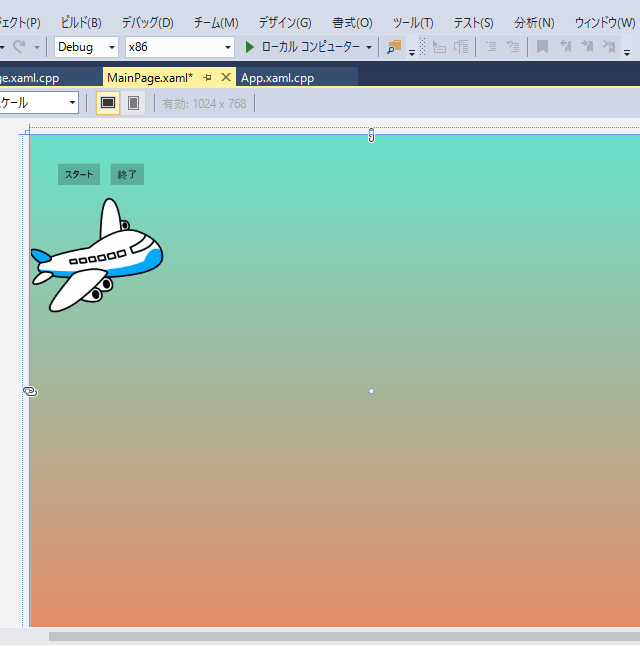
《その378》画像の移動(2)
画像の移動(2)
今回は、前回《377》のアプリに色付けしてみただけの内容です。
前回のままではちょっと寂しいので、背景色や夕日などを付け足しました。
飛行中の画面全体の様子です。ここのスペースに収めるために縮小してあります。

背景色は、Grid のブラシ用エディターでグラデーションに仕上げました。