2018年05月12日
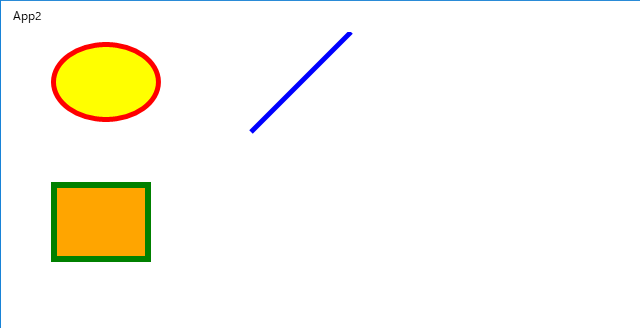
《その381》楕円,直線,四角形 の表示
楕円,直線,四角形 の表示
今回は、楕円,直線,四角形 の表示についてだけの内容です。
Canvas を3つ用意してそれぞれの図形を独立させているので、クリックによる移動(本ブログの《379》)やドラッグによる移動(本ブログの《380》)等も個別に行えます。
また、タイマー(本ブログの《373》~《378》)を利用して、図形を自動的に動かすこともできるので、例えば、直線を回転させて時計の針に利用するなど、いろいろと応用できると思います。

以下は、MainPage.xaml.cpp です。
//
// MainPage.xaml.cpp
// MainPage クラスの実装。
//

#include "pch.h"
#include "MainPage.xaml.h"

using namespace App2;

using namespace Platform;
using namespace Windows::Foundation;
using namespace Windows::Foundation::Collections;
using namespace Windows::UI::Xaml;
using namespace Windows::UI::Xaml::Controls;
using namespace Windows::UI::Xaml::Controls::Primitives;
using namespace Windows::UI::Xaml::Data;
using namespace Windows::UI::Xaml::Input;
using namespace Windows::UI::Xaml::Media;
using namespace Windows::UI::Xaml::Navigation;


MainPage::MainPage()
{
    InitializeComponent();

    Shapes::Ellipse^ circle;
    circle = ref new Shapes::Ellipse();
    circle->Width = 110;
    circle->Height = 80;
    circle->Stroke
        = ref new SolidColorBrush(Windows::UI::Colors::Red);
    circle->Fill
        = ref new SolidColorBrush(Windows::UI::Colors::Yellow);
    circle->StrokeThickness = 5;
    canvas1->Margin = Thickness(50, 10, 0, 0);
    canvas1->Children->Append(circle);

    Shapes::Line^ line;
    line = ref new Shapes::Line();
    line->Stroke
        = ref new SolidColorBrush(Windows::UI::Colors::Blue);
    line->StrokeThickness = 5;
    line->X1 = 50;
    line->Y1 = 100;
    line->X2 = 150;
    line->Y2 = 0;
    canvas2->Margin = Thickness(200, 0, 0, 0);
    canvas2->Children->Append(line);

    Shapes::Rectangle^ rectangle;
    rectangle = ref new Shapes::Rectangle();
    rectangle->Width = 100;
    rectangle->Height = 80;
    rectangle->Stroke
        = ref new SolidColorBrush(Windows::UI::Colors::Green);
    rectangle->Fill
        = ref new SolidColorBrush(Windows::UI::Colors::Orange);
    rectangle->StrokeThickness = 6;
    canvas3->Margin = Thickness(50, 150, 0, 0);
    canvas3->Children->Append(rectangle);
}
この記事へのコメント
コメントを書く
この記事へのトラックバックURL
https://fanblogs.jp/tb/7648188
※ブログオーナーが承認したトラックバックのみ表示されます。
この記事へのトラックバック

