2015年01月16日
Ubuntu 14.04server でFTPSサーバ接続を作ってみた
Ubuntu 14.04server でFTPSサーバ接続を作ってみた
ubuntu 14.04 server でIP固定とソフトRAIDを組んでみた を参照して、ubuntu 14.04 serverをセットアップしてください。
この記事では 管理者を yamada としています(インストール時に作った ユーザー名)
何をするか?
GUIでのIP固定化
GUIでのユーザーとグループの作成
vsftpのインストール
複数人で共有できるFTPサーバを作成 のためのvsftp の設定
1,GUIでのIPの固定化
それをする為に、/etc/network/interfaces の記述を設定し直します。
$ sudo gedit /etc/network/interfaces
以下のように書き換えます
・・・・・・・・・・・・・・・・・・・・・・・・・・・・・・・・・・・・・・・・・・・・・・・・・・・・・・・・・・・・・
# This file describes the network interfaces available on your
# system
# and how to activate them. For more information, see
#interfaces(5).
# The loopback network interface
auto lo
iface lo inet loopback
# The primary network interface
# auto eth0
# iface eth0 inet dhcp
・・・・・・・・・・・・・・・・・・・・・・・・・・・・・・・・・・・・・・・・・・・・・・・・・・・・・・・・・・・・・
$ sync
$ sudo reboot (再起動)
2,GUIでのユーザーとグループの作成
$ sudo apt-get install gnome-system-tools
$ sync
$ sudo reboot(再起動)
再起動したら
$ users-admin
上記コマンドで、ユーザーとグループの作成が起動したら、それをタスクバーに固定しておきましょう(今後使うので)
vsftpd.user_listの作成
chrootするためには、空のvsftpd.user_listが必要になります。
そのため、空のvsftpd.user_listを作ります
$ sudo gedit /etc/vsftpd.user_list
何も記入しないで保存を押してください。これで、vsftpd.user_listが作られました。
また後程vsftpd.user_listの作成は記述します。
/etc/vsftpd.user_list の作成
$ sudo gedit /etc/vsftpd.user_list このコマンドでvsftpd.user_list を作成します。
記述はユーザー名を列挙していけばよいのです。
例
yamada
yamamoto
saitou
takahashi
のようにして、保存します
また後程/etc/vsftpd.user_listの事は記述します
3,vsftpのインストール
$ sudo apt-get install vsftpd
vsftpd.conf の編集
$ sudo gedit /etc/vsftpd.conf
以下のように書き換えます
・・・・・・・・・・・・・・・・・・・・・・・・・・・・・・・・・・・・・・・・・・・・・・・・・・・・・・・・・・・・・・
# Example config file /etc/vsftpd.conf
#
# The default compiled in settings are fairly paranoid. This sample file
# loosens things up a bit, to make the ftp daemon more usable.
# Please see vsftpd.conf.5 for all compiled in defaults.
#
# READ THIS: This example file is NOT an exhaustive list of vsftpd options.
# Please read the vsftpd.conf.5 manual page to get a full idea of vsftpd's
# capabilities.
#
#
# Run standalone? vsftpd can run either from an inetd or as a standalone
# daemon started from an initscript.
listen=YES
#
# Run standalone with IPv6?
# Like the listen parameter, except vsftpd will listen on an IPv6 socket
# instead of an IPv4 one. This parameter and the listen parameter are mutually
# exclusive.
#listen_ipv6=YES
#
# Allow anonymous FTP? (Disabled by default)
anonymous_enable=NO
#
# Uncomment this to allow local users to log in.
local_enable=YES
#
# Uncomment this to enable any form of FTP write command.
write_enable=YES
#
# Default umask for local users is 077. You may wish to change this to 022,
# if your users expect that (022 is used by most other ftpd's)
local_umask=022
#
# Uncomment this to allow the anonymous FTP user to upload files. This only
# has an effect if the above global write enable is activated. Also, you will
# obviously need to create a directory writable by the FTP user.
#anon_upload_enable=YES
#
# Uncomment this if you want the anonymous FTP user to be able to create
# new directories.
#anon_mkdir_write_enable=YES
#
# Activate directory messages - messages given to remote users when they
# go into a certain directory.
dirmessage_enable=YES
#
# If enabled, vsftpd will display directory listings with the time
# in your local time zone. The default is to display GMT. The
# times returned by the MDTM FTP command are also affected by this
# option.
use_localtime=YES
#
# Activate logging of uploads/downloads.
xferlog_enable=YES
#
# Make sure PORT transfer connections originate from port 20 (ftp-data).
connect_from_port_20=YES
#
# If you want, you can arrange for uploaded anonymous files to be owned by
# a different user. Note! Using "root" for uploaded files is not
# recommended!
#chown_uploads=YES
#chown_username=whoever
#
# You may override where the log file goes if you like. The default is shown
# below.
#xferlog_file=/var/log/vsftpd.log
#
# If you want, you can have your log file in standard ftpd xferlog format.
# Note that the default log file location is /var/log/xferlog in this case.
#xferlog_std_format=YES
#
# You may change the default value for timing out an idle session.
#idle_session_timeout=600
#
# You may change the default value for timing out a data connection.
#data_connection_timeout=120
#
# It is recommended that you define on your system a unique user which the
# ftp server can use as a totally isolated and unprivileged user.
#nopriv_user=ftpsecure
#
# Enable this and the server will recognise asynchronous ABOR requests. Not
# recommended for security (the code is non-trivial). Not enabling it,
# however, may confuse older FTP clients.
#async_abor_enable=YES
#
# By default the server will pretend to allow ASCII mode but in fact ignore
# the request. Turn on the below options to have the server actually do ASCII
# mangling on files when in ASCII mode.
# Beware that on some FTP servers, ASCII support allows a denial of service
# attack (DoS) via the command "SIZE /big/file" in ASCII mode. vsftpd
# predicted this attack and has always been safe, reporting the size of the
# raw file.
# ASCII mangling is a horrible feature of the protocol.
ascii_upload_enable=YES
ascii_download_enable=YES
#
# You may fully customise the login banner string:
#ftpd_banner=Welcome to blah FTP service.
#
# You may specify a file of disallowed anonymous e-mail addresses. Apparently
# useful for combatting certain DoS attacks.
#deny_email_enable=YES
# (default follows)
#banned_email_file=/etc/vsftpd.banned_emails
#
# You may restrict local users to their home directories. See the FAQ for
# the possible risks in this before using chroot_local_user or
# chroot_list_enable below.
# chroot_local_user=YES
#
# You may specify an explicit list of local users to chroot() to their home
# directory. If chroot_local_user is YES, then this list becomes a list of
# users to NOT chroot().
# (Warning! chroot'ing can be very dangerous. If using chroot, make sure that
# the user does not have write access to the top level directory within the
# chroot)
chroot_local_user=YES
chroot_list_enable=YES
# (default follows)
allow_writeable_chroot=YES
chroot_list_file=/etc/vsftpd.chroot_list
local_root=/media/yamada/RAID5/NetFile
# local_root=/mnt/d00c1a70-2769-4ddb-a298-5685b812fdde/NetFile
#
# You may activate the "-R" option to the builtin ls. This is disabled by
# default to avoid remote users being able to cause excessive I/O on large
# sites. However, some broken FTP clients such as "ncftp" and "mirror" assume
# the presence of the "-R" option, so there is a strong case for enabling it.
#ls_recurse_enable=YES
#
# Customization
#
# Some of vsftpd's settings don't fit the filesystem layout by
# default.
#
# This option should be the name of a directory which is empty. Also, the
# directory should not be writable by the ftp user. This directory is used
# as a secure chroot() jail at times vsftpd does not require filesystem
# access.
secure_chroot_dir=/var/run/vsftpd/empty
#
# This string is the name of the PAM service vsftpd will use.
pam_service_name=vsftpd
# pam_service_name=ftp
#
# This option specifies the location of the RSA certificate to use for SSL
ssl_enable=YES
force_local_logins_ssl=NO
allow_anon_ssl=NO
force_local_data_ssl=YES
force_local_logins_ssl=YES
ssl_tlsv1=YES
ssl_sslv2=YES
ssl_sslv3=YES
# encrypted connections.
rsa_cert_file=/etc/ssl/certs/ssl-cert-snakeoil.pem
# This option specifies the location of the RSA key to use for SSL
# encrypted connections.
rsa_private_key_file=/etc/ssl/private/ssl-cert-snakeoil.key
#
# FileZillaClient対応
ssl_ciphers=HIGH
#
# AndFTP対応
require_ssl_reuse=NO
ssl_ciphers=HIGH
#指定したユーザーのみアクセス出来るようにする
userlist_enable=YES
userlist_deny=NO
userlist_file=/etc/vsftpd.user_list
# Show hidden files and the "." and ".." folders.
# Useful to not write over hidden files:
# .等の隠しフォルダ、又は、ファイルを上書しないようにする。
force_dot_files=YES
# Hide the info about the owner (user and group) of the files.
# ファイルの所有者等の情報を非表示にする
hide_ids=YES
# Connection limit for each IP:
# 各IPのための接続制限
max_per_ip=10
# Maximum number of clients:
# クライアントの最大接続数
max_clients=20
# Enable (only) guests.
# ゲストのみ有効にします
guest_enable=YES
# ログインするユーザーを全てバーチャルユーザーとみなす
guest_enable=YES
# バーチャルユーザーがマッピングされるOS上のユーザー
guest_username=yamada
# バーチャルユーザーがファイルアップロードする事を許可する
anon_upload_enable=YES
# バーチャルユーザーが新規にディレクトリを作成する事を許可する
anon_mkdir_write_enable=YES
# バーチャルユーザーがファイル名の変更やファイル削除をする事を許可する
anon_other_write_enable=YES
# World Readableなファイルのみをダウンロードできるというオプションを無効にする
anon_world_readable_only=NO
# バーチャルユーザー用のumask
anon_umask=002
# バーチャルユーザーをマッピングしたOSユーザーと同等の権限にする
virtual_use_local_privs=YES
# パッシブモード yes
pasv_enable=YES
# listens on this port for incoming FTP connections
listen_port=60021
# the minimum port to allocate for PASV style data connections
pasv_min_port=62222
# the maximum port to allocate for PASV style data connections
pasv_max_port=62223
# controls whether PORT style data connections use port 20 (ftp-data)
connect_from_port_20=YES
・・・・・・・・・・・・・・・・・・・・・・・・・・・・・・・・・・・・・・・・・・・・・・・・・・・・・・・・・・・・・・・・・・・・・・・・・・・・・・・・
少し説明を入れます
まずコレは重要です、chrootした時で、且つ、local_root=/~/を書いた時、これがないと、書き込みが出来ませんし、接続できません
allow_writeable_chroot=YES
chrootで指定したディレクトリにすべてのユーザーを接続させたい場合以下のように書きます。この場合NetFile以下にはユーザーが移動できません。
複数人共有して使うサーバーでは、このような設定が良いかと思います。
local_root=/media/yamada/RAID5/NetFile (local_root=)(/media/yamada/RAID5/NetFile)
以下も同じですが、自動マウントにした例です
この場合、GUIのディスクで自動マウントにした場合の例です
自動マウントにしておけば、再起動した時、いちいちドライブをマウントしなくても済みますので常時可動のサーバーには向いているかと思います。
local_root=/mnt/d00c1a70-2769-4ddb-a298-5685b812fdde/NetFile (local_root=)(/mnt/d00c1a70-2769-4ddb-a298-5685b812fdde/NetFile)
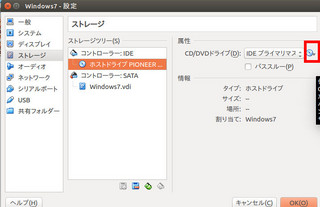
自動マウントにしたいディスクを選びます。 歯車のアイコンにカーソルを持って行き左クリック、
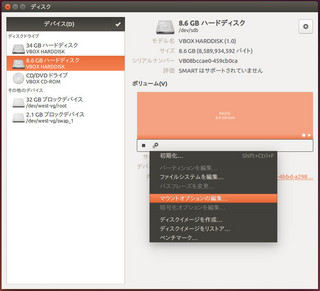
自動マウントオプションをオフにする。 起動時にマウントするをチェックして、他のチェックは外す
(「ユーザーインターフェースに表示しない」を「チェックすると起動時にエラーが出て起動できなくなります」 経験済み)
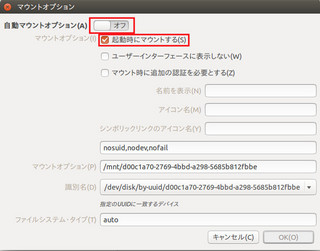
自動でマウントされると、/mnt 以下に数字が並んだフォルダが出来ます。それが、HDDになりますので、その中にフォルダを作って(この場合はNetFile)それを、local_rootしてください
vsftpd.user_listの作成
chrootするためには、空のvsftpd.user_listが必要になります。
そのため、空のvsftpd.user_listを作ります
$ sudo gedit /etc/vsftpd.user_list
何も記入しないで保存を押してください。これで、vsftpd.user_listが作られました。
# This option specifies the location of the RSA certificate to use for SSL
SSL証明に関する記述です 以下のようにします。
ssl_enable=YES
force_local_logins_ssl=NO
allow_anon_ssl=NO
force_local_data_ssl=YES
force_local_logins_ssl=YES
ssl_tlsv1=YES
ssl_sslv2=YES
ssl_sslv3=YES
#指定したユーザーのみアクセス出来るようにする
許可したユーザーのみアクセスできるように設定します以下のようにします。
userlist_enable=YES
userlist_deny=NO
userlist_file=/etc/vsftpd.user_list
/etc/vsftpd.user_list の作成
$ sudo gedit /etc/vsftpd.user_list このコマンドでvsftpd.user_list を作成します。
記述はユーザー名を列挙していけばよいのです。
例
yamada
yamamoto
saitou
takahashi
のようにして、保存します
指定したユーザーをログインさせるためには、以下の設定が必要になります。
# Enable (only) guests.
# ゲストのみ有効にします
guest_enable=YES
# ログインするユーザーを全てバーチャルユーザーとみなす
guest_enable=YES
# バーチャルユーザーがマッピングされるOS上のユーザー
guest_username=yamada
(ここでは、OSにログインするときのログイン名を書きます、この場合は「yamada」です。これを記述しないと、権限がftpになってしまいますので、FTPでアップロードしたふぁいるは、Ubuntuサーバー上で操作出来ません)
(操作しなくても良い場合ばコメントして、スルーします)
# バーチャルユーザーがファイルアップロードする事を許可する
anon_upload_enable=YES
# バーチャルユーザーが新規にディレクトリを作成する事を許可する
anon_mkdir_write_enable=YES
# バーチャルユーザーがファイル名の変更やファイル削除をする事を許可する
anon_other_write_enable=YES
# World Readableなファイルのみをダウンロードできるというオプションを無効にする
anon_world_readable_only=NO
# バーチャルユーザー用のumask
anon_umask=002
# バーチャルユーザーをマッピングしたOSユーザーと同等の権限にする
virtual_use_local_privs=YES
(これを記述しないと、FTPでアップロードしたファイルに鍵のマークが付きます)
# listens on this port for incoming FTP connections
listen_port=60021 (ポート60021でFTPクライアントと接続します)
さて、ユーザーの作成です。
タスクバーに止めたユーザーとグループをクリックして起動します。
左下の追加をクリック
名前を先ほど入れた vsftpd.user_list と同じユーザーを作成します。
yamada(これは管理者なので予め作成されています)
yamamoto(これを作成)
saitou(これを作成)
takahashi(これを作成)
例
新しいユーザーを作成します。に yamamoto と入力します。 そしてOKを押します。
次にパスワードを入力します。 例 123456 これがyamamotoのパスワードになりますので覚えておいてください。
次々 sautou takahashi とユーザー名とパスワードを作成していきます。
これらを保存して、閉じます。
ここまで来たら、vsftpdを再起動します。
$ sudo service vsftpd restart
(自動マウントにした人は、設定をよく確認して、PCを再起動してください)
$ sudo reboot (再起動)
FTPクライアントの設定
とりあえず、ローカルで接続してみてください。Ubuntu同士なら、FW設定が無いので、接続できるはずですが、接続できない場合FWや、SSLポートの可能性があります。
SSLポートは通常990ですが、普通はポートを開けなくても良いはずです。また、
# the minimum port to allocate for PASV style data connections
pasv_min_port=62222
# the maximum port to allocate for PASV style data connections
pasv_max_port=62223
を設定していますので、このポートを開けることで、外からの接続が出来るようになると思います
もちろん、60021のポートも開けることを忘れずに
この鯖に接続できる人は、 yamada yamamoto saitou takahashi の4人です(追記すればもっと接続できます)
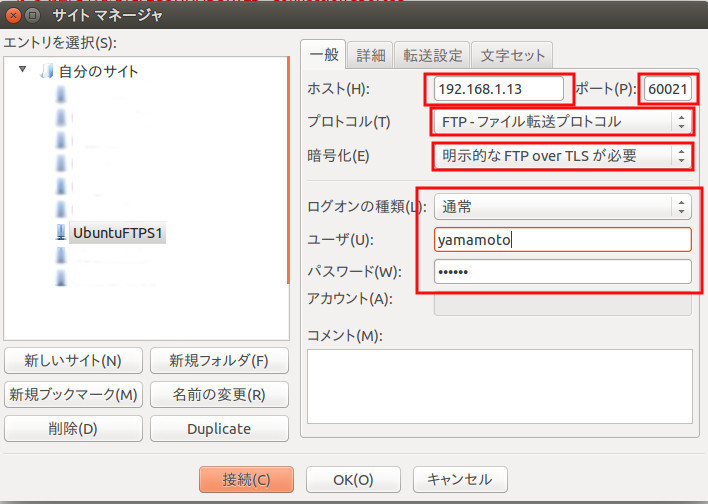
FileZilla
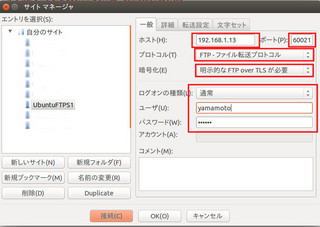
のように設定して接続します。
これで、うまく接続できたら終わりです。
ubuntu 14.04 server でIP固定とソフトRAIDを組んでみた を参照して、ubuntu 14.04 serverをセットアップしてください。
この記事では 管理者を yamada としています(インストール時に作った ユーザー名)
何をするか?
GUIでのIP固定化
GUIでのユーザーとグループの作成
vsftpのインストール
複数人で共有できるFTPサーバを作成 のためのvsftp の設定
1,GUIでのIPの固定化
それをする為に、/etc/network/interfaces の記述を設定し直します。
$ sudo gedit /etc/network/interfaces
以下のように書き換えます
・・・・・・・・・・・・・・・・・・・・・・・・・・・・・・・・・・・・・・・・・・・・・・・・・・・・・・・・・・・・・
# This file describes the network interfaces available on your
# system
# and how to activate them. For more information, see
#interfaces(5).
# The loopback network interface
auto lo
iface lo inet loopback
# The primary network interface
# auto eth0
# iface eth0 inet dhcp
・・・・・・・・・・・・・・・・・・・・・・・・・・・・・・・・・・・・・・・・・・・・・・・・・・・・・・・・・・・・・
$ sync
$ sudo reboot (再起動)
2,GUIでのユーザーとグループの作成
$ sudo apt-get install gnome-system-tools
$ sync
$ sudo reboot(再起動)
再起動したら
$ users-admin
上記コマンドで、ユーザーとグループの作成が起動したら、それをタスクバーに固定しておきましょう(今後使うので)
vsftpd.user_listの作成
chrootするためには、空のvsftpd.user_listが必要になります。
そのため、空のvsftpd.user_listを作ります
$ sudo gedit /etc/vsftpd.user_list
何も記入しないで保存を押してください。これで、vsftpd.user_listが作られました。
また後程vsftpd.user_listの作成は記述します。
/etc/vsftpd.user_list の作成
$ sudo gedit /etc/vsftpd.user_list このコマンドでvsftpd.user_list を作成します。
記述はユーザー名を列挙していけばよいのです。
例
yamada
yamamoto
saitou
takahashi
のようにして、保存します
また後程/etc/vsftpd.user_listの事は記述します
3,vsftpのインストール
$ sudo apt-get install vsftpd
vsftpd.conf の編集
$ sudo gedit /etc/vsftpd.conf
以下のように書き換えます
・・・・・・・・・・・・・・・・・・・・・・・・・・・・・・・・・・・・・・・・・・・・・・・・・・・・・・・・・・・・・・
# Example config file /etc/vsftpd.conf
#
# The default compiled in settings are fairly paranoid. This sample file
# loosens things up a bit, to make the ftp daemon more usable.
# Please see vsftpd.conf.5 for all compiled in defaults.
#
# READ THIS: This example file is NOT an exhaustive list of vsftpd options.
# Please read the vsftpd.conf.5 manual page to get a full idea of vsftpd's
# capabilities.
#
#
# Run standalone? vsftpd can run either from an inetd or as a standalone
# daemon started from an initscript.
listen=YES
#
# Run standalone with IPv6?
# Like the listen parameter, except vsftpd will listen on an IPv6 socket
# instead of an IPv4 one. This parameter and the listen parameter are mutually
# exclusive.
#listen_ipv6=YES
#
# Allow anonymous FTP? (Disabled by default)
anonymous_enable=NO
#
# Uncomment this to allow local users to log in.
local_enable=YES
#
# Uncomment this to enable any form of FTP write command.
write_enable=YES
#
# Default umask for local users is 077. You may wish to change this to 022,
# if your users expect that (022 is used by most other ftpd's)
local_umask=022
#
# Uncomment this to allow the anonymous FTP user to upload files. This only
# has an effect if the above global write enable is activated. Also, you will
# obviously need to create a directory writable by the FTP user.
#anon_upload_enable=YES
#
# Uncomment this if you want the anonymous FTP user to be able to create
# new directories.
#anon_mkdir_write_enable=YES
#
# Activate directory messages - messages given to remote users when they
# go into a certain directory.
dirmessage_enable=YES
#
# If enabled, vsftpd will display directory listings with the time
# in your local time zone. The default is to display GMT. The
# times returned by the MDTM FTP command are also affected by this
# option.
use_localtime=YES
#
# Activate logging of uploads/downloads.
xferlog_enable=YES
#
# Make sure PORT transfer connections originate from port 20 (ftp-data).
connect_from_port_20=YES
#
# If you want, you can arrange for uploaded anonymous files to be owned by
# a different user. Note! Using "root" for uploaded files is not
# recommended!
#chown_uploads=YES
#chown_username=whoever
#
# You may override where the log file goes if you like. The default is shown
# below.
#xferlog_file=/var/log/vsftpd.log
#
# If you want, you can have your log file in standard ftpd xferlog format.
# Note that the default log file location is /var/log/xferlog in this case.
#xferlog_std_format=YES
#
# You may change the default value for timing out an idle session.
#idle_session_timeout=600
#
# You may change the default value for timing out a data connection.
#data_connection_timeout=120
#
# It is recommended that you define on your system a unique user which the
# ftp server can use as a totally isolated and unprivileged user.
#nopriv_user=ftpsecure
#
# Enable this and the server will recognise asynchronous ABOR requests. Not
# recommended for security (the code is non-trivial). Not enabling it,
# however, may confuse older FTP clients.
#async_abor_enable=YES
#
# By default the server will pretend to allow ASCII mode but in fact ignore
# the request. Turn on the below options to have the server actually do ASCII
# mangling on files when in ASCII mode.
# Beware that on some FTP servers, ASCII support allows a denial of service
# attack (DoS) via the command "SIZE /big/file" in ASCII mode. vsftpd
# predicted this attack and has always been safe, reporting the size of the
# raw file.
# ASCII mangling is a horrible feature of the protocol.
ascii_upload_enable=YES
ascii_download_enable=YES
#
# You may fully customise the login banner string:
#ftpd_banner=Welcome to blah FTP service.
#
# You may specify a file of disallowed anonymous e-mail addresses. Apparently
# useful for combatting certain DoS attacks.
#deny_email_enable=YES
# (default follows)
#banned_email_file=/etc/vsftpd.banned_emails
#
# You may restrict local users to their home directories. See the FAQ for
# the possible risks in this before using chroot_local_user or
# chroot_list_enable below.
# chroot_local_user=YES
#
# You may specify an explicit list of local users to chroot() to their home
# directory. If chroot_local_user is YES, then this list becomes a list of
# users to NOT chroot().
# (Warning! chroot'ing can be very dangerous. If using chroot, make sure that
# the user does not have write access to the top level directory within the
# chroot)
chroot_local_user=YES
chroot_list_enable=YES
# (default follows)
allow_writeable_chroot=YES
chroot_list_file=/etc/vsftpd.chroot_list
local_root=/media/yamada/RAID5/NetFile
# local_root=/mnt/d00c1a70-2769-4ddb-a298-5685b812fdde/NetFile
#
# You may activate the "-R" option to the builtin ls. This is disabled by
# default to avoid remote users being able to cause excessive I/O on large
# sites. However, some broken FTP clients such as "ncftp" and "mirror" assume
# the presence of the "-R" option, so there is a strong case for enabling it.
#ls_recurse_enable=YES
#
# Customization
#
# Some of vsftpd's settings don't fit the filesystem layout by
# default.
#
# This option should be the name of a directory which is empty. Also, the
# directory should not be writable by the ftp user. This directory is used
# as a secure chroot() jail at times vsftpd does not require filesystem
# access.
secure_chroot_dir=/var/run/vsftpd/empty
#
# This string is the name of the PAM service vsftpd will use.
pam_service_name=vsftpd
# pam_service_name=ftp
#
# This option specifies the location of the RSA certificate to use for SSL
ssl_enable=YES
force_local_logins_ssl=NO
allow_anon_ssl=NO
force_local_data_ssl=YES
force_local_logins_ssl=YES
ssl_tlsv1=YES
ssl_sslv2=YES
ssl_sslv3=YES
# encrypted connections.
rsa_cert_file=/etc/ssl/certs/ssl-cert-snakeoil.pem
# This option specifies the location of the RSA key to use for SSL
# encrypted connections.
rsa_private_key_file=/etc/ssl/private/ssl-cert-snakeoil.key
#
# FileZillaClient対応
ssl_ciphers=HIGH
#
# AndFTP対応
require_ssl_reuse=NO
ssl_ciphers=HIGH
#指定したユーザーのみアクセス出来るようにする
userlist_enable=YES
userlist_deny=NO
userlist_file=/etc/vsftpd.user_list
# Show hidden files and the "." and ".." folders.
# Useful to not write over hidden files:
# .等の隠しフォルダ、又は、ファイルを上書しないようにする。
force_dot_files=YES
# Hide the info about the owner (user and group) of the files.
# ファイルの所有者等の情報を非表示にする
hide_ids=YES
# Connection limit for each IP:
# 各IPのための接続制限
max_per_ip=10
# Maximum number of clients:
# クライアントの最大接続数
max_clients=20
# Enable (only) guests.
# ゲストのみ有効にします
guest_enable=YES
# ログインするユーザーを全てバーチャルユーザーとみなす
guest_enable=YES
# バーチャルユーザーがマッピングされるOS上のユーザー
guest_username=yamada
# バーチャルユーザーがファイルアップロードする事を許可する
anon_upload_enable=YES
# バーチャルユーザーが新規にディレクトリを作成する事を許可する
anon_mkdir_write_enable=YES
# バーチャルユーザーがファイル名の変更やファイル削除をする事を許可する
anon_other_write_enable=YES
# World Readableなファイルのみをダウンロードできるというオプションを無効にする
anon_world_readable_only=NO
# バーチャルユーザー用のumask
anon_umask=002
# バーチャルユーザーをマッピングしたOSユーザーと同等の権限にする
virtual_use_local_privs=YES
# パッシブモード yes
pasv_enable=YES
# listens on this port for incoming FTP connections
listen_port=60021
# the minimum port to allocate for PASV style data connections
pasv_min_port=62222
# the maximum port to allocate for PASV style data connections
pasv_max_port=62223
# controls whether PORT style data connections use port 20 (ftp-data)
connect_from_port_20=YES
・・・・・・・・・・・・・・・・・・・・・・・・・・・・・・・・・・・・・・・・・・・・・・・・・・・・・・・・・・・・・・・・・・・・・・・・・・・・・・・・
少し説明を入れます
まずコレは重要です、chrootした時で、且つ、local_root=/~/を書いた時、これがないと、書き込みが出来ませんし、接続できません
allow_writeable_chroot=YES
chrootで指定したディレクトリにすべてのユーザーを接続させたい場合以下のように書きます。この場合NetFile以下にはユーザーが移動できません。
複数人共有して使うサーバーでは、このような設定が良いかと思います。
local_root=/media/yamada/RAID5/NetFile (local_root=)(/media/yamada/RAID5/NetFile)
以下も同じですが、自動マウントにした例です
この場合、GUIのディスクで自動マウントにした場合の例です
自動マウントにしておけば、再起動した時、いちいちドライブをマウントしなくても済みますので常時可動のサーバーには向いているかと思います。
local_root=/mnt/d00c1a70-2769-4ddb-a298-5685b812fdde/NetFile (local_root=)(/mnt/d00c1a70-2769-4ddb-a298-5685b812fdde/NetFile)
自動マウントにしたいディスクを選びます。 歯車のアイコンにカーソルを持って行き左クリック、

自動マウントオプションをオフにする。 起動時にマウントするをチェックして、他のチェックは外す
(「ユーザーインターフェースに表示しない」を「チェックすると起動時にエラーが出て起動できなくなります」 経験済み)

自動でマウントされると、/mnt 以下に数字が並んだフォルダが出来ます。それが、HDDになりますので、その中にフォルダを作って(この場合はNetFile)それを、local_rootしてください
vsftpd.user_listの作成
chrootするためには、空のvsftpd.user_listが必要になります。
そのため、空のvsftpd.user_listを作ります
$ sudo gedit /etc/vsftpd.user_list
何も記入しないで保存を押してください。これで、vsftpd.user_listが作られました。
# This option specifies the location of the RSA certificate to use for SSL
SSL証明に関する記述です 以下のようにします。
ssl_enable=YES
force_local_logins_ssl=NO
allow_anon_ssl=NO
force_local_data_ssl=YES
force_local_logins_ssl=YES
ssl_tlsv1=YES
ssl_sslv2=YES
ssl_sslv3=YES
#指定したユーザーのみアクセス出来るようにする
許可したユーザーのみアクセスできるように設定します以下のようにします。
userlist_enable=YES
userlist_deny=NO
userlist_file=/etc/vsftpd.user_list
/etc/vsftpd.user_list の作成
$ sudo gedit /etc/vsftpd.user_list このコマンドでvsftpd.user_list を作成します。
記述はユーザー名を列挙していけばよいのです。
例
yamada
yamamoto
saitou
takahashi
のようにして、保存します
指定したユーザーをログインさせるためには、以下の設定が必要になります。
# Enable (only) guests.
# ゲストのみ有効にします
guest_enable=YES
# ログインするユーザーを全てバーチャルユーザーとみなす
guest_enable=YES
# バーチャルユーザーがマッピングされるOS上のユーザー
guest_username=yamada
(ここでは、OSにログインするときのログイン名を書きます、この場合は「yamada」です。これを記述しないと、権限がftpになってしまいますので、FTPでアップロードしたふぁいるは、Ubuntuサーバー上で操作出来ません)
(操作しなくても良い場合ばコメントして、スルーします)
# バーチャルユーザーがファイルアップロードする事を許可する
anon_upload_enable=YES
# バーチャルユーザーが新規にディレクトリを作成する事を許可する
anon_mkdir_write_enable=YES
# バーチャルユーザーがファイル名の変更やファイル削除をする事を許可する
anon_other_write_enable=YES
# World Readableなファイルのみをダウンロードできるというオプションを無効にする
anon_world_readable_only=NO
# バーチャルユーザー用のumask
anon_umask=002
# バーチャルユーザーをマッピングしたOSユーザーと同等の権限にする
virtual_use_local_privs=YES
(これを記述しないと、FTPでアップロードしたファイルに鍵のマークが付きます)
# listens on this port for incoming FTP connections
listen_port=60021 (ポート60021でFTPクライアントと接続します)
さて、ユーザーの作成です。
タスクバーに止めたユーザーとグループをクリックして起動します。
左下の追加をクリック
名前を先ほど入れた vsftpd.user_list と同じユーザーを作成します。
yamada(これは管理者なので予め作成されています)
yamamoto(これを作成)
saitou(これを作成)
takahashi(これを作成)
例
新しいユーザーを作成します。に yamamoto と入力します。 そしてOKを押します。
次にパスワードを入力します。 例 123456 これがyamamotoのパスワードになりますので覚えておいてください。
次々 sautou takahashi とユーザー名とパスワードを作成していきます。
これらを保存して、閉じます。
ここまで来たら、vsftpdを再起動します。
$ sudo service vsftpd restart
(自動マウントにした人は、設定をよく確認して、PCを再起動してください)
$ sudo reboot (再起動)
FTPクライアントの設定
とりあえず、ローカルで接続してみてください。Ubuntu同士なら、FW設定が無いので、接続できるはずですが、接続できない場合FWや、SSLポートの可能性があります。
SSLポートは通常990ですが、普通はポートを開けなくても良いはずです。また、
# the minimum port to allocate for PASV style data connections
pasv_min_port=62222
# the maximum port to allocate for PASV style data connections
pasv_max_port=62223
を設定していますので、このポートを開けることで、外からの接続が出来るようになると思います
もちろん、60021のポートも開けることを忘れずに
この鯖に接続できる人は、 yamada yamamoto saitou takahashi の4人です(追記すればもっと接続できます)
FileZilla
のように設定して接続します。
これで、うまく接続できたら終わりです。
【このカテゴリーの最新記事】
-
no image
-
-
no image
-
-
no image
-
-
-
no image
-
no image
-
no image