新規記事の投稿を行うことで、非表示にすることが可能です。
2014年05月25日
MOZCのカーソル部のポップを消す方法 Ubuntu14.04
MOZCのカーソル部のポップを消す方法 Ubuntu14.04
Ubuntu14.04で標準になったMOZCの文字入力がやりにくいので、カーソル部に表示されるポップを消す方法を記してみる。
端末で、 ibus-setup エンター
iBusの設定で、全般、プロパティパネルの表示、 表示しないに設定
以上でポップが消えます
Ubuntu14.04で標準になったMOZCの文字入力がやりにくいので、カーソル部に表示されるポップを消す方法を記してみる。
端末で、 ibus-setup エンター
iBusの設定で、全般、プロパティパネルの表示、 表示しないに設定
以上でポップが消えます
2014年05月19日
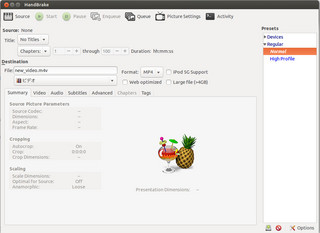
Ubuntu handbrake を インストール
handbrakeはあらゆる、動画をMP4に変換してくれるソフトです。
Ubuntu に handbrake をインストール
Installing handbrake in Ubuntu 13.10
ファイル置き場
https://launchpad.net/~stebbins/+archive/ubuntu/handbrake-releases/+packages
handbrakeのアドレスの取得とダウンロード
以下の文字列を端末に貼り付けて、エンター(実行)
wget https://launchpad.net/~stebbins/+archive/handbrake-releases/+build/4589165/+files/handbrake-gtk_0.9.9ppa1~raring1_amd64.deb
以下コマンドラインから入力
sudo dpkg -i handbrake-gtk_0.9.9ppa1~raring1_*.deb
sudo apt-get -f install
ここまでで、インストールが終わり
以下、不要なファイルの除去
sudo apt-get autoremove kde-l10n-ja
これで、64Bitの handbrake が使用可能になる。
タグ:handbrake
UbuntuでDVDを鑑賞する
その1
UbuntuでDVDを再生出来るようにする。
Installing libdvdcss in Ubuntu 13.10
標準のgeditで、sources.listを開く
sudo gedit -w /etc/apt/sources.list
sources.listの末尾に以下の文字をコピーして保存
deb ftp://ftp.videolan.org/pub/debian/stable ./
libdvdcssのアドレスの取得とダウンロード
wget ftp://ftp.videolan.org/pub/debian/videolan-apt.asc
以下を端末にコピーして実行する
sudo apt-key add videolan-apt.asc
sudo apt-get update
sudo apt-get install libdvdcss2
もしくは
$ sudo /usr/share/doc/libdvdread4/install-css.sh
以上でUbuntuにlibdvdcssのインストールが終了
その2
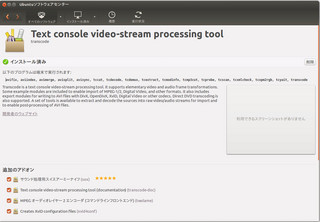
Ubuntuに transcode をインストールする。
Ubuntuのソフトウェアセンターで transcode と入力して検索
以上
タグ:Ubuntu DVD
2014年05月13日
Ubuntu からの HDDの引っ越し
Ubuntu からの HDDの引っ越し
Ubuntu単体でもできるのですが、ディスクを調べたり・・・コピーするまで準備が大変なので、簡単な方法を選択して実行することにします。
まず用意するもの EaseUS Disk Copy Home Edition (All operating systems)
EaseUS Disk Copy
1,コピー元のHDDとコピー先のHDDをそれぞれ同じPCに接続します。
2,EaseUS Disk Copy Home Editionをドライブに入れてDVD/CDドライブから起動します。
3,Disk Copy 又は Partition Copyのどちらかを選択します。
今回は、HDDのコピーなので Disk Copyを選びます。
4、コピー元のHDDを選んでクリック、Nextをクリック
5,コピー先のHDDを選んでクリック、Nextをクリック
6,コピー先のHDDのデータが全て消えますのウィンドゥが出てくるので、Yesをクリック
7,コピーが開始されます。
8、終わったらQuitを押して終了です。
これで、HDDのクローンが完了しました。

パーテーションの変更と移動
1、UbuntuのインストールCDを用意します。それをドライブに入れてDVD/CDドライブから起動します。
2,お試し起動で(インストールせずに起動)Ubuntuを起動します。
3,Gpertedパーテーション編集ツールを検索して、起動します。(標準でインストールされています)
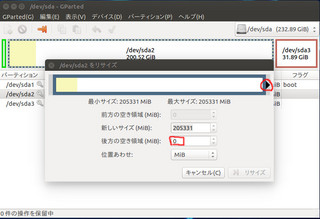
Ubuntuの場合 後方に/dev/sda3(約30GB)のパーテションがありますのでこれを先ず移動します。
4,パーテーションを移動したいディスクをクリックで選択して、パーテーション>リサイズ/移動>後方の空き領域を0
にして、パーテーションをクリップして後方に移動します。
5、次にデーターが入っているパーテーションのサイズを変更します。
6,パーテーションを移動したいディスクをクリックで選択して、パーテーション>リサイズ/移動>後方の空き領域を0
にして、青いパーテーションの端をクリップして左にスライドするとパーテーションの拡張ができます。
7.以上の用に準備が整ったら、編集>保留中のすベての操作を適用する をクリックして完了させます。
8,おわったら、再起動して、コピーしたHDDで起動します これで終わりです。
追加
私の場合Ubuntuのインストールディスクが正常に起動しなかったので、コピー元のHDDで起動して、そこからパーテーションを変更しました。
参考にさせて頂いたサイト様
http://kikuchisan.net/sotec/

Ubuntu単体でもできるのですが、ディスクを調べたり・・・コピーするまで準備が大変なので、簡単な方法を選択して実行することにします。
まず用意するもの EaseUS Disk Copy Home Edition (All operating systems)
EaseUS Disk Copy
1,コピー元のHDDとコピー先のHDDをそれぞれ同じPCに接続します。
2,EaseUS Disk Copy Home Editionをドライブに入れてDVD/CDドライブから起動します。
3,Disk Copy 又は Partition Copyのどちらかを選択します。
今回は、HDDのコピーなので Disk Copyを選びます。
4、コピー元のHDDを選んでクリック、Nextをクリック
5,コピー先のHDDを選んでクリック、Nextをクリック
6,コピー先のHDDのデータが全て消えますのウィンドゥが出てくるので、Yesをクリック
7,コピーが開始されます。
8、終わったらQuitを押して終了です。
これで、HDDのクローンが完了しました。

パーテーションの変更と移動
1、UbuntuのインストールCDを用意します。それをドライブに入れてDVD/CDドライブから起動します。
2,お試し起動で(インストールせずに起動)Ubuntuを起動します。
3,Gpertedパーテーション編集ツールを検索して、起動します。(標準でインストールされています)
Ubuntuの場合 後方に/dev/sda3(約30GB)のパーテションがありますのでこれを先ず移動します。
4,パーテーションを移動したいディスクをクリックで選択して、パーテーション>リサイズ/移動>後方の空き領域を0
にして、パーテーションをクリップして後方に移動します。
5、次にデーターが入っているパーテーションのサイズを変更します。
6,パーテーションを移動したいディスクをクリックで選択して、パーテーション>リサイズ/移動>後方の空き領域を0
にして、青いパーテーションの端をクリップして左にスライドするとパーテーションの拡張ができます。
7.以上の用に準備が整ったら、編集>保留中のすベての操作を適用する をクリックして完了させます。
8,おわったら、再起動して、コピーしたHDDで起動します これで終わりです。
追加
私の場合Ubuntuのインストールディスクが正常に起動しなかったので、コピー元のHDDで起動して、そこからパーテーションを変更しました。
参考にさせて頂いたサイト様
http://kikuchisan.net/sotec/
 |
新品価格 |
タグ:HDDクローンの作成
2014年05月12日
Ubuntu に FTPSサーバー を立てる!
Ubuntu に FTPSサーバー を立てる!
検証 Ubuntu14.04
基本的にFTPなのですが、標準で証明書を持っているらしいので、それを使ってSSLを使ったFTPSにします。
色々大変なのですが、そこのところは端折って行きます。
とりあえず、これがないと始まらないので vsftpd を Ubuntuにインストールします。
端末を立ち上げて以下のように入力します。
sudo apt-get install vsftpd
インストールが終わったら、vsftpd.confを端末から開いて中身を弄ります。
sudo gedit /etc/vsftpd.conf
解説
sudo(一時的にrootで開く) gedit(標準のテキストエディタ) /etc/vsftpd.conf(開くファイルの場所とファイル名)
開いたら、以下のように修正します。
----------------------------------------------------------------------------------------------
# Example config file /etc/vsftpd.conf
#
# The default compiled in settings are fairly paranoid. This sample file
# loosens things up a bit, to make the ftp daemon more usable.
# Please see vsftpd.conf.5 for all compiled in defaults.
#
# READ THIS: This example file is NOT an exhaustive list of vsftpd options.
# Please read the vsftpd.conf.5 manual page to get a full idea of vsftpd's
# capabilities.
#
#
# Run standalone? vsftpd can run either from an inetd or as a standalone
# daemon started from an initscript.
listen=YES
#
# Run standalone with IPv6?
# Like the listen parameter, except vsftpd will listen on an IPv6 socket
# instead of an IPv4 one. This parameter and the listen parameter are mutually
# exclusive.
#listen_ipv6=YES
#
# Allow anonymous FTP? (Disabled by default)
anonymous_enable=NO
#
# Uncomment this to allow local users to log in.
local_enable=YES
#
# Uncomment this to enable any form of FTP write command.
write_enable=YES
#
# Default umask for local users is 077. You may wish to change this to 022,
# if your users expect that (022 is used by most other ftpd's)
local_umask=022
#
# Uncomment this to allow the anonymous FTP user to upload files. This only
# has an effect if the above global write enable is activated. Also, you will
# obviously need to create a directory writable by the FTP user.
#anon_upload_enable=YES
#
# Uncomment this if you want the anonymous FTP user to be able to create
# new directories.
#anon_mkdir_write_enable=YES
#
# Activate directory messages - messages given to remote users when they
# go into a certain directory.
dirmessage_enable=YES
#
# If enabled, vsftpd will display directory listings with the time
# in your local time zone. The default is to display GMT. The
# times returned by the MDTM FTP command are also affected by this
# option.
use_localtime=YES
#
# Activate logging of uploads/downloads.
xferlog_enable=YES
#
# Make sure PORT transfer connections originate from port 20 (ftp-data).
connect_from_port_20=YES
#
# If you want, you can arrange for uploaded anonymous files to be owned by
# a different user. Note! Using "root" for uploaded files is not
# recommended!
#chown_uploads=YES
#chown_username=whoever
#
# You may override where the log file goes if you like. The default is shown
# below.
#xferlog_file=/var/log/vsftpd.log
#
# If you want, you can have your log file in standard ftpd xferlog format.
# Note that the default log file location is /var/log/xferlog in this case.
#xferlog_std_format=YES
#
# You may change the default value for timing out an idle session.
#idle_session_timeout=600
#
# You may change the default value for timing out a data connection.
#data_connection_timeout=120
#
# It is recommended that you define on your system a unique user which the
# ftp server can use as a totally isolated and unprivileged user.
#nopriv_user=ftpsecure
#
# Enable this and the server will recognise asynchronous ABOR requests. Not
# recommended for security (the code is non-trivial). Not enabling it,
# however, may confuse older FTP clients.
#async_abor_enable=YES
#
# By default the server will pretend to allow ASCII mode but in fact ignore
# the request. Turn on the below options to have the server actually do ASCII
# mangling on files when in ASCII mode.
# Beware that on some FTP servers, ASCII support allows a denial of service
# attack (DoS) via the command "SIZE /big/file" in ASCII mode. vsftpd
# predicted this attack and has always been safe, reporting the size of the
# raw file.
# ASCII mangling is a horrible feature of the protocol.
#ascii_upload_enable=YES
#ascii_download_enable=YES
#
# You may fully customise the login banner string:
#ftpd_banner=Welcome to blah FTP service.
#
# You may specify a file of disallowed anonymous e-mail addresses. Apparently
# useful for combatting certain DoS attacks.
#deny_email_enable=YES
# (default follows)
#banned_email_file=/etc/vsftpd.banned_emails
#
# You may restrict local users to their home directories. See the FAQ for
# the possible risks in this before using chroot_local_user or
# chroot_list_enable below.
#chroot_local_user=YES
#
# You may specify an explicit list of local users to chroot() to their home
# directory. If chroot_local_user is YES, then this list becomes a list of
# users to NOT chroot().
# (Warning! chroot'ing can be very dangerous. If using chroot, make sure that
# the user does not have write access to the top level directory within the
# chroot)
#chroot_local_user=YES
#chroot_list_enable=YES
# (default follows)
#chroot_list_file=/etc/vsftpd.chroot_list
#
# You may activate the "-R" option to the builtin ls. This is disabled by
# default to avoid remote users being able to cause excessive I/O on large
# sites. However, some broken FTP clients such as "ncftp" and "mirror" assume
# the presence of the "-R" option, so there is a strong case for enabling it.
#ls_recurse_enable=YES
#
# Customization
#
# Some of vsftpd's settings don't fit the filesystem layout by
# default.
#
# This option should be the name of a directory which is empty. Also, the
# directory should not be writable by the ftp user. This directory is used
# as a secure chroot() jail at times vsftpd does not require filesystem
# access.
secure_chroot_dir=/var/run/vsftpd/empty
#
# This string is the name of the PAM service vsftpd will use.
pam_service_name=vsftpd
#
# This option specifies the location of the RSA certificate to use for SSL
ssl_enable=YES
# encrypted connections.
rsa_cert_file=/etc/ssl/certs/ssl-cert-snakeoil.pem
# This option specifies the location of the RSA key to use for SSL
# encrypted connections.
rsa_private_key_file=/etc/ssl/private/ssl-cert-snakeoil.key
#
# FileZillaClient対応
ssl_ciphers=HIGH
#
# AndFTP対応
require_ssl_reuse=NO
ssl_ciphers=HIGH
-----------------------------------------------------------------------------------------
詳しくはこちらを参考にしました
http://www005.upp.so-net.ne.jp/develop-tom/deb/vsftpd-deb.html
ざっとこんな感じです。
FileZillaでエラーを吐くので、その部分も修正してあります。・・・修正が終わったら、保存してください。
これで、証明書付きのFTPSサーバの設定が出来上がりましたので、端末からサーバーを起動します。
sudo restart vsftpd
これで終わりなのですが、問題は、ログインするときの ユーザー名 と パスワード になると思います。
ユーザー名はPCに登録したユーザー名 パスワードはそのユーザーのパスワードがそのまま使えますが、そのままでは危険があるので、
制限を持つ一般ユーザーを新たに作ります。これでFTPでログインします。
参考にさせていただいた所(一般ユーザーの作成)
http://naka7772.blog.fc2.com/blog-entry-230.html
確認方法
Ubuntuのシステム設定からユーザーアカウントで、現在のアカウント名が表示されます。これがユーザー名になります。
そして、そのパスワードが、FTPのパスワードになります。
それでは接続して確認してください。 ローカルアドレス ポート21 ログイン方法 通常
メモ
vsftpdのリスタート
sudo restart vsftpd
停止
sudo stop vsftpd
開始
sudo start vsftpd
 |
Samsung SSD840EVO ベーシックキット250GB MZ-7TE250B/IT (国内正規代理店 ITGマーケティング取扱い品) 新品価格 |
タグ:Ubuntu


