2018年07月09日
《その426》Contentプロパティ
Contentプロパティ
Button要素や Label要素など、Contentプロパティを持つ要素の場合、その Contentプロパティに任意の型の子要素を設定することができます。
<Button>
<Button.Content>
<TextBlock Text="あいうえお"/>
</Button.Content>
</Button>
この例の場合であれば、<Button.Content>タグを省略して、
<Button>
<TextBlock Text="あいうえお"/>
</Button>
のように記述することもできます。
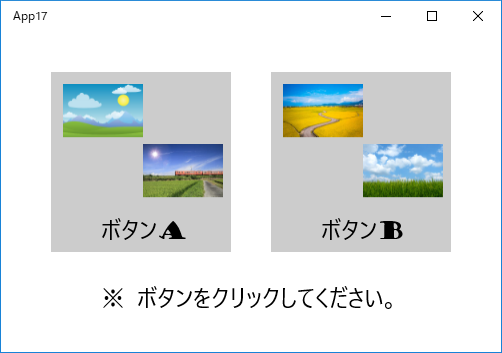
また、パネル要素を使用することで、複数の子要素を設定することも可能です。
例えば、下記の MainPage.xaml にあるコード、
<Button x:Name="button2" HorizontalAlignment="Left"
Margin="270,40,0,0" VerticalAlignment="Top" Height="180"
Width="180" Padding="0" Click="button2_Click">
<StackPanel Height="180" Width="180">
<Image x:Name="image01" HorizontalAlignment="Left" Height="60"
Margin="10,10,0,0" VerticalAlignment="Top" Width="80"
Source="pic01.jpg"/>
<Image x:Name="image04" HorizontalAlignment="Left" Height="60"
Margin="90,0,0,0" VerticalAlignment="Top" Width="80"
Source="pic04.jpg"/>
<TextBlock x:Name="textBlock2" HorizontalAlignment="Left"
Margin="48,10,0,0" Text="ボタンB" TextWrapping="Wrap"
VerticalAlignment="Top"
FontFamily="Goudy Stout" FontSize="24"/>
</StackPanel>
</Button>
においては、
<Button>
<StackPanel>
<Image/>
<Image/>
<TextBlock/>
</StackPanel>
</Button>
の形で、Button要素に 3つの子要素を持たせています。
今回のアプリの開始画面です。

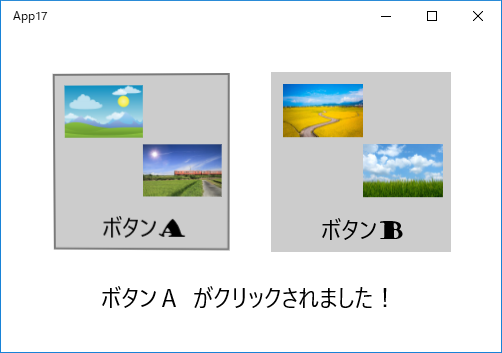
ボタンA をクリックしました。

以下は、MainPage.xaml のコードです。
<Page
    x:Class="App17.MainPage"
    xmlns="http://schemas.microsoft.com/winfx/2006/xaml/presentation"
    xmlns:x="http://schemas.microsoft.com/winfx/2006/xaml"
    xmlns:local="using:App17"
    xmlns:d="http://schemas.microsoft.com/expression/blend/2008"
    xmlns:mc="http://schemas.openxmlformats.org/markup-compatibility/2006"
    mc:Ignorable="d">

    <Grid Background="{ThemeResource ApplicationPageBackgroundThemeBrush}">
        <Button x:Name="button1" HorizontalAlignment="Left"
                    Margin="50,40,0,0" VerticalAlignment="Top" Height="180"
                    Width="180" Padding="0" Click="button1_Click">
            <StackPanel Height="180" Width="180">
                <Image x:Name="image1" HorizontalAlignment="Left" Height="60"
                       Margin="10,10,0,0" VerticalAlignment="Top" Width="80"
                       Source="pic02.jpg"/>
                <Image x:Name="image2" HorizontalAlignment="Left" Height="60"
                       Margin="90,0,0,0" VerticalAlignment="Top" Width="80"
                       Source="pic03.jpg"/>
                <TextBlock x:Name="textBlock1" HorizontalAlignment="Left"
                       Margin="48,10,0,0" Text="ボタンA" TextWrapping="Wrap"
                       VerticalAlignment="Top"
                       FontFamily="Goudy Stout" FontSize="24"/>
            </StackPanel>
        </Button>

        <Button x:Name="button2" HorizontalAlignment="Left"
                    Margin="270,40,0,0" VerticalAlignment="Top" Height="180"
                    Width="180" Padding="0" Click="button2_Click">
            <StackPanel Height="180" Width="180">
                <Image x:Name="image01" HorizontalAlignment="Left" Height="60"
                       Margin="10,10,0,0" VerticalAlignment="Top" Width="80"
                       Source="pic01.jpg"/>
                <Image x:Name="image04" HorizontalAlignment="Left" Height="60"
                       Margin="90,0,0,0" VerticalAlignment="Top" Width="80"
                       Source="pic04.jpg"/>
                <TextBlock x:Name="textBlock2" HorizontalAlignment="Left"
                       Margin="48,10,0,0" Text="ボタンB" TextWrapping="Wrap"
                       VerticalAlignment="Top"
                       FontFamily="Goudy Stout" FontSize="24"/>
            </StackPanel>
        </Button>

        <TextBlock x:Name="textBlock3" HorizontalAlignment="Left"
                   Margin="100,250,0,0"
                   Text="※ ボタンをクリックしてください。"
                   TextWrapping="Wrap" VerticalAlignment="Top"
                   FontFamily="Goudy Stout" FontSize="24"/>

    </Grid>
</Page>
以下は、MainPage.xaml.cpp のコードです。
//
// MainPage.xaml.cpp
// MainPage クラスの実装。
//

#include "pch.h"
#include "MainPage.xaml.h"

using namespace App17;

using namespace Platform;
using namespace Windows::Foundation;
using namespace Windows::Foundation::Collections;
using namespace Windows::UI::Xaml;
using namespace Windows::UI::Xaml::Controls;
using namespace Windows::UI::Xaml::Controls::Primitives;
using namespace Windows::UI::Xaml::Data;
using namespace Windows::UI::Xaml::Input;
using namespace Windows::UI::Xaml::Media;
using namespace Windows::UI::Xaml::Navigation;
using namespace Platform;


MainPage::MainPage()
{
    InitializeComponent();
}


void App17::MainPage::button1_Click(Object^ sender, RoutedEventArgs^ e)
{
    textBlock3->Text = "ボタンA がクリックされました!";
}


void App17::MainPage::button2_Click(Object^ sender, RoutedEventArgs^ e)
{
    textBlock3->Text = "ボタンB がクリックされました!";
}
この記事へのコメント
コメントを書く
この記事へのトラックバックURL
https://fanblogs.jp/tb/7877067
※ブログオーナーが承認したトラックバックのみ表示されます。
この記事へのトラックバック

