新規記事の投稿を行うことで、非表示にすることが可能です。
2018年06月19日
《その407》タスクの起動・タスクの返却値
タスクの起動・タスクの返却値
【タスクの起動】
create_task関数を使ってタスク task1 を生成します。
auto task1 = create_task([] { cout << 1000 << '\n'; });
タスク task1 は、、
task1.then([]{ });
あるいは
task1.wait();
などのコードを記述することで 確実に実行されます。
【タスクの返却値】
ラムダ式が値を返却するように変更してみます。
auto task1 = create_task([] { return 1000; });
返却される値は、
task1.then([](int n){ cout << n << '\n'; });
あるいは
cout << task1.get() << '\n';
のようにして確認できます。
このことから、継続タスクの仮引数 int n が、task1 のラムダ式の返却値を受け取っていることがわかります。
また、task1.get() により、タスクオブジェクト task1 から ラムダ式の返却値を取り出すことができることもわかります。
#include <ppltasks.h>
#include <iostream>

using namespace concurrency;
using namespace std;

int main()
{
    auto task1 = create_task([] { return 1000; });

    cout << task1.get() << '\n';
//  task1.then([](int n) { cout << n << '\n'; });
//                               としても同様です。
}

2018年06月18日
《その406》create_task関数
create_task関数
create_task関数は、PPL_taskオブジェクトを作成します(PPL : Parallel Patterns Library)。
そして、この非同期処理の完了時に、task::then関数を用いて継続処理を行わせることができます。
プログラムでは、
auto task_start = create_task( ・・・・・・ );
として、最初の task を 定義しています。
次いで、
auto task_continuation_1 = task_start.then( ・・・・・・ );
auto task_continuation_2 = auto task_continuation_1.then( ・・・・・・ );
のようにして、task_start, task_continuation_1, task_continuation_2 を実行しています。
各task は連続実行されますが、それぞれの task の終了を、wait関数を用いて、
task_start.wait();
task_continuation_1.wait();
task_continuation_2.wait();
とすることにより、別個につかむこともできます。
以下はプログラムです。
#include <ppltasks.h>
#include <iostream>
using namespace concurrency;
using namespace std;
int main()
{
double a = 0;
double d = 0.000001;
int m = 30000;
int n = 40000;
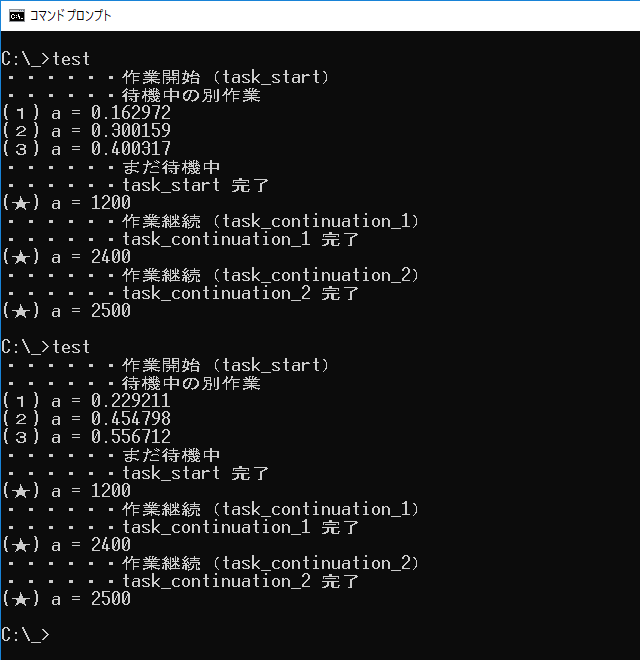
cout << "・・・・・・作業開始(task_start)\n";
auto task_start = create_task([&a, d, m, n]
{
for (int i = 0; i < m; i++)
for (int j = 0; j < n; j++)
a += d;
cout << "・・・・・・task_start 完了\n";
});
auto task_continuation_1 = task_start.then([&a, d, m, n]
{
cout << "・・・・・・作業継続(task_continuation_1)\n";
for (int i = 0; i < m; i++)
for (int j = 0; j < n; j++)
a += d;
cout << "・・・・・・task_continuation_1 完了\n";
});
auto task_continuation_2 = task_continuation_1.then([&a, d, m, n]
{
cout << "・・・・・・作業継続(task_continuation_2)\n";
for (int i = 0; i < n - m; i++)
for (int j = 0; j < n - m; j++)
a += d;
cout << "・・・・・・task_continuation_2 完了\n";
});
cout << "・・・・・・待機中の別作業\n";
cout << "(1) a = " << a << '\n';
cout << "(2) a = " << a << '\n';
cout << "(3) a = " << a << '\n';
cout << "・・・・・・まだ待機中\n";
task_start.wait();
cout << "(★) a = " << a << '\n';
task_continuation_1.wait();
cout << "(★) a = " << a << '\n';
task_continuation_2.wait();
cout << "(★) a = " << a << '\n';
}
以下はプログラム実行結果です(2回実行しました)。
2018年06月16日
《その405》async関数
async
std::async は、
・・・・・・
std::future<戻り値の型> val = async(std::launch::async,
[ ] { 戻り値を返す処理 }
);
・・・・・・
別の処理を実行
・・・・・・
std::cout << val.get();
の形で使います。
・std::async は、ポリシー std::launch::async の指定を受けて、関数を別スレッドで実行します。
・別スレッドで実行された関数の戻り値は、
val.get();
の形式で、get関数により取得できます。
※このとき、関数がまだ実行中であれば、待機します。
※また、この時点で join() されます。
以下はプログラムです。
#include <iostream>
#include <future>
int main() {
double a = 0;
double d = 0.000001;
int n = 50000;
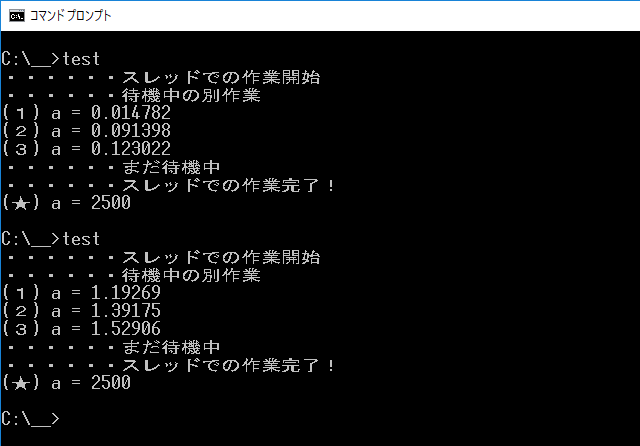
std::cout << "・・・・・・スレッドでの作業開始\n";
std::future<double> val = async(std::launch::async,
[&a, n, d] {
for (int i = 0; i < n; i++)
for (int j = 0; j < n; j++)
a += d;
std::cout << "・・・・・・スレッドでの作業完了!\n";
return a;
});
std::cout << "・・・・・・待機中の別作業\n";
std::cout << "(1) a = " << a << '\n';
std::cout << "(2) a = " << a << '\n';
std::cout << "(3) a = " << a << '\n';
std::cout << "・・・・・・まだ待機中\n";
std::cout << "(★) a = " << val.get() << '\n';
}
以下はプログラム実行結果です(2回実行しました)。
《その404》ラムダ式の参照キャプチャ
ラムダ式の参照キャプチャ
キャプチャリストの変数を参照にすることで、ラムダ式の中から外部の変数にアクセスできるようになります。
下記のプログラムのラムダ式は、
[&a, n, d] { ・・・・・・ }
となっていますから、ラムダ式の中から、外部の変数 a を操作できます。
スレッドによる並行処理
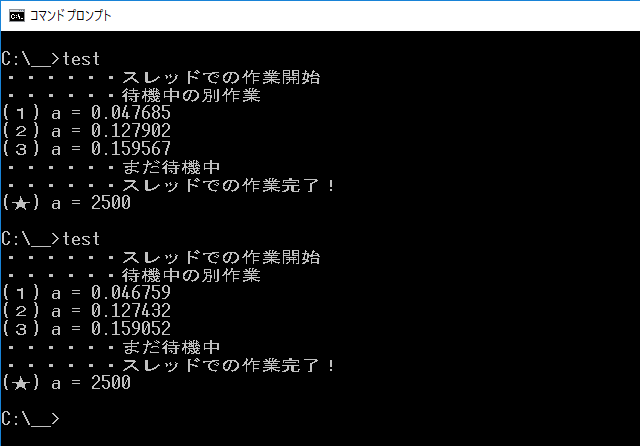
スレッドによる並行処理の様子を実感したいと思い、単純すぎるとは思いますが、下記のようなプログラムを作りました。
プログラムでは、0.000001 を 50000 × 50000 回 足し算します。
計算に少し時間がかかるので、この計算をスレッド th に任せることにして、プログラムは a の値を3回出力します。
スレッド th での計算が並行して行なわれているため、a の値は、取得するたびに増加しています。
スレッド th での処理に時間がかかるので、
th.join();
として、処理終了まで待機します。
最後に、待機後の a の値を取得して表示します。
以下はプログラムです。
#include <iostream>
#include <thread>
using namespace std;

int main() {
    double a = 0;
    int n = 50000;
    double d = 0.000001;

    cout << "・・・・・・スレッドでの作業開始\n";
    auto th = thread([&a, n, d] {
        for (int i = 0; i < n; i++)
            for (int j = 0; j < n; j++)
                a += d;
        cout << "・・・・・・スレッドでの作業完了!\n";
    });

    cout << "・・・・・・待機中の別作業\n";
    cout << "(1) a = " << a << '\n';
    cout << "(2) a = " << a << '\n';
    cout << "(3) a = " << a << '\n';
    cout << "・・・・・・まだ待機中\n";

    th.join();
    cout << "(★) a = " << a << '\n';
}
以下はプログラム実行結果です(2回実行しました)。
2018年06月15日
《その403》thread の引数としての 関数およびラムダ式
thread の引数としての 関数およびラムダ式
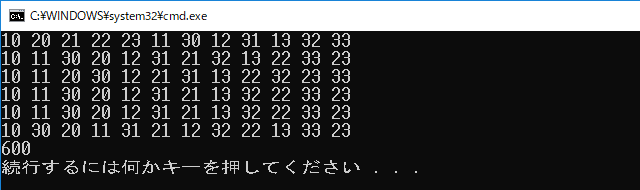
下記のプログラムにおいて、
★1. スレッド th1 の受け取る引数は func, a, n の3つです。
この場合、func が関数なので、 func, a, n の並びは func(a, n) と同じ効果をもちます。
★2. スレッド th2 の受け取る引数は ラムダ式です。
キャプチャリスト [ ]内に b, n を指定しています。
※外部の変数 b, n のコピーが作られ、ラムダ式の内部で使えるようになります。
ラムダ式
ラムダ式は、基本的には、
[キャプチャリスト](パラメータリスト){ 関数本体 }()
の形をしています。
このうち、パラメータリストは省略が可能です。
また、最後の () はこのラムダ式の呼び出しです。その場でラムダ式を実行させたいときに記述し、パラメータリストに渡す引数を この中に記入できます。
下記のプログラムの最後に、参考用のラムダ式
[&a, &b, &c](int k) {
cout << (a + b + c) * k << '\n';
}(10);
を加えてあります。
キャプチャリストが &a, &b, &c となっているので、各変数のコピーではなく、変数 a, b, c を参照してラムダ式内部で利用します。
ラムダ式は、引数 10 で呼び出されますから、これを k が受け取って処理が行われます。
以下はプログラムです。
#include <iostream>
#include <thread>
#include <string>
using namespace std;

void func(int a, int n) {
    for (int i = 0; i < n; i++)
        cout << to_string(a + i) + ' ';
}

int main() {
    int a = 10;
    int b = 20;
    int c = 30;
    int n = 4;

    // 6回繰り返します。
    int loop = 6; while (loop--) {

        // ★1. 整数 10, 11, 12, 13 を順に出力します。
        thread th1 = thread(func, a, n);

        // ★2. 整数 20, 21, 22, 23 を順に出力します。
        thread th2 = thread([b, n]() {
            for (int i = 0; i < n; i++)
                cout << to_string(b + i) + ' ';
        });

        // ★3. 整数 30, 31, 32, 33 を順に出力します。
        for (int i = 0; i < n; i++) {
            cout << to_string(c + i) + ' ';
        }

        th1.join();
        th2.join();

        cout << '\n';
    }

    // 参考用のラムダ式
    [&a, &b, &c](int k) {
        cout << (a + b + c) * k << '\n';
    }(10);
}
2018年06月14日
《その402》マルチスレッド と mutexクラス
マルチスレッド と mutexクラス
例えば、スレッド th1 での cout による画面出力のコードを比較してみると、
前回《401》のプログラムでは、
cout << "th1 ・・・" + to_string(i + 1) + "回目\n";
となっていますから、一つにまとめられた文字列を一気に出力しています。
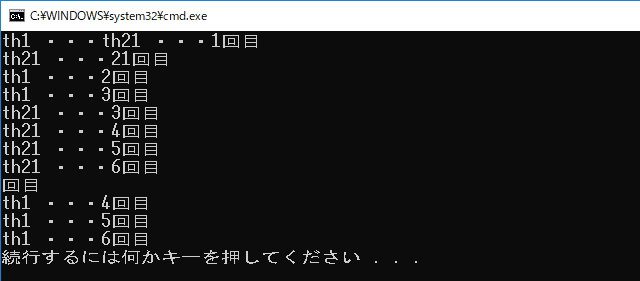
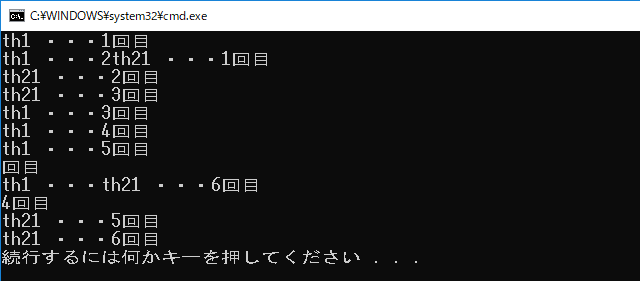
一方、今回は、、
cout << "th1 ・・・" << i + 1 << "回目\n";
と、"th1 ・・・", i + 1, "回目\n" の3回に分けて出力しています。
そのため、本来、この3回の出力は連続して実行されるべきなのに、
非同期並列処理では相手のスレッドの状況が考慮されないため、スレッド th2 からの出力が途中に割り込んでしまう可能性があります。
今回の例でも、実際、割り込みが起きて出力が乱れています。
cout は、2つのスレッドから同時に書き込まれることを想定していないのです。
次のプログラムの出力結果は、そのことを示しています。
以下は、プログラムと出力結果です。
#include <iostream>
#include <thread>
#include <string>

using namespace std;

int main() {
    thread th1 = thread([] {
        for (int i = 0; i < 6; i++) {
            cout << "th1 ・・・"
                 << i + 1 << "回目\n";
        }
    });

    thread th2 = thread([] {
        for (int i = 0; i < 6; i++) {
            cout << "th21 ・・・"
                 << i + 1 << "回目\n";
        }
    });

    th1.join();
    th2.join();
}
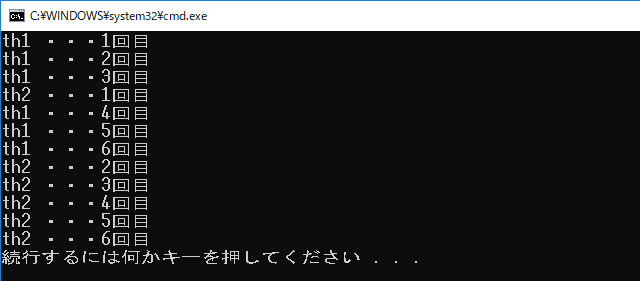
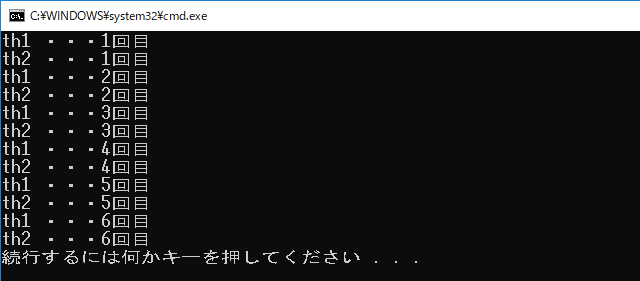
mutexクラスを用いて、この問題を解決することができます。
複数のスレッドから同じリソースを利用する際に、mutex の lock関数をを使うことでリソースの使用を制限することができます。
今回の例のような cout による文字出力で生じる問題を解決する手段の一つとして、
次のようにして cout を必要な期間だけ排他にします。
・mutexクラスオブジェクト mtx を作成します(オブジェクト名は任意)。
・lock関数で、一定期間 cout を排他にします。
mtx.lock();
cout << "th1 ・・・" << i + 1 << "回目\n";
・unlock関数で、ロックを解除します。
mtx.unlock();
このようにすることで、他のスレッドから邪魔されることなく、一連の出力を行うことが可能になります。
以下は、プログラムと出力結果です。
#include <iostream>
#include <thread>
#include <string>
#include <mutex>
using namespace std;

mutex mtx;

int main() {
    thread th1 = thread([] {
        for (int i = 0; i < 6; i++) {
            mtx.lock();
            cout << "th1 ・・・"
                 << i + 1 << "回目\n";
            mtx.unlock();
        }
    });

    thread th2 = thread([] {
        for (int i = 0; i < 6; i++) {
            mtx.lock();
            cout << "th2 ・・・"
                 << i + 1 << "回目\n";
            mtx.unlock();
        }
    });

    th1.join();
    th2.join();
}

《その401》スレッド(2)
スレッド(2)
下記のプログラムは、前回《400》のプログラムから、スレッド th1 の時間間隔のコード
for (int j = 0; j < 10000; j++) {
for (int k = 0; k < 10000; k++)
;
を取り除いたものです。
th1 の時間間隔のコードを省くと、ほぼ同じ動作をする2つのスレッドからの出力は、例えば、次のようになります。
プログラムの出力結果が一定していないのは、並列に動作している2つのスレッドが、相手のスレッドの状況とは無関係に、出力準備ができ次第出力するからです。


以下はプログラムです。
#include <iostream>
#include <thread>
#include <string>

using namespace std;

int main() {
    thread th1 = thread([] {
        for (int i = 0; i < 6; i++) {
            cout << "th1 ・・・" + to_string(i + 1) + "回目\n";
        }
    });

    thread th2 = thread([] {
        for (int i = 0; i < 6; i++) {
            cout << "th2 ・・・" + to_string(i + 1) + "回目\n";
        }
    });

    th1.join();
    th2.join();
}
《その400》スレッド(1)
スレッド (1)
私の場合、新版明解C++入門編と新版明解C++中級編で C++ を勉強しただけなので、非同期処理についての知識がありません。
例えば前回までのアプリに、
・CopyAsync や CreateFileAsync 等の非同期関数を create_task関数の引数に渡す。
・非同期関数からの返却値を、then関数が受け取って、ラムダ式が実行される。
というのがありますが、初めて見るコードでした。
意味的には理解できますが、非同期処理の基礎事項を少し確認しておきたい思いました。
というわけで、今回は、スレッドについてです。
下記のプログラムでは、2つのスレッドを並列的に実行しています。
スレッド th1 は、ある程度の時間間隔で
"th1 ・・・1回目"
"th1 ・・・2回目"
・・・・・・
"th1 ・・・6回目"
の6つの文字列を表示します。
スレッド th2 は、一気に
"th2 ・・・1回目"
"th2 ・・・2回目"
・・・・・・
"th2 ・・・6回目"
の6つの文字列を表示します。
したがって、スレッド th1 が
"th1 ・・・1回目"
を表示して次を表示するまでの間に、スレッド th2 の処理が完了してしまうことが予想されます。
下記プログラムの実行結果を見ると、確かにそのようになっています。
以下はプログラムです。
#include <iostream>
#include <thread>
#include <string>

using namespace std;

int main() {
    thread th1 = thread([] {
        for (int i = 0; i < 6; i++) {
            cout << "th1 ・・・" + to_string(i + 1) + "回目\n";
            for (int j = 0; j < 10000; j++) {
                for (int k = 0; k < 10000; k++)
                    ;
            }
        }
    });

    thread th2 = thread([] {
        for (int i = 0; i < 6; i++) {
            cout << "th2 ・・・" + to_string(i + 1) + "回目\n";
        }
    });

    // スレッド th1 の終了まで待機
    // (この記述が無いとエラーになります。)
    th1.join();

    // スレッド th2 の終了まで待機
    // (この記述が無いとエラーになります。)
    th2.join();
}

2018年06月12日
《その399》テキストファイルの編集・保存(2)
テキストファイルの編集・保存(2)
前回《398》のプログラムの、ファイル読込〜ファイル保存では、下記のような手順を踏んでいます。
ファイルの文字列が std::string型であるのに対して、
テキストボックスの文字列が Platform::String型なので、文字列型の変換が必要になります。
【ファイル読込の手順】
◆ CopyAsync関数を用いて、外部ファイルの std::string型文字列を内部ファイルにコピーします。
◆ 入力ストリームを利用して、内部ファイルの std::string型文字列を読み出します。
◆ 読み出した std::string型文字列を、Platform::String型に変換してテキストボックスに表示します。
【ファイルの編集】
◆ テキストボックス上で、ファイルを編集します。
【ファイル保存の手順】
◆ テキストボックス上の Platform::String型文字列を、std::string型に変換します。
◆ 出力ストリームを利用して、std::string型文字列を内部ファイルに書き込みます。
◆ CopyAsync関数を用いて、内部ファイルの std::string型文字列を外部ファイルにコピーします。
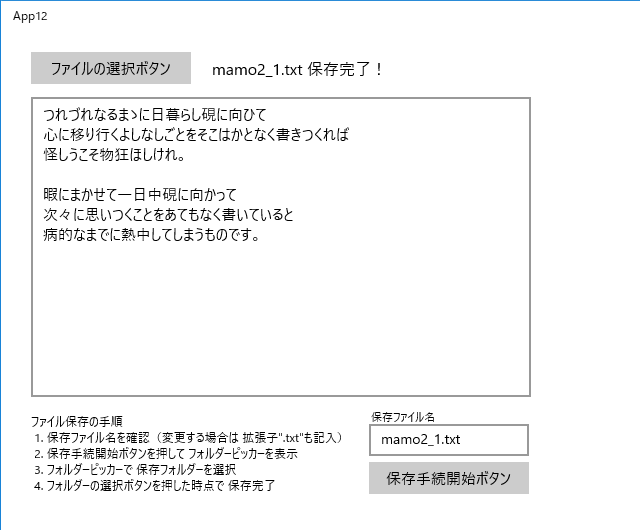
ファイル保存が完了したときに、「保存完了!」メッセージが表示されるように変更しました。
以下は、MainPage.xaml.cpp です。
using namespace Windows::Storage; 等を記述して、コードを少しだけスッキリさせました。
//
//
// MainPage.xaml.cpp
// MainPage クラスの実装。
//

#include "pch.h"
#include "MainPage.xaml.h"
#include <fstream>

using namespace App12;

using namespace Platform;
using namespace Windows::Foundation;
using namespace Windows::Foundation::Collections;
using namespace Windows::UI::Xaml;
using namespace Windows::UI::Xaml::Controls;
using namespace Windows::UI::Xaml::Controls::Primitives;
using namespace Windows::UI::Xaml::Data;
using namespace Windows::UI::Xaml::Input;
using namespace Windows::UI::Xaml::Media;
using namespace Windows::UI::Xaml::Navigation;

using namespace Windows::Storage;
using namespace Windows::Storage::Pickers;
using namespace concurrency;


MainPage::MainPage()
{
    InitializeComponent();

    textBlock2->Text = "ファイル保存の手順\n"
        " 1. 保存ファイル名を確認"
        "(変更する場合は 拡張子\".txt\"も記入)\n"
        " 2. 保存手続開始ボタンを押して フォルダーピッカーを表示\n"
        " 3. フォルダーピッカーで 保存フォルダーを選択\n"
        " 4. フォルダーの選択ボタンを押した時点で 保存完了";

    textBlock3->Text = "保存ファイル名\n";
}


void App12::MainPage::button_Click(Platform::Object^ sender, RoutedEventArgs^ e)
{
    //  FileOpenPicker の設定
    FileOpenPicker^ fP = ref new FileOpenPicker();
    fP->FileTypeFilter->Append(".txt");

    // ファイルピッカーを表示します。
    create_task(fP->PickSingleFileAsync()).then([this](StorageFile^ file)
    {
        // ファイルの選択に成功した場合
        if (file) {

            // 選択ファイル名
            Platform::String^ pickedFile = file->Name;

            // ローカルフォルダ localFolder
            StorageFolder^ localFolder = ApplicationData::Current->LocalFolder;

            // ローカルフォルダにファイルをコピーします。
            //     NameCollisionOption::ReplaceExisting の指定で、
            //     既存のファイルがある場合は 置き換えます。
            create_task(file->CopyAsync(localFolder, pickedFile,
                NameCollisionOption::ReplaceExisting))
                .then([this, pickedFile](StorageFile^ copiedFile)
            {
                // ファイルのコピーに成功した場合
                if (copiedFile) {

                    // コピーしたファイルへのパスを取得
                    String^ Path2 = copiedFile->Path;

                    // パスを wstring型に変換
                    std::wstring fP(Path2->Begin());

                    // 入力用ファイルストリーム in
                    std::ifstream in(fP);

                    // 入力用ファイルストリームから
                    //       string型文字列 str を取得します。
                    std::string str((std::istreambuf_iterator<char>(in)),
                        std::istreambuf_iterator<char>());

                    // MultiByteToWideChar関数を利用して、str を
                    //       wstring型文字列 wstr に変換します。
                    int size = MultiByteToWideChar(CP_ACP, 0, str.c_str(), -1, NULL, 0);
                    wchar_t* p = new wchar_t[size];
                    MultiByteToWideChar(CP_ACP, 0, str.c_str(), -1, p, size);
                    std::wstring wstr(p, p + size - 1);

                    // wstr を String^型文字列 p_str に変換します。
                    String^ p_str = ref new String(wstr.c_str());

                    // textBox->Tex に p_str を設定します。
                    textBox->Text = p_str;
                    textBlock->Text = "選択ファイル名 : " + pickedFile;
                    textBox2->Text = pickedFile;
                }
                else {
                    // ファイルのコピーに失敗した場合のエラー処理
                    // 省略してあります (;^ω^A
                }
            });
        }
        else {
            // ファイルの選択に失敗した場合のエラー処理
            // 省略してあります (;^ω^A
        }
    });
}


void App12::MainPage::button2_Click(Platform::Object^ sender, RoutedEventArgs^ e)
{
    // String^型の textBox->Text を、std::string型 str に変換します。
    std::wstring ws((textBox->Text)->Data());
    int size = WideCharToMultiByte(
        CP_ACP, 0, ws.c_str(), -1, (char *)NULL, 0, NULL, NULL);
    CHAR* p = new CHAR[size];
    WideCharToMultiByte(CP_ACP, 0, ws.c_str(), -1, p, size, NULL, NULL);
    std::string str(p, p + size - 1);
    delete[] p;

    // FolderPicker の設定
    FolderPicker^ folderPicker = ref new FolderPicker();
    folderPicker->SuggestedStartLocation = PickerLocationId::Desktop;
    folderPicker->FileTypeFilter->Append(".txt");

    // FolderPicker を表示します。
    create_task(folderPicker->PickSingleFolderAsync()).
        then([this, str](StorageFolder^ folder)
    {
        // フォルダ選択に成功した場合
        if (folder) {

            // ローカルフォルダ localFolder を取得します。
            StorageFolder^ localFolder = ApplicationData::Current->LocalFolder;

            // ローカルフォルダにファイルを作ります(名前は任意)。
            create_task(localFolder->CreateFileAsync(
                "abc.txt", CreationCollisionOption::ReplaceExisting))
                .then([this, str, folder](StorageFile^ samplefile)
            {
                // ローカルフォルダに作ったファイルへのパス
                auto path_abc = samplefile->Path;

                // パスを wstring型に変換
                std::wstring path_abc_wstr(path_abc->Begin());

                // 出力用ファイルストリーム out
                std::ofstream out(path_abc_wstr);

                // str をローカルファイルに書き込みます。
                out.write(str.c_str(), str.length());
                out.close();

                // 保存ファイル名
                String^ name = textBox2->Text;
                textBlock->Text = "";

                // ローカルフォルダ内のファイルを、出力先のファイルに
                //         コピーします(同名のファイルがあれば上書き)。
                create_task(samplefile->CopyAsync(
                    folder, name, NameCollisionOption::ReplaceExisting))
                    .then([this, name](StorageFile^ copiedFile)
                {
                    // ファイルのコピーに成功した場合
                    if (copiedFile) {
                        textBlock->Text = name + " 保存完了!";
                    }
                    else {
                        // ファイルのコピーに失敗した場合のエラー処理
                        // 省略してあります (;^ω^A
                    }
                });
            });
        }
        else {
            // フォルダ選択に失敗した場合のエラー処理
            // 省略してあります (;^ω^A
        }
    });
}
2018年06月11日
《その398》テキストファイルの編集・保存(1)
テキストファイルの編集・保存(1)
前回《397》のアプリに、編集・保存機能を追加しました。
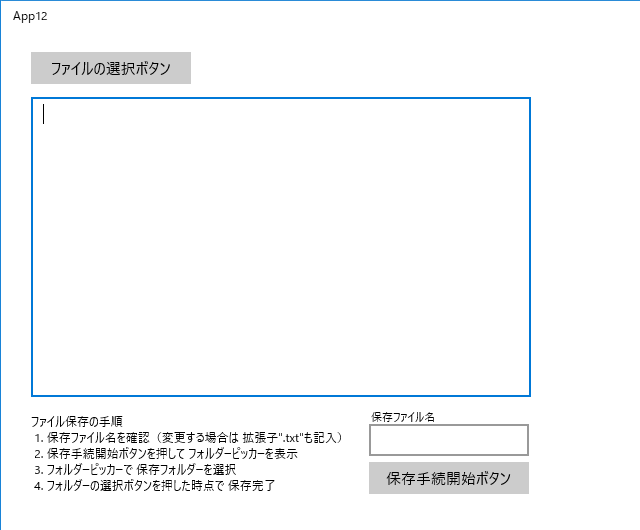
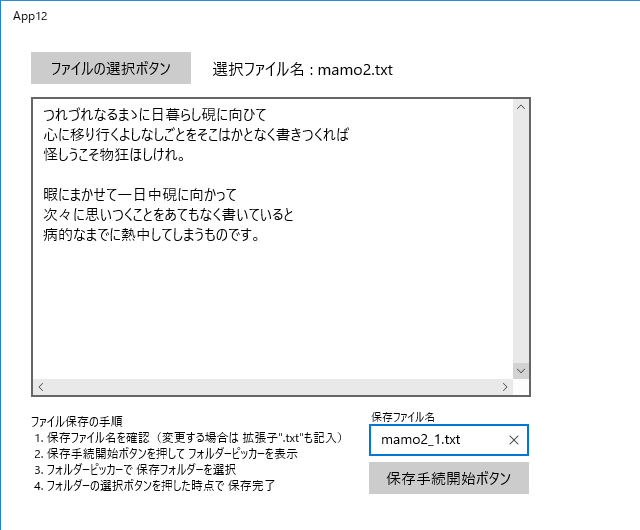
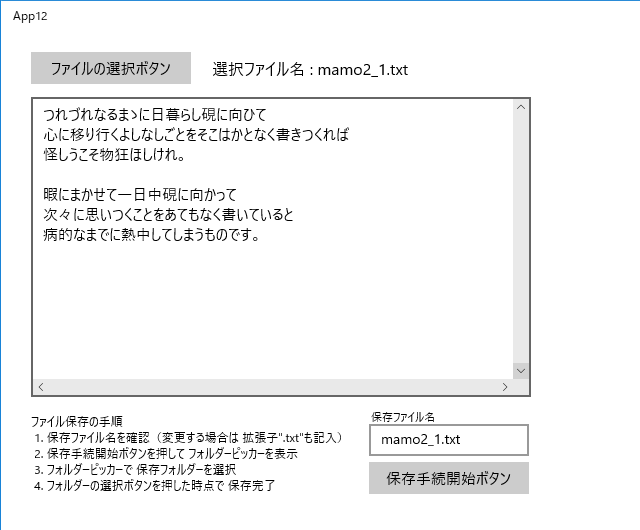
開始画面です。
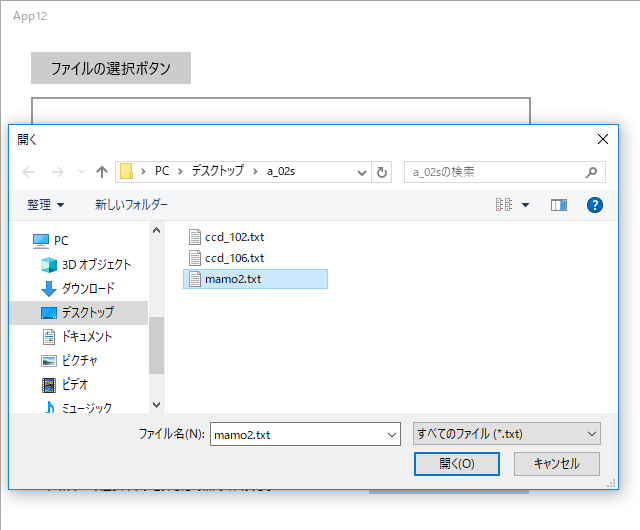
ファイルを選択します。
選択したファイルが表示されました。

テキストの編集が終了しました。
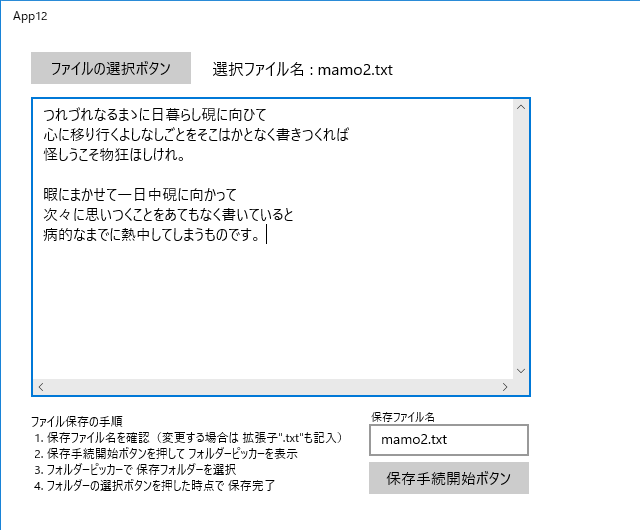
元のファイル名に"_1"を付けて 保存ファイル名としました。
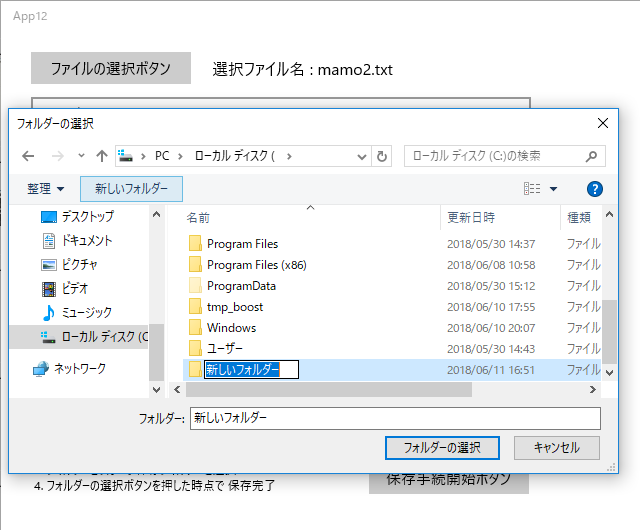
保存手続開始ボタンをクリックし フォルダーピッカーを表示。
保存先を"新しいフォルダー"にして、"フォルダーの選択"をクリックします。
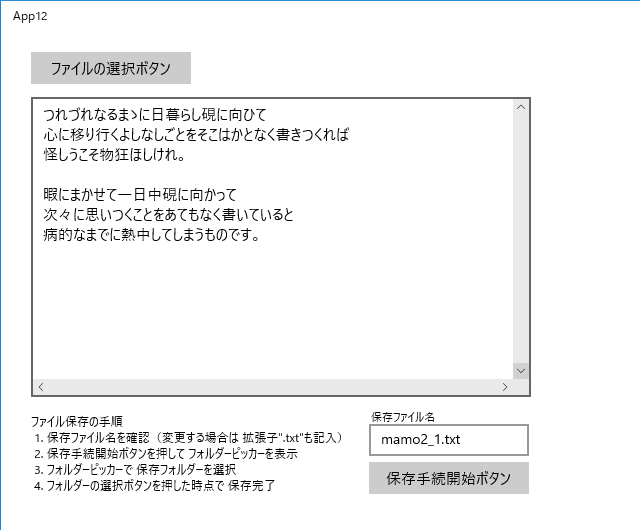
保存されました。
元のファイルを読み込んでみました。
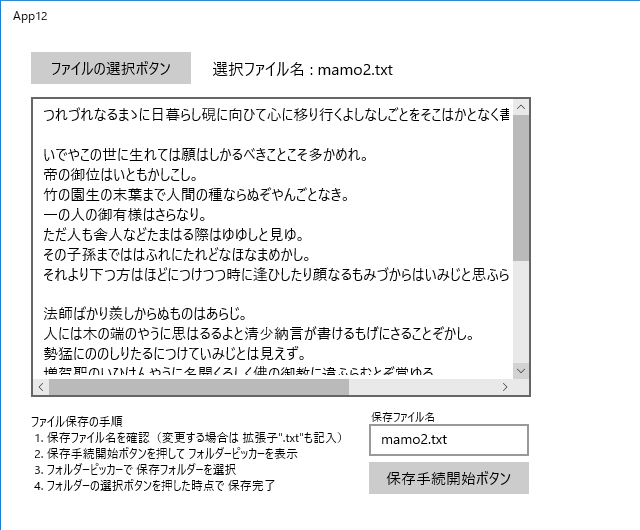
変更したファイルを読み込んでみました。
以下は、MainPage.xaml.cpp です。
//
//
// MainPage.xaml.cpp
// MainPage クラスの実装。
//

#include "pch.h"
#include "MainPage.xaml.h"
#include <fstream>

using namespace App12;

using namespace Platform;
using namespace Windows::Foundation;
using namespace Windows::Foundation::Collections;
using namespace Windows::UI::Xaml;
using namespace Windows::UI::Xaml::Controls;
using namespace Windows::UI::Xaml::Controls::Primitives;
using namespace Windows::UI::Xaml::Data;
using namespace Windows::UI::Xaml::Input;
using namespace Windows::UI::Xaml::Media;
using namespace Windows::UI::Xaml::Navigation;


MainPage::MainPage()
{
    InitializeComponent();

    textBlock2->Text = "ファイル保存の手順\n"
        " 1. 保存ファイル名を確認"
        "(変更する場合は 拡張子\".txt\"も記入)\n"
        " 2. 保存手続開始ボタンを押して フォルダーピッカーを表示\n"
        " 3. フォルダーピッカーで 保存フォルダーを選択\n"
        " 4. フォルダーの選択ボタンを押した時点で 保存完了";

    textBlock3->Text = "保存ファイル名\n";
}


void App12::MainPage::button_Click(Platform::Object^ sender,
    Windows::UI::Xaml::RoutedEventArgs^ e)
{
    //  FileOpenPickerクラスオブジェクト fp を作成します。
    Windows::Storage::Pickers::FileOpenPicker^ fP
        = ref new Windows::Storage::Pickers::FileOpenPicker();

    // 選択対象ファイルの拡張子を設定します。
    fP->FileTypeFilter->Append(".txt");

    //  ひとつのファイルを選択するための ファイルピッカーを表示します。
    concurrency::create_task(fP->PickSingleFileAsync())
        .then([this](Windows::Storage::StorageFile^ file)
    {
        // ファイルの選択に成功した場合
        if (file) {

            // pickedFile : 選択ファイル名
            Platform::String^ pickedFile = file->Name;

            // ローカルフォルダ localFolder
            Windows::Storage::StorageFolder^ localFolder
                = Windows::Storage::ApplicationData::Current->LocalFolder;

            // ローカルフォルダにファイルをコピーします。
            //     NameCollisionOption::ReplaceExisting の指定で、
            //     既存のファイルがある場合は 置き換えます。
            concurrency::create_task(file->CopyAsync(localFolder, pickedFile,
                Windows::Storage::NameCollisionOption::ReplaceExisting))
                .then([this, pickedFile](Windows::Storage::StorageFile^ copiedFile)
            {
                // ファイルのコピーに成功した場合
                if (copiedFile) {

                    // コピーしたファイルへのパスを取得します。
                    String^ Path2 = copiedFile->Path;

                    // パスを wstring型に変換
                    std::wstring fP(Path2->Begin());

                    // 入力用ファイルストリーム in
                    std::ifstream in(fP);

                    // 入力用ファイルストリームから
                    //       string型文字列 str を取得します。
                    std::string str((std::istreambuf_iterator<char>(in)),
                        std::istreambuf_iterator<char>());

                    // MultiByteToWideChar関数を利用して、str を
                    //       wstring型文字列 wstr に変換します。
                    int size = MultiByteToWideChar(
                        CP_ACP, 0, str.c_str(), -1, NULL, 0);
                    wchar_t* p = new wchar_t[size];
                    MultiByteToWideChar(CP_ACP, 0, str.c_str(), -1, p, size);
                    std::wstring wstr(p, p + size - 1);

                    // wstr を String^型文字列 p_str に変換します。
                    String^ p_str = ref new String(wstr.c_str());

                    // textBox->Tex に p_str を設定します。
                    textBox->Text = p_str;
                    textBlock->Text = "選択ファイル名 : " + pickedFile;
                    textBox2->Text = pickedFile;
                }

                // ファイルのコピーに失敗した場合
                else {
                    // エラー処理・・・省略してあります (;^ω^A
                }
            });
        }

        // ファイルの選択に失敗した場合
        else {
            // エラー処理・・・省略してあります (;^ω^A
        }
    });
}


void App12::MainPage::button2_Click(Platform::Object^ sender,
    Windows::UI::Xaml::RoutedEventArgs^ e)
{
    // String^型の textBox->Text を、std::string型 str に変換します。
    std::wstring ws((textBox->Text)->Data());
    int size = WideCharToMultiByte(
        CP_ACP, 0, ws.c_str(), -1, (char *)NULL, 0, NULL, NULL);
    CHAR* p = new CHAR[size];
    WideCharToMultiByte(CP_ACP, 0, ws.c_str(), -1, p, size, NULL, NULL);
    std::string str(p, p + size - 1);
    delete[] p;

    // FolderPicker の設定
    Windows::Storage::Pickers::FolderPicker^ folderPicker
        = ref new Windows::Storage::Pickers::FolderPicker();
    folderPicker->SuggestedStartLocation
        = Windows::Storage::Pickers::PickerLocationId::Desktop;
    folderPicker->FileTypeFilter->Append(".txt");

    // フォルダを選択するための FolderPicker を表示します。
    concurrency::create_task(folderPicker->PickSingleFolderAsync()).
        then([this, str](Windows::Storage::StorageFolder^ folder)
    {
        // フォルダ選択に成功した場合
        if (folder) {

            // ローカルフォルダ localFolder を取得します。
            Windows::Storage::StorageFolder^ localFolder
                = Windows::Storage::ApplicationData::Current->LocalFolder;

            // ローカルフォルダにファイルを作ります(名前は任意)。
            concurrency::create_task(localFolder->CreateFileAsync(
                "abc.txt", Windows::Storage::
                CreationCollisionOption::ReplaceExisting))
                .then([this, str, folder](
                    Windows::Storage::StorageFile^ samplefile)
            {
                // ローカルフォルダに作ったファイルへのパス
                auto path_abc = samplefile->Path;

                // パスを wstring型に変換
                std::wstring path_abc_wstr(path_abc->Begin());

                // 出力用ファイルストリーム out
                std::ofstream out(path_abc_wstr);

                // str(テキストボックスの内容)を
                //           ローカルファイルに書き込みます。
                out.write(str.c_str(), str.length());
                out.close();

                String^ name = textBox2->Text;
                textBlock->Text = "";

                // ローカルフォルダ内のファイルを
                //           出力先のファイルにコピーします。
                concurrency::create_task(samplefile->CopyAsync(
                    folder, name, Windows::Storage::
                    NameCollisionOption::ReplaceExisting))
                    .then([this](Windows::Storage::StorageFile^ copiedFile)
                {
                    // ファイルのコピーに成功した場合
                    if (copiedFile) {
                        // 成功したことを示すメッセージ表示のコードを
                        //         ここに入れるべきでした !Σ(×_×;)
                        //         あとで、手直ししようと思います。
                    }
                    else {
                        // ファイルのコピーに失敗した場合のエラー処理
                        // 省略してあります (;^ω^A
                    }
                });
            });
        }
        else {
            // フォルダ選択に失敗した場合のエラー処理
            // 省略してあります (;^ω^A
        }
    });
}