新規記事の投稿を行うことで、非表示にすることが可能です。
2018年07月10日
【番外編5】Simple_Two-Step_Sequencer (STSS) / ブレッドボード
Workshop: Basic Arduino Square-Wave Synth
前回までAuduino_v5を少し変えたりしてみたけど、これ以上は似たようなアイデアしかない
ほかのArduinoシンセも聴きたいので別のものを作ってみる
ググってたら"Workshop: Basic Arduino Square-Wave Synth"というサイトを見つけた
何かのWorkshopネタらしいのでやりやすいかなと思ったけど、このシンセの音情報が見つけられなかったのでどんな音が出るのかわからない
で、とりあえずつくってから考える
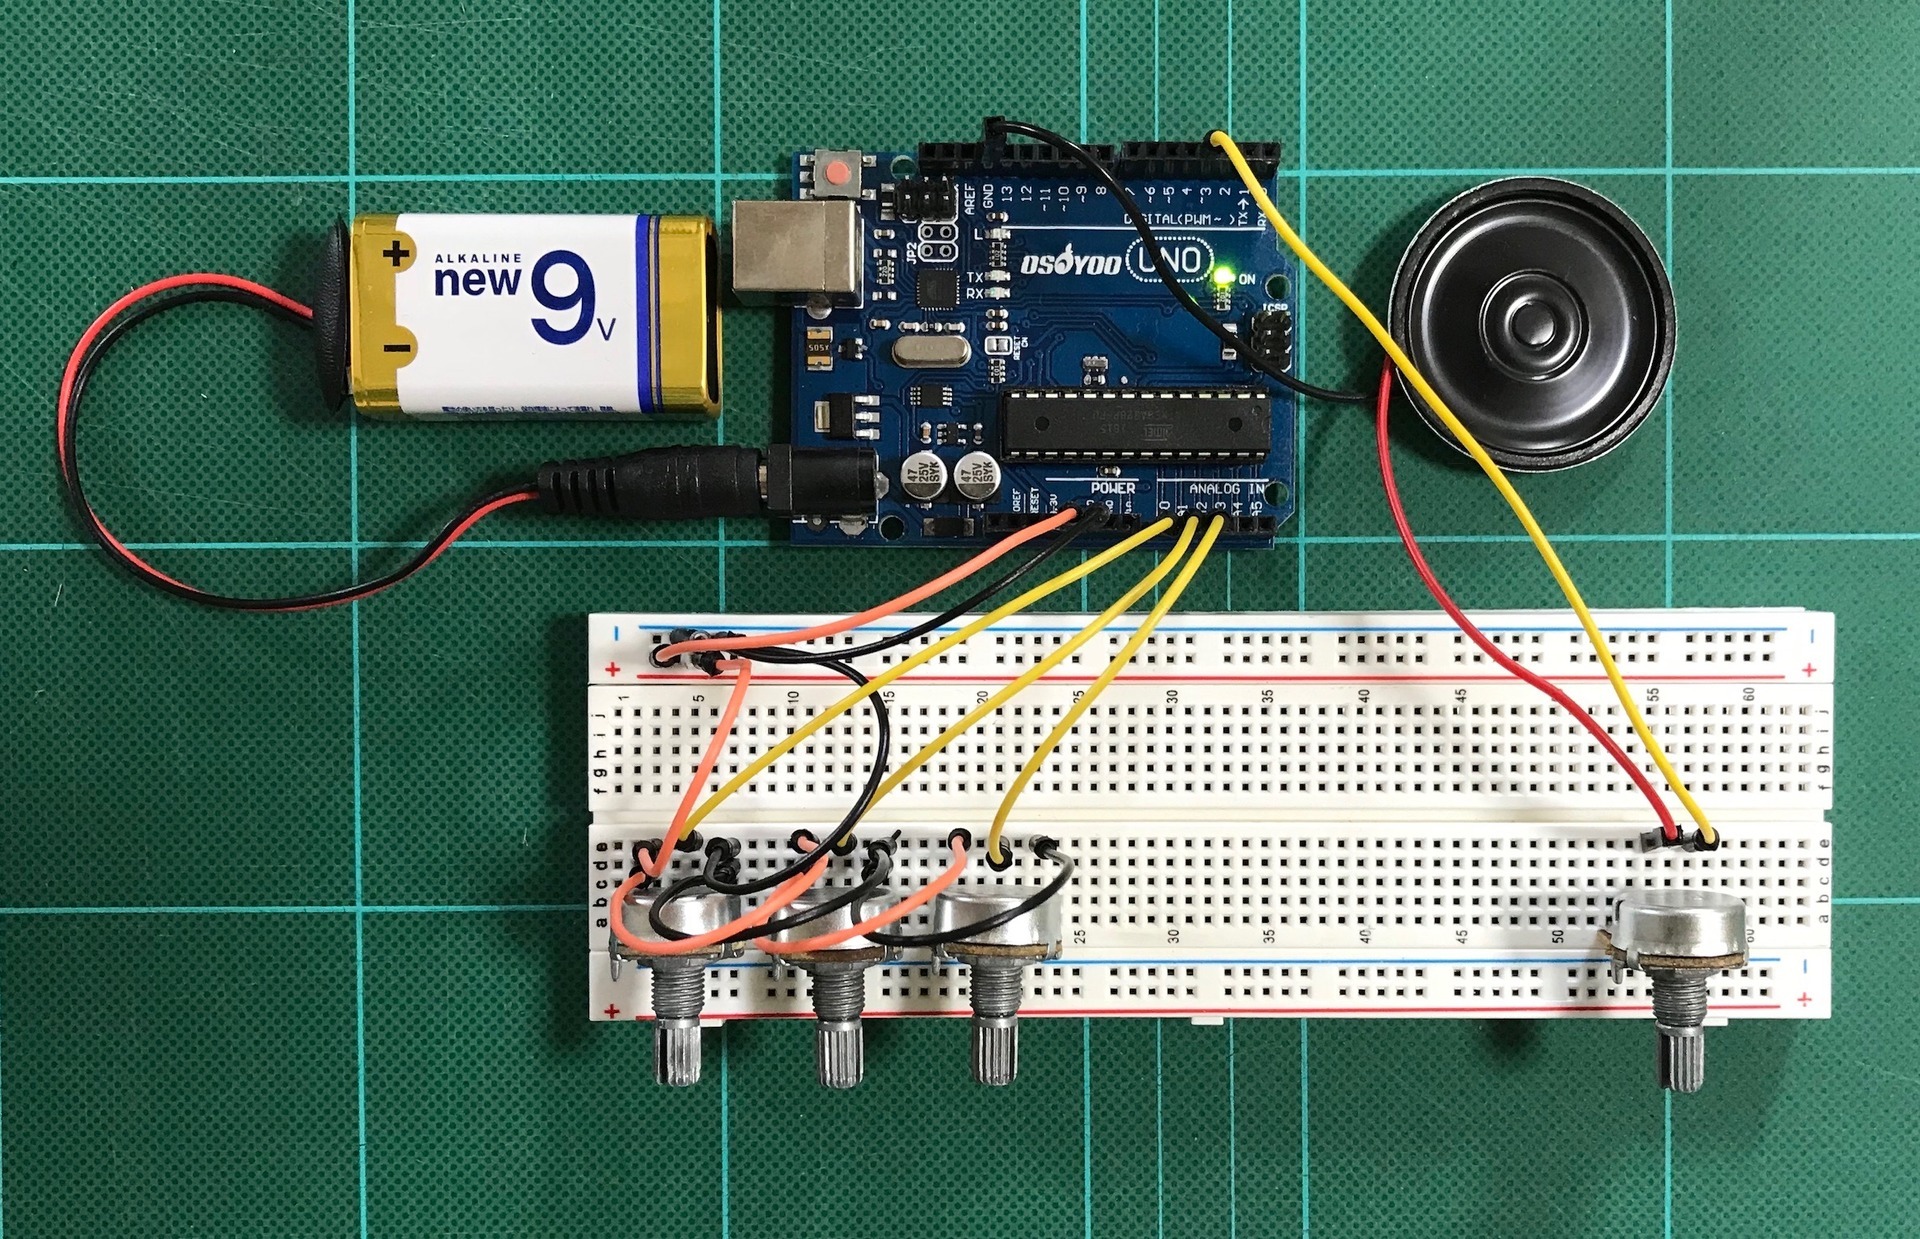
1. Simple_Two-Step_Sequencer (STSS)
(1)配線
まずはブレッドボードでの配線
Fritzingも
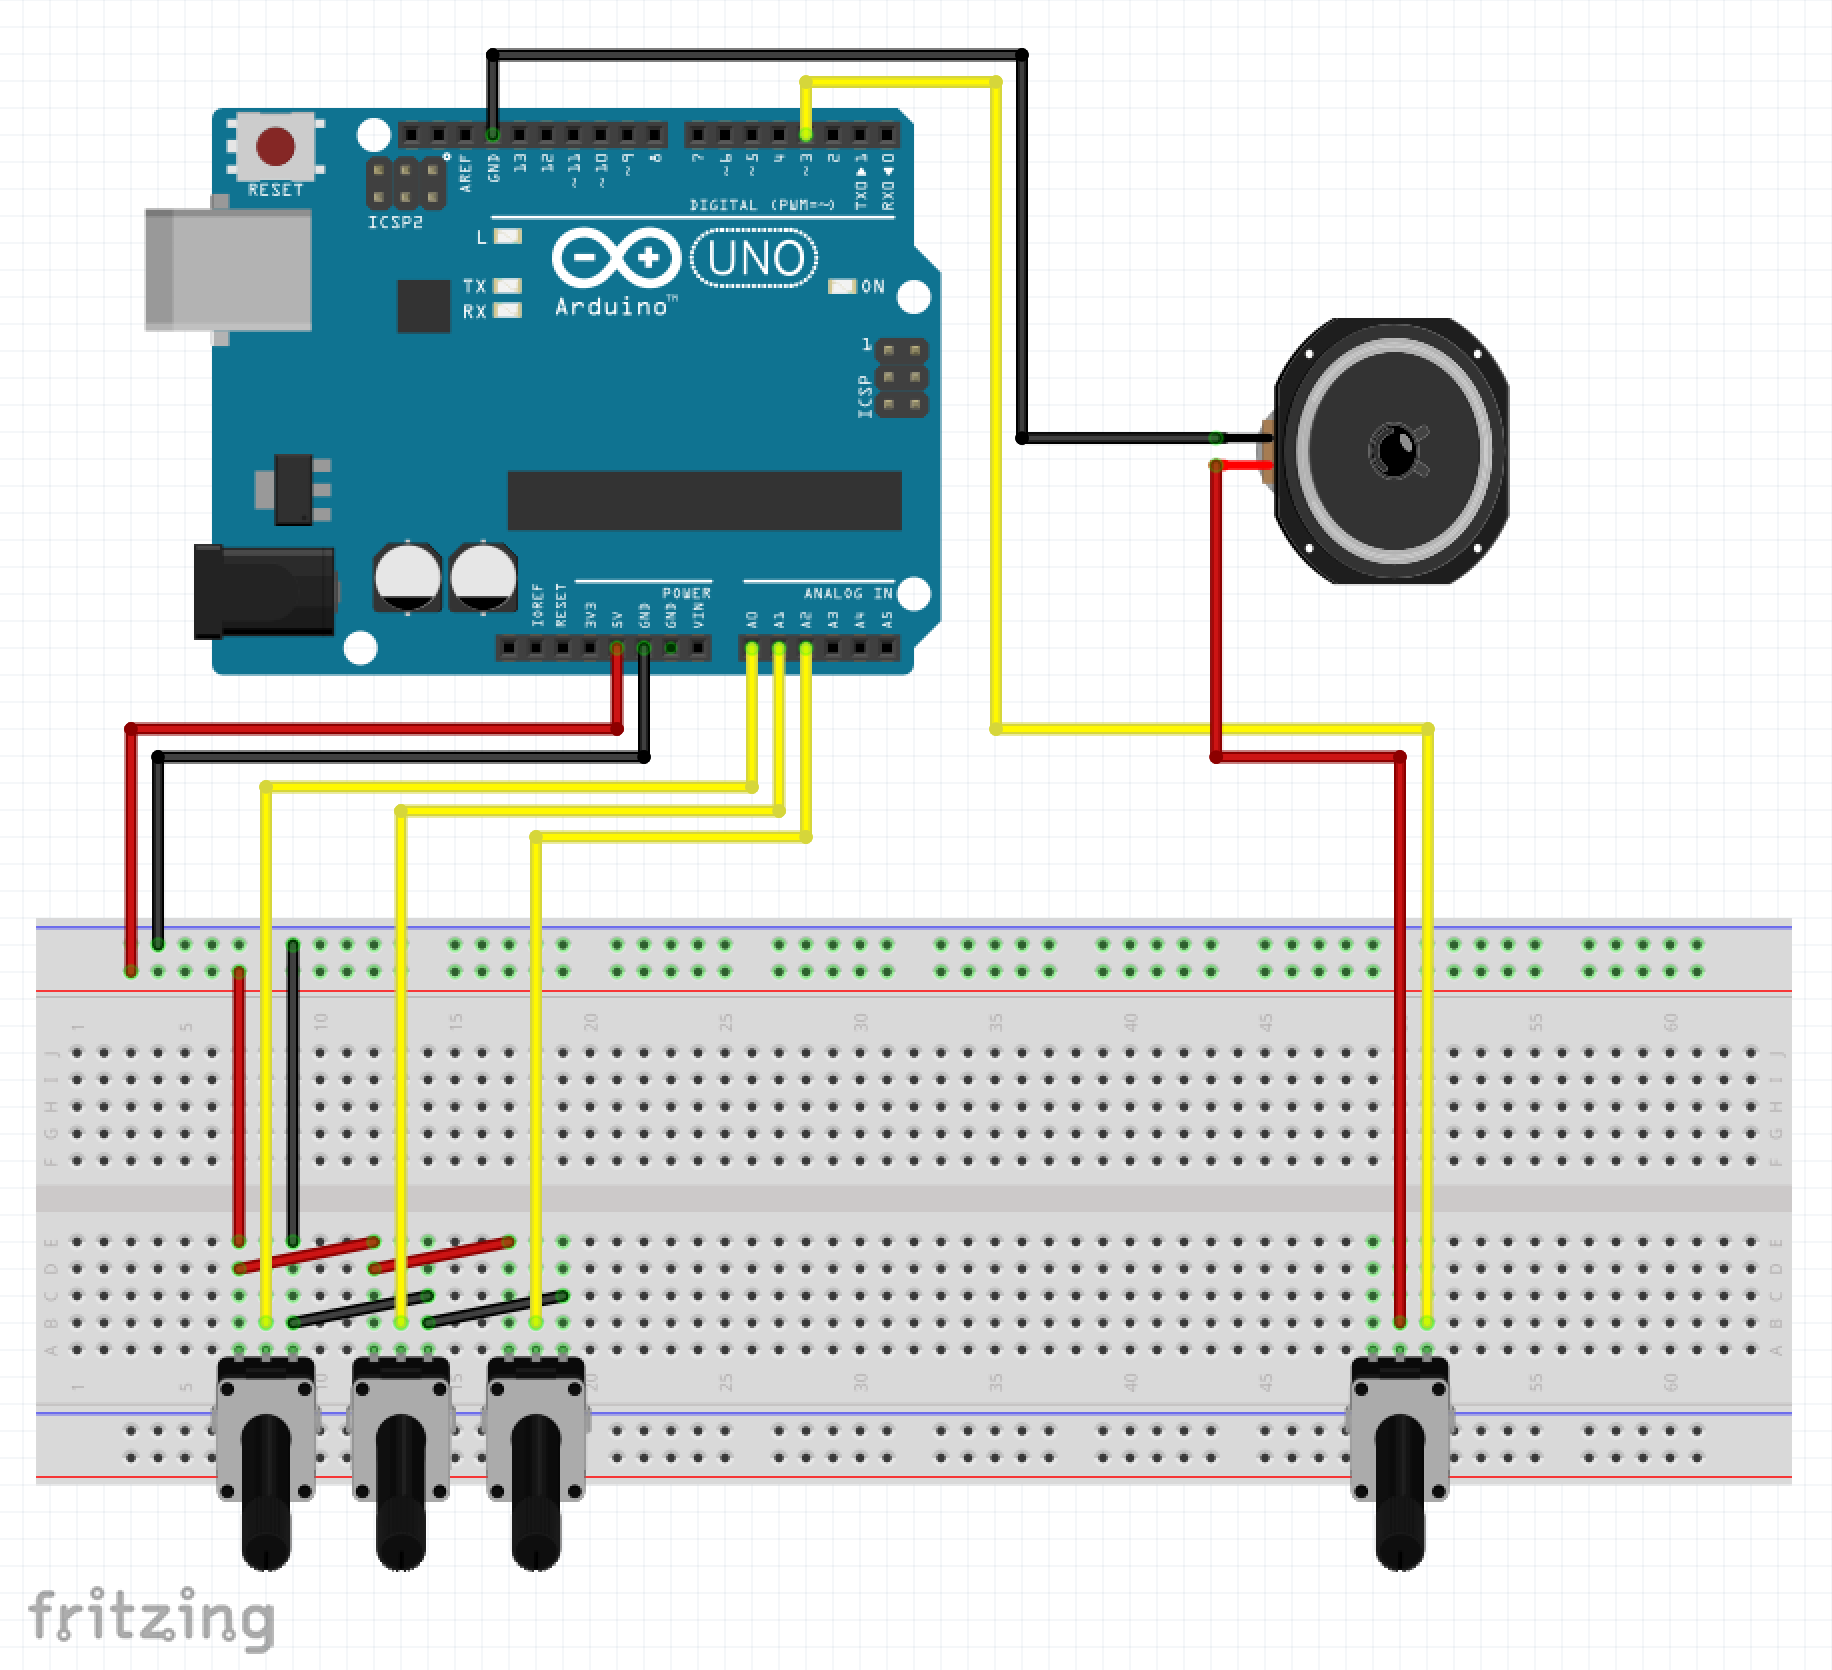
今回、ポテンショは10kΩを使ってます
(2)スケッチ
スケッチは"Workshop: Basic Arduino Square-Wave Synth"からコピペ
Simple_Two-Step_Sequencer (STSS)
―――――――(Simple_Two-Step_Sequencer)―――――――
/*
6: Simple Two-Step Sequencer
This project combines pretty much everything from the previous tutorials.
It involves two oscillators, a status led, and tempo and volume pots.
*/
int speakerPin = 3; //connect speaker to pin 3
int ledPin = 11; //we'll use this pin for our status led
int oscillator1Pin = 0; //we can set frequency for first step here...
int oscillator2Pin = 1; //... and frequency for step 2 on this pin
int tempoPin = 2; //read tempo pot here
/*
The pinState variable checks if we are outputting a sound.
By default we can set it to LOW - meaning "off".
*/
int pinState = LOW;
long previousMicros; //count microSeconds to control frequency
int frequency; //variable to set frequency
long previousMillis; //count milliSeconds to control tempo
int tempo = 120; //default tempo is 120BPM
void setup(){
Serial.begin(9600);
pinMode(speakerPin, OUTPUT);
}
void loop(){
//read from our analog pins and set our frequency limits
float oscillator1 = analogRead(oscillator1Pin);
oscillator1 = map(oscillator1, 0, 1023, 200, 2000);
float oscillator2 = analogRead(oscillator2Pin);
oscillator2 = map(oscillator2, 0, 1023, 200, 2000);
//read and set tempo limits
float tempo = analogRead(tempoPin);
tempo = map(tempo, 0, 1023, 60, 1000);
//algorithm to convert tempo into BPM
float interval = (1000/tempo)*60;
/*
We can't use the delay function in this case,
as it will freeze the sketch and disrupt the
oscillators.
Instead we use a method that counts milliSeconds,
compares it to our BPM, and switches between which
oscillator should be in use.
*/
//oscillator1
if(millis()-previousMillis > interval/2){
playTone(speakerPin, oscillator1, interval/2);
analogWrite(ledPin, LOW);
}
//oscillator 2
if(millis()-previousMillis < interval/2){
playTone(speakerPin, oscillator2, interval/2);
analogWrite(ledPin, tempo/4);
}
//One cycle completed: reset our counter!
if(millis()-previousMillis > interval){
previousMillis = millis();
}
}
/*
We use the same method here as above to
switch our outputPin on and off without having
to use delay() and thus keep everything running
smoothly.
*/
void playTone(int outputPin, int frequency, float tempo){
//this bit is new - it makes sure we're calculating the note's frequency correctly
float hperiod = (500000 / frequency) -7;
long cycles = ((frequency*tempo)/1000);
for(long i=0; i<=cycles; i++){
//we use frequency/2 because one LOW + one HIGH = one whole cycle
if(micros() - previousMicros > frequency/2){
previousMicros = micros();
if(pinState == LOW){
pinState = HIGH; //if the pin is already LOW, set it to HIGH
}
else{
pinState = LOW; //otherwise if it's HIGH, set it to LOW
}
digitalWrite(outputPin, pinState); //Write pinState to specified pin
}
}
}
――――――――――――――――――――――――――――
(3)実行
します
なるほど・・・昔のアニメの効果音みたいな音が出てきましたね・・・
思ってたんとちがーうって感じですがこれはこれで
で、これで終わっちゃうと"Workshop: Basic Arduino Square-Wave Synth"の重複情報を無駄に増やしただけなので少し変えます
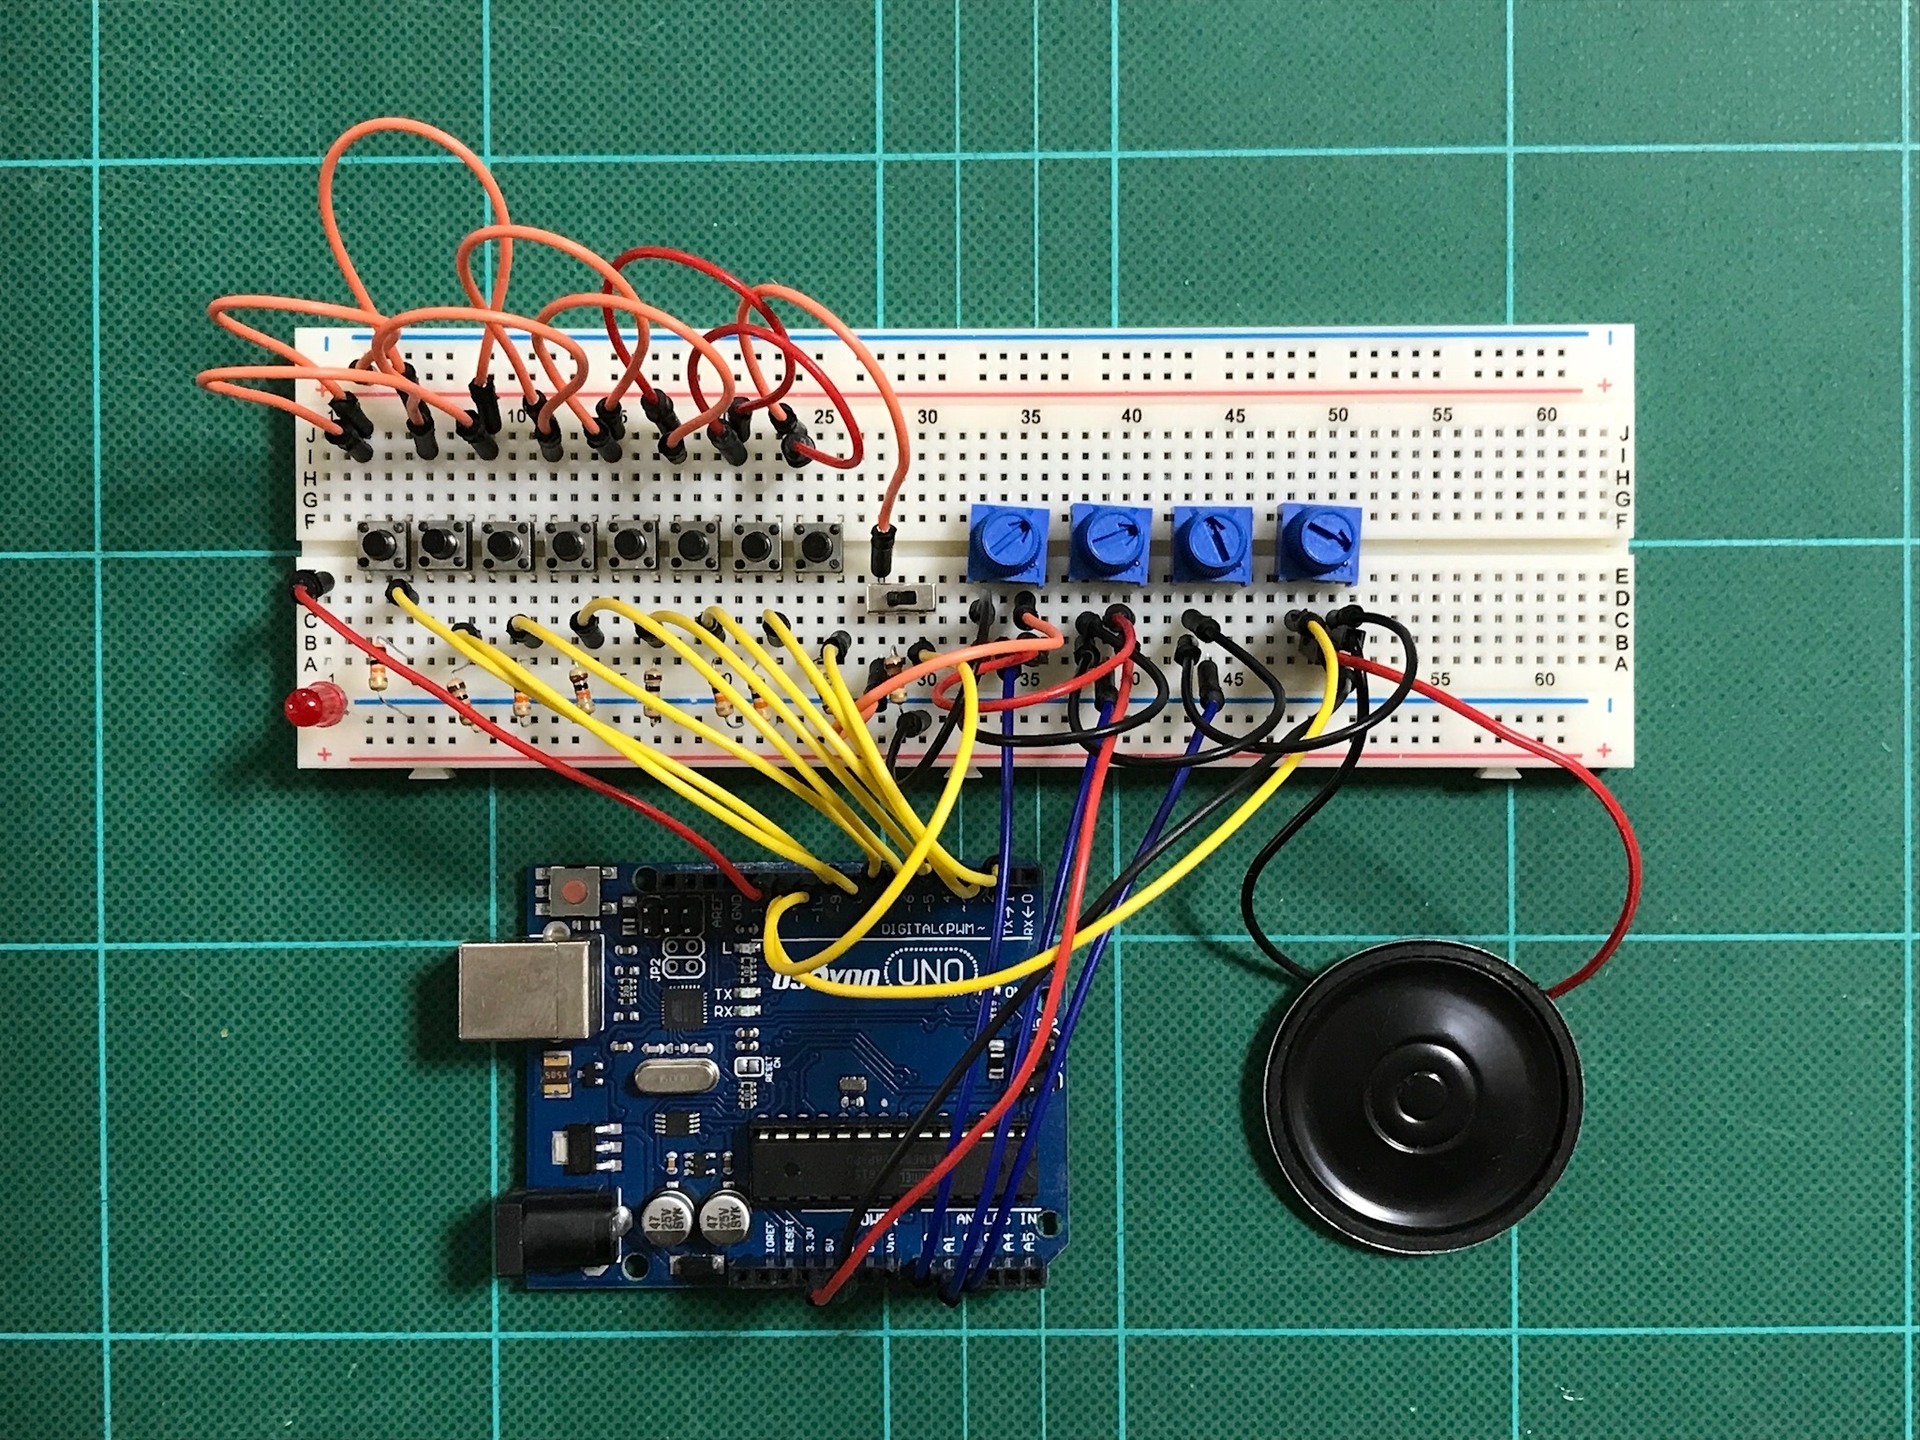
2. Simple_Two-Step_Sequencerx2 (STSSx2)
Auduino_v5の時に2倍化しましたが今回もします
Arduino UNOには6つのアナログインプットがありますが、STSSはオシレーター2つとテンポ1つで合わせて3つのアナログインプットが使われています
今回はこれをもう1セット付け加えるだけです
というわけで名前はSimple_Two-Step_Sequencerx2
(1)配線
ブレッドボード上での配線はこんな感じ


(2)スケッチ
スケッチは少し書き足してこんな感じ
Simple_Two-Step_Sequencerx2
―――――(Simple_Two-Step_Sequencerx2 (STSSx2))―――――
/*
6': Simple Two-Step Sequencer x2
This project combines pretty much everything from the previous tutorials.
It involves two oscillators, a status led, and tempo and volume pots.
Changelog:
It involves four oscillators, a status led, and two tempo and volume pots.
*/
int speakerPin = 3; //connect speaker to pin 3
int ledPin = 11; //we'll use this pin for our status led
int oscillator1Pin = 0; //we can set frequency for first step here...
int oscillator2Pin = 1; //... and frequency for step 2 on this pin
int tempoPin1 = 2; //read tempo pot here
int oscillator3Pin = 3; //we can set frequency for first step here...
int oscillator4Pin = 4; //... and frequency for step 2 on this pin
int tempoPin2 = 5; //read tempo pot here
/*
The pinState variable checks if we are outputting a sound.
By default we can set it to LOW - meaning "off".
*/
int pinState = LOW;
long previousMicros; //count microSeconds to control frequency
int frequency; //variable to set frequency
long previousMillis; //count milliSeconds to control tempo
int tempo = 120; //default tempo is 120BPM
void setup(){
Serial.begin(9600);
pinMode(speakerPin, OUTPUT);
}
void loop(){
//read from our analog pins and set our frequency limits
float oscillator1 = analogRead(oscillator1Pin);
oscillator1 = map(oscillator1, 0, 1023, 200, 2000);
float oscillator2 = analogRead(oscillator2Pin);
oscillator2 = map(oscillator2, 0, 1023, 200, 2000);
//read and set tempo1 limits
float tempo1 = analogRead(tempoPin1);
tempo1 = map(tempo1, 0, 1023, 60, 1000);
//algorithm to convert tempo into BPM
float interval1 = (1000/tempo1)*60;
//read from our analog pins and set our frequency limits
float oscillator3 = analogRead(oscillator3Pin);
oscillator3 = map(oscillator3, 0, 1023, 200, 2000);
float oscillator4 = analogRead(oscillator4Pin);
oscillator4 = map(oscillator4, 0, 1023, 200, 2000);
//read and set tempo2 limits
float tempo2 = analogRead(tempoPin2);
tempo2 = map(tempo2, 0, 1023, 60, 1000);
//algorithm to convert tempo into BPM
float interval2 = (1000/tempo2)*60;
/*
We can't use the delay function in this case,
as it will freeze the sketch and disrupt the
oscillators.
Instead we use a method that counts milliSeconds,
compares it to our BPM, and switches between which
oscillator should be in use.
*/
//oscillator1
if(millis()-previousMillis > interval1/2){
playTone(speakerPin, oscillator1, interval1/2);
analogWrite(ledPin, LOW);
}
//oscillator2
if(millis()-previousMillis < interval1/2){
playTone(speakerPin, oscillator2, interval1/2);
analogWrite(ledPin, tempo1/4);
}
//One cycle completed: reset our counter!
if(millis()-previousMillis > interval1){
previousMillis = millis();
}
//oscillator3
if(millis()-previousMillis > interval2/2){
playTone(speakerPin, oscillator3, interval2/2);
analogWrite(ledPin, LOW);
}
//oscillator4
if(millis()-previousMillis < interval2/2){
playTone(speakerPin, oscillator4, interval2/2);
analogWrite(ledPin, tempo2/4);
}
//One cycle completed: reset our counter!
if(millis()-previousMillis > interval2){
previousMillis = millis();
}
}
/*
We use the same method here as above to
switch our outputPin on and off without having
to use delay() and thus keep everything running
smoothly.
*/
void playTone(int outputPin, int frequency, float tempo){
//this bit is new - it makes sure we're calculating the note's frequency correctly
float hperiod = (500000 / frequency) -7;
long cycles = ((frequency*tempo)/1000);
for(long i=0; i<=cycles; i++){
//we use frequency/2 because one LOW + one HIGH = one whole cycle
if(micros() - previousMicros > frequency/2){
previousMicros = micros();
if(pinState == LOW){
pinState = HIGH; //if the pin is already LOW, set it to HIGH
}
else{
pinState = LOW; //otherwise if it's HIGH, set it to LOW
}
digitalWrite(outputPin, pinState); //Write pinState to specified pin
}
}
}
―――――――――――――――――――――――――――――
(3)実行
さて音の変化は2倍になったんでしょうか
う〜んなんとも・・・表現が広がった気はするけど2倍まではいかないかな
パラメーターをもう少しいじってみたほうがいいかな
とりあえずもう1つの案もやってみる
3. Simple_Five-Step_Sequencer (SFSS)
オシレーターのフリークエンシー調節に使ってるポテンショメーターの数を5つに増やしてみる
オシレーター5つとテンポ1つで6つのアナログインプットを埋めるという案
(1)配線
配線は上記2. Simple_Two-Step_Sequencerx2 (STSSx2)と同じ
(2)スケッチ
スケッチをこんな感じにして
Simple_Five-Step_Sequencer
―――――――(Simple_FIve-Step_Sequencer)―――――――
/*
6'': Simple Five-Step Sequencer
This project combines pretty much everything from the previous tutorials.
It involves two oscillators, a status led, and tempo and volume pots.
Changelog:
It involves five oscillators, a status led, and tempo and volume pots.
*/
int speakerPin = 3; //connect speaker to pin 3
int ledPin = 11; //we'll use this pin for our status led
int oscillator1Pin = 0; //we can set frequency for first step here...
int oscillator2Pin = 1; //... and frequency for step 2 on this pin
int oscillator3Pin = 2; //... and frequency for step 3 on this pin
int oscillator4Pin = 3; //... and frequency for step 4 on this pin
int oscillator5Pin = 4; //... and frequency for step 5 on this pin
int tempoPin = 5; //read tempo pot here
/*
The pinState variable checks if we are outputting a sound.
By default we can set it to LOW - meaning "off".
*/
int pinState = LOW;
long previousMicros; //count microSeconds to control frequency
int frequency; //variable to set frequency
long previousMillis; //count milliSeconds to control tempo
int tempo = 120; //default tempo is 120BPM
void setup(){
Serial.begin(9600);
pinMode(speakerPin, OUTPUT);
}
void loop(){
//read from our analog pins and set our frequency limits
float oscillator1 = analogRead(oscillator1Pin);
oscillator1 = map(oscillator1, 0, 1023, 200, 2000);
float oscillator2 = analogRead(oscillator2Pin);
oscillator2 = map(oscillator2, 0, 1023, 200, 2000);
float oscillator3 = analogRead(oscillator3Pin);
oscillator3 = map(oscillator3, 0, 1023, 200, 2000);
float oscillator4 = analogRead(oscillator4Pin);
oscillator4 = map(oscillator4, 0, 1023, 200, 2000);
float oscillator5 = analogRead(oscillator5Pin);
oscillator5 = map(oscillator5, 0, 1023, 200, 2000);
//read and set tempo limits
float tempo = analogRead(tempoPin);
tempo = map(tempo, 0, 1023, 60, 1000);
//algorithm to convert tempo into BPM
float interval = (1000/tempo)*60;
/*
We can't use the delay function in this case,
as it will freeze the sketch and disrupt the
oscillators.
Instead we use a method that counts milliSeconds,
compares it to our BPM, and switches between which
oscillator should be in use.
*/
//oscillator1
if(millis()-previousMillis > interval/2){
playTone(speakerPin, oscillator1, interval/2);
analogWrite(ledPin, LOW);
}
//oscillator 2
if(millis()-previousMillis < interval/2){
playTone(speakerPin, oscillator2, interval/2);
analogWrite(ledPin, tempo/2);
}
//oscillator 3
if(millis()-previousMillis > interval/3){
playTone(speakerPin, oscillator3, interval/3);
analogWrite(ledPin, tempo/3);
}
//oscillator 4
if(millis()-previousMillis < interval/3){
playTone(speakerPin, oscillator4, interval/3);
analogWrite(ledPin, tempo/4);
}
//oscillator 5
if(millis()-previousMillis < interval/5){
playTone(speakerPin, oscillator5, interval/5);
analogWrite(ledPin, tempo/5);
}
//One cycle completed: reset our counter!
if(millis()-previousMillis > interval){
previousMillis = millis();
}
}
/*
We use the same method here as above to
switch our outputPin on and off without having
to use delay() and thus keep everything running
smoothly.
*/
void playTone(int outputPin, int frequency, float tempo){
//this bit is new - it makes sure we're calculating the note's frequency correctly
float hperiod = (500000 / frequency) -7;
long cycles = ((frequency*tempo)/1000);
for(long i=0; i<=cycles; i++){
//we use frequency/2 because one LOW + one HIGH = one whole cycle
if(micros() - previousMicros > frequency/2){
previousMicros = micros();
if(pinState == LOW){
pinState = HIGH; //if the pin is already LOW, set it to HIGH
}
else{
pinState = LOW; //otherwise if it's HIGH, set it to LOW
}
digitalWrite(outputPin, pinState); //Write pinState to specified pin
}
}
}
――――――――――――――――――――――――――――
(3)実行
これでもっとガチャガチャした音が出てくれればいいんだけど・・・
い、いけてるのか?
まあ、子供騙しなのでこれはこの辺で
で、せっかくなので次回このうちどれかを筐体に入れようかなと思います
ではまた〜
 | 新品価格 |
 | Raspberry Pi3 Model B ボード&ケースセット (Element14版, Clear)-Physical Computing Lab 新品価格 |
 | Arduinoをはじめよう 第3版 (Make:PROJECTS) 新品価格 |
 | Arduinoをはじめよう 互換キット UNO R3対応互換ボード 初心者専用実験キット 基本部品セット20 in 1 Arduino sidekick basic kit 新品価格 |
 | 新品価格 |
 | Arduino エントリーキット(Uno版)- Physical Computing Lab 新品価格 |
 | タミヤ 楽しい工作シリーズ No.216 3ch RCロボット製作セット 70216 新品価格 |
 | 新品価格 |
 | 新品価格 |
 | 新品価格 |
 | タミヤ 楽しい工作シリーズ No.211 アームクローラー工作セット 70211 新品価格 |
 | タミヤ 楽しい工作シリーズ No.97 ツインモーターギヤーボックス (70097) 新品価格 |
 | タミヤ 楽しい工作シリーズ No.106 4チャンネル・リモコンボックス (70106) 新品価格 |