�V�K�L���̓��e���s�����ƂŁA��\���ɂ��邱�Ƃ��\�ł��B
�L��
�V�K�L���̓��e���s�����ƂŁA��\���ɂ��邱�Ƃ��\�ł��B
posted by fanblog
2021�N07��02��
npm install && npm run dev�ŃR�}���h�G���[�bLaravel�w�K
�̂�т肳��͌���Laravel�̕����Ă��܂�
�a�J�œ����G���W�j�A�������Laravel�����npm install && npm run dev�R�}���h��@�����炽��G���[���o�܂���
���������Anpm���͂����ĂȂ��ANode.js�C���X�g�[�����Ȃ��Ⴂ���Ȃ��Ȃ�Ē����S�҂̂̂�т肳��ɂ� ������B
�Ƃ肠���������ł����̂ŁA���Y�^�Ƃ��Ă܂Ƃ߂܂��B
OS�FWindows10
PHP�FPHP 7.4.20
Laravel�FLaravel Framework 8.48.1
MySQL�FMySQL Server 8.0�@(Ver 8.0.23 for Win64 on x86_64 (MySQL Community Server - GPL))
Node.js�F14.17.20
npm�F6.14.13
�a�J�œ����G���W�j�A�������Laravel�����npm install && npm run dev�R�}���h��@�����炽��G���[���o�܂���
���������Anpm���͂����ĂȂ��ANode.js�C���X�g�[�����Ȃ��Ⴂ���Ȃ��Ȃ�Ē����S�҂̂̂�т肳��ɂ�
�Ƃ肠���������ł����̂ŁA���Y�^�Ƃ��Ă܂Ƃ߂܂��B
�J����
OS�FWindows10
PHP�FPHP 7.4.20
Laravel�FLaravel Framework 8.48.1
MySQL�FMySQL Server 8.0�@(Ver 8.0.23 for Win64 on x86_64 (MySQL Community Server - GPL))
Node.js�F14.17.20
npm�F6.14.13
������
- npm install && npm run dev�R�}���h�ŃG���[
- npm install�R�}���h���ēx������
- npm run dev�R�}���h���ēx������
-
no image
-
no image
npm install && npm run dev�R�}���h�ŃG���[
C:\Users\NONBIRI>cd ../../MAMP/htdocs/blog
C:\MAMP\htdocs\blog>npm install && npm run dev
npm WARN deprecated popper.js@1.16.1: You can find the new Popper v2 at @popperjs/core, this package is dedicated to the legacy v1
npm WARN deprecated querystring@0.2.0: The
npm WARN deprecated uuid@3.4.0: Please upgrade to version 7 or higher. Older versions may use Math.random() in certain circumstances, which is known to be problematic. See https://v8.dev/blog/math-random for details.
npm notice created a lockfile as package-lock.json. You should commit this file.
npm WARN optional SKIPPING OPTIONAL DEPENDENCY: fsevents@~2.3.2 (node_modules\chokidar\node_modules\fsevents):
npm WARN notsup SKIPPING OPTIONAL DEPENDENCY: Unsupported platform for fsevents@2.3.2: wanted {"os":"darwin","arch":"any"} (current: {"os":"win32","arch":"x64"})
added 775 packages from 447 contributors and audited 778 packages in 57.261s
83 packages are looking for funding
run `npm fund` for details
found 0 vulnerabilities
> @ dev C:\MAMP\htdocs\blog
> npm run development
> @ development C:\MAMP\htdocs\blog
> mix
Additional dependencies must be installed. This will only take a moment.
Running: npm install resolve-url-loader@^4.0.0 --save-dev --legacy-peer-deps
npm WARN optional SKIPPING OPTIONAL DEPENDENCY: fsevents@2.3.2 (node_modules\fsevents):
npm WARN notsup SKIPPING OPTIONAL DEPENDENCY: Unsupported platform for fsevents@2.3.2: wanted {"os":"darwin","arch":"any"} (current: {"os":"win32","arch":"x64"})
Finished. Please run Mix again.
npm ERR! code ELIFECYCLE
npm ERR! errno 1
npm ERR! @ development: `mix`
npm ERR! Exit status 1
npm ERR!
npm ERR! Failed at the @ development script.
npm ERR! This is probably not a problem with npm. There is likely additional logging output above.
npm ERR! A complete log of this run can be found in:
npm ERR! C:\Users\NONBIRI\AppData\Roaming\npm-cache\_logs\2021-07-02T04_55_39_819Z-debug.log
npm ERR! code ELIFECYCLE
npm ERR! errno 1
npm ERR! @ dev: `npm run development`
npm ERR! Exit status 1
npm ERR!
npm ERR! Failed at the @ dev script.
npm ERR! This is probably not a problem with npm. There is likely additional logging output above.
npm ERR! A complete log of this run can be found in:
npm ERR! C:\Users\NONBIRI\AppData\Roaming\npm-cache\_logs\2021-07-02T04_55_39_880Z-debug.log
�gFinished. Please run Mix again.�h�Ƃ������ŁA������x�R�}���h��ł��ĂƂ̃��b�Z�[�W���c
npm install�R�}���h���ēx������
C:\MAMP\htdocs\blog>npm install
npm WARN optional SKIPPING OPTIONAL DEPENDENCY: fsevents@2.3.2 (node_modules\fsevents):
npm WARN notsup SKIPPING OPTIONAL DEPENDENCY: Unsupported platform for fsevents@2.3.2: wanted {"os":"darwin","arch":"any"} (current: {"os":"win32","arch":"x64"})
audited 788 packages in 7.957s
84 packages are looking for funding
run `npm fund` for details
found 0 vulnerabilities
npm run dev�R�}���h���ēx������
C:\MAMP\htdocs\blog>npm run dev
> @ dev C:\MAMP\htdocs\blog
> npm run development
> @ development C:\MAMP\htdocs\blog
> mix
* Mix █████████████████████████ building (10%) 0/2 entries 2/3 dependencies 0/2 modules 2 active
...r �� postcss-loader �� resolve-url-loader �� sass-loader �� resources\sass\app.scss
DEPRECATION WARNING: Using / for division is deprecated and will be removed in Dart Sass 2.0.0.
Recommendation: math.div($spacer, 2)
More info and automated migrator: https://sass-lang.com/d/slash-div
╷
302 �� $headings-margin-bottom: $spacer / 2 !default;
�� ^^^^^^^^^^^
╵
node_modules\bootstrap\scss\_variables.scss 302:31 @import
node_modules\bootstrap\scss\bootstrap.scss 9:9 @import
resources\sass\app.scss 8:9 root stylesheet
DEPRECATION WARNING: Using / for division is deprecated and will be removed in Dart Sass 2.0.0.
Recommendation: math.div($input-padding-y, 2)
More info and automated migrator: https://sass-lang.com/d/slash-div
╷
498 �� $input-height-inner-quarter: add($input-line-height * .25em, $input-padding-y / 2) !default;
�� ^^^^^^^^^^^^^^^^^^^^
╵
node_modules\bootstrap\scss\_variables.scss 498:73 @import
node_modules\bootstrap\scss\bootstrap.scss 9:9 @import
resources\sass\app.scss 8:9 root stylesheet
DEPRECATION WARNING: Using / for division is deprecated and will be removed in Dart Sass 2.0.0.
Recommendation: math.div($custom-control-indicator-size, 2)
More info and automated migrator: https://sass-lang.com/d/slash-div
(�|�|�|�|�r���ȗ��[�[�[�[)
Laravel Mix v6.0.25
Compiled Successfully in 10492ms
�������������������������������������������������������������������������������������������������������������������������������� File �� Size �������������������������������������������������������������������������������������������������������������������������������� /js/app.js �� 2.92 MiB ���� css/app.css �� 178 KiB ������������������������������������������������������������������������������������������������������������������������������webpack compiled successfully
C:\MAMP\htdocs\blog>
npm install && npm run dev�R�}���h�ŃG���[��͍ēx�A�gnpm install�h�Ɓgnpm run dev�h�ŕ����ăR�}���h��ł��Ă݂����A�����R���v���[�g���܂����B
npm install && npm run dev�ňꏏ�ɑł��Ă��悩�����̂��c������ƐT�d�ɕ����ăR�}���h��ł����̂�т肳��Ȃ̂ł���
�o�T�F�a�J�œ����G���W�j�A���́u���H�Ŋw�ԃv���O���~���O����v
(https://www.youtube.com/channel/UCqzJi2o7bAPtRD3tTFvi7zA)
�y���̃J�e�S���[�̍ŐV�L���z
Target class [��������Controller] does not exist.�̃G���[�bLaravel�w�K
�̂�т肳��͌���Laravel�̕����Ă��܂�
�a�J�œ����G���W�j�A�������Laravel����ňꗗ��ʂ�\�����悤�Ƃ�����G���[���o�܂���
Laravel�̃o�[�W�����̈Ⴄ�̂ŁA�����̃o�[�W�����ɂ������L�q�ɏC���B
���Y�^�Ƃ��Ă܂Ƃ߂܂��B
OS�FWindows10
PHP�FPHP 7.4.20
Laravel�FLaravel Framework 8.48.1
MySQL�FMySQL Server 8.0�@(Ver 8.0.23 for Win64 on x86_64 (MySQL Community Server - GPL))
Node.js�F14.17.20
npm�F6.14.13
�a�J�œ����G���W�j�A�������Laravel����ňꗗ��ʂ�\�����悤�Ƃ�����G���[���o�܂���
Laravel�̃o�[�W�����̈Ⴄ�̂ŁA�����̃o�[�W�����ɂ������L�q�ɏC���B
���Y�^�Ƃ��Ă܂Ƃ߂܂��B
�J����
OS�FWindows10
PHP�FPHP 7.4.20
Laravel�FLaravel Framework 8.48.1
MySQL�FMySQL Server 8.0�@(Ver 8.0.23 for Win64 on x86_64 (MySQL Community Server - GPL))
Node.js�F14.17.20
npm�F6.14.13
������
- BlogController.php�̋L�q
- web.php�̋L�q
- RouteServiceProvider.php�̏C��
BlogController.php
<?php
namespace App\Http\Controllers;
use Illuminate\Http\Request;
class BlogController extends Controller
{
�@/*
�@* �u���O�ꗗ��\������
�@*
�@* @return view
�@*/
�@public function showList()
�@{
�@�@return view('blog.list');
�@}
}
namespace App\Http\Controllers;
use Illuminate\Http\Request;
class BlogController extends Controller
{
�@/*
�@* �u���O�ꗗ��\������
�@*
�@* @return view
�@*/
�@public function showList()
�@{
�@�@return view('blog.list');
�@}
}
web.php
<?php
use Illuminate\Support\Facades\Route;
/*
|--------------------------------------------------------------------------
| Web Routes
|--------------------------------------------------------------------------
|
| Here is where you can register web routes for your application. These
| routes are loaded by the RouteServiceProvider within a group which
| contains the "web" middleware group. Now create something great!
|
*/
// �u���O�ꗗ��ʂ�\��
Route::get('/', 'BlogController@showList')->name('blogs');
RouteServiceProvider.php
<?php
namespace App\Providers;
use Illuminate\Cache\RateLimiting\Limit;
use Illuminate\Foundation\Support\Providers\RouteServiceProvider as ServiceProvider;
use Illuminate\Http\Request;
use Illuminate\Support\Facades\RateLimiter;
use Illuminate\Support\Facades\Route;
class RouteServiceProvider extends ServiceProvider
{
�@/**
�@* The path to the "home" route for your application.
�@*
�@* This is used by Laravel authentication to redirect users after login.
�@*
�@* @var string
�@*/
�@public const HOME = '/home';
�@/**
�@* The controller namespace for the application.
�@*
�@* When present, controller route declarations will automatically be prefixed with this namespace.
�@*
�@* @var string|null
�@*/
�@// protected $namespace = 'App\\Http\\Controllers';
�@/**
�@* Define your route model bindings, pattern filters, etc.
�@*
�@* @return void
�@*/
�@protected $namespace = 'App\Http\Controllers'; //�lj�
�@public function boot()
�@{
�@�@$this->configureRateLimiting();
�@�@$this->routes(function () {
�@�@Route::prefix('api')
�@�@�@->middleware('api')
�@�@�@->namespace($this->namespace)
�@�@�@->group(base_path('routes/api.php'));
�@�@Route::middleware('web')
�@�@�@->namespace($this->namespace)
�@�@�@->group(base_path('routes/web.php'));
�@�@});
�@}
�@/**
�@* Configure the rate limiters for the application.
�@*
�@* @return void
�@*/
�@protected function configureRateLimiting()
�@{
�@�@RateLimiter::for('api', function (Request $request) {
�@�@�@return Limit::perMinute(60)->by(optional($request->user())->id ?: $request->ip());
�@�@});
�@}
}
protected $namespace = 'App\Http\Controllers';��36�s�ڂɒNjL
�o�T�F�a�J�œ����G���W�j�A���́u���H�Ŋw�ԃv���O���~���O����v
(https://www.youtube.com/channel/UCqzJi2o7bAPtRD3tTFvi7zA)
php artisan db:seed �ŃG���[�bLaravel�w�K
�̂�т肳��͌���Laravel�̕����Ă��܂�
�a�J�œ����G���W�j�A�������Laravel����ł܂Â����̂Ŕ��Y�^�܂Ƃ߂܂��B
YouTube����ł͂����炭MacOS��Laravel�̃o�[�W������5.8�ł����A����������Ă��܂����B
OS�FWindows10
PHP�FPHP 7.4.20
Laravel�FLaravel Framework 8.48.1
MySQL�FMySQL Server 8.0�@(Ver 8.0.23 for Win64 on x86_64 (MySQL Community Server - GPL))
Node.js�F14.17.20
npm�F6.14.13
�a�J�œ����G���W�j�A�������Laravel����ł܂Â����̂Ŕ��Y�^�܂Ƃ߂܂��B
YouTube����ł͂����炭MacOS��Laravel�̃o�[�W������5.8�ł����A����������Ă��܂����B
�J����
OS�FWindows10
PHP�FPHP 7.4.20
Laravel�FLaravel Framework 8.48.1
MySQL�FMySQL Server 8.0�@(Ver 8.0.23 for Win64 on x86_64 (MySQL Community Server - GPL))
Node.js�F14.17.20
npm�F6.14.13
������
- Models/Blog.php�̋L�q
- BlogsTableSeeder.php�̏C��
- BlogFactory.php�̏C��
- DatabaseSeeder.php�̏C��
Models/Blog.php
<?php
namespace App\Models;
use Illuminate\Database\Eloquent\Factories\HasFactory;
use Illuminate\Database\Eloquent\Model;
class Blog extends Model
{
�@use HasFactory;
�@// �e�[�u����
�@protected $table = 'blogs';
�@// �ύ���
�@protected $fillable =
�@[
�@�@'title',
�@�@'content'
�@];
}
namespace App\Models;
use Illuminate\Database\Eloquent\Factories\HasFactory;
use Illuminate\Database\Eloquent\Model;
class Blog extends Model
{
�@use HasFactory;
�@// �e�[�u����
�@protected $table = 'blogs';
�@// �ύ���
�@protected $fillable =
�@[
�@�@'title',
�@�@'content'
�@];
}
BlogsTableSeeder.php
<?php
namespace Database\Seeders;
use Illuminate\Database\Seeder;
use App\Models\Blog;
class BlogsTableSeeder extends Seeder
{
�@/**
�@* Run the database seeds.
�@*
�@* @return void
�@*/
�@public function run()
�@{
�@�@factory(App\Models\Blog::class)->create();
�@}
}
namespace Database\Seeders;
use Illuminate\Database\Seeder;
use App\Models\Blog;
class BlogsTableSeeder extends Seeder
{
�@/**
�@* Run the database seeds.
�@*
�@* @return void
�@*/
�@public function run()
�@{
�@�@factory(App\Models\Blog::class)->create();
�@}
}
����ł́gfactory(Blog::class, 15)->create();�h�ƂȂ��Ă������A�C���B
BlogFactory.php
<?php
namespace Database\Factories;
use App\Models\Blog;
use Illuminate\Database\Eloquent\Factories\Factory;
use Illuminate\Support\Str;
class BlogFactory extends Factory
{
�@/**
�@* The name of the factory's corresponding model.
�@*
�@* @var string
�@*/
�@protected $model = Blog::class;
�@/**
�@* Define the model's default state.
�@*
�@* @return array
�@*/
�@public function definition()
�@{
�@�@return [
�@�@�@'title' => $this->faker->word,
�@�@�@'content' => $this->faker->realText
�@�@];
�@}
}
��������g'title' => $Faker->word,�h�Ɓg'content' => $Faker->realText,�h�Ə�����Ă������A$this�����鏑�����ɏC��
DatabaseSeeder.php
<?php
namespace Database\Seeders;
use Illuminate\Database\Seeder;
class DatabaseSeeder extends Seeder
{
�@/**
�@* Seed the application's database.
�@*
�@* @return void
�@*/
�@public function run()
�@{
�@�@\App\Models\Blog::factory(15)->create();
�@}
}
namespace Database\Seeders;
use Illuminate\Database\Seeder;
class DatabaseSeeder extends Seeder
{
�@/**
�@* Seed the application's database.
�@*
�@* @return void
�@*/
�@public function run()
�@{
�@�@\App\Models\Blog::factory(15)->create();
�@}
}
��������g$this->call(BlogsTableSeeder::class);�h�Ə�����Ă������A�C��
�o�T�F�a�J�œ����G���W�j�A���́u���H�Ŋw�ԃv���O���~���O����v
(https://www.youtube.com/channel/UCqzJi2o7bAPtRD3tTFvi7zA)
2021�N04��23��
�F��Ȍ����for�����܂Ƃ߂Ă݂�
�̂�т肳��̓X�L���A�b�v�̂��߂ɐF��Ȍ��������Ă��܂�
Java�AJavaScript�APHP�AjQuery�AC#�c�������g���Ă��Ă����Ⴒ���Ⴕ�Ă��܂����̂�for���ň�x�����炢�����Ă��������Ǝv���܂��B
Java�AJavaScript�APHP�AjQuery�AC#�c�������g���Ă��Ă����Ⴒ���Ⴕ�Ă��܂����̂�for���ň�x�����炢�����Ă��������Ǝv���܂��B
������
- Java��for��
- JavaScript��for��
- PHP��for��
- jQuery��for��
- C#��for��
Java��for��
for (int i = 0; i < 5; i++) {
�@System.out.println("i = " + i);
}
�@System.out.println("i = " + i);
}
JavaScript��for��
for (let i = 0; i < 5; i++) {
�@console.log("i = " + i);
}
�@console.log("i = " + i);
}
PHP��for��
for ($i = 0; $i < 5; $i++) {
�@print "i=".$i;
}
�@print "i=".$i;
}
jQuery��for��
for(var i = 0; i< 5; i++) {
�@console.log("i = " + i);
}
�@console.log("i = " + i);
}
C#��for��
for(int i=1; i < 5; ++i) {
�@Console.Write(i);
}
�@Console.Write(i);
}
2021�N04��19��
PostgreSQL�ł悭�g���R�}���h�������炢�@
�ŋ߁ACentOS���g����PostgreSQL�̕������Ă��܂��BLinux�̃R�}���h���s����ȏŁA�K���ς݂�MySQL�̃R�}���h�̈Ⴂ�ɃA���A��
����͊w�K�Ɏg�p�����h�b�g�C���X�g�[������ꕔ���p���āA���Y�^�ɂ܂Ƃ߂܂�
���FPostgreSQL(9.2.24)
OS�FCentOS(7)
postgres�Ƃ������[�U�[�����쐬���A���O�C�����Ă܂��B
�o�T�F�h�b�g�C���X�g�[��(https://dotinstall.com/lessons/basic_postgresql)
�����̃R�[�h�̓h�b�g�C���X�g�[���ł̊w�K�ł���A�����ł͂���܂���B
����͊w�K�Ɏg�p�����h�b�g�C���X�g�[������ꕔ���p���āA���Y�^�ɂ܂Ƃ߂܂�
���FPostgreSQL(9.2.24)
OS�FCentOS(7)
������
- PostgreSQL�̐ڑ�
- PostgreSQL�̏I��
- �o�[�W�����̊m�F
- DB�ꗗ�\��
- �����DB�ɐڑ�
PostgreSQL�̐ڑ�
psql -U postgres
postgres�Ƃ������[�U�[�����쐬���A���O�C�����Ă܂��B
PostgreSQL�̏I��
\q
�o�[�W�����̊m�F
psql --version
DB�ꗗ�\��
\l
�����DB�ɐڑ�
\c [DB��];
�o�T�F�h�b�g�C���X�g�[��(https://dotinstall.com/lessons/basic_postgresql)
�����̃R�[�h�̓h�b�g�C���X�g�[���ł̊w�K�ł���A�����ł͂���܂���B
2017�N06��01��
Bootstrap�ŃA�C�R����Font Awesome(�t�H���g �I�[�T��)�̃A�C�R���ɒu��������
Bootstrap�̕����ɏo���킵�������ɑΉ�
���̒����̏ڍׂ�Bootstrap�̃A�C�R����iOS�G�����ɂȂ���������������
�����BootstrapDCN�ŃA�C�R����Font Awesome�̃A�C�R���ɕς��Ă݂܂��傤

�܂���BootstrapDCN�֍s���܂��B�w�b�_�[���ɋL�q���镔�����Q�b�g���܂��B
�T�C�g���ɏ���������܂��B�����A���̂�html�̋L�q���o�ĂȂ�������l�p�̂Ƃ�����N���b�N����ƁA���ꂼ��ɍ��킹���L�q������܂��B
�����html �ł̋L�q�Ȃ̂ŁA�I�����W�F�g���̋L�q���R�s�[���܂��B

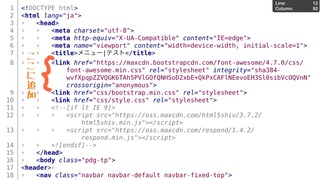
html �t�@�C���ɖ߂�A��قǃR�s�[�����L�q���w�b�_�[��title�^�O�̒����Ƀy�[�X�g���܂��B
����Font Awesome�̃y�[�W�ɍs���A���D�݂̃A�C�R����T���܂��B�A�C�R�������܂�����N���b�N���ďڍ׃y�[�W�ցc����̓J�����_�[�̃A�C�R�����g�p���܂�
�I�����W�F�g���̋L�q���R�s�[���܂��B
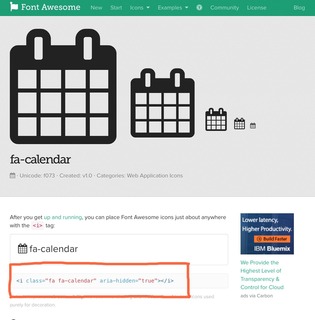
���Ȃ݂ɃA�C�R�����L�̃N���X�̌��fa-2x��NjL����ƃT�C�Y���ύX�ł��܂��B������傫������ƃA�C�R�����傫���Ȃ�d�g�݂ł��B
html�t�@�C���̔C�ӂ̏ꏊ�Ƀy�[�X�g���܂��B����Ŋ����ł�
Bootstrap��Font Awesome�̃A�C�R�����r���Ă݂܂���
���������Ɋ����ł��B
���̒����̏ڍׂ�Bootstrap�̃A�C�R����iOS�G�����ɂȂ���������������
�����BootstrapDCN�ŃA�C�R����Font Awesome�̃A�C�R���ɕς��Ă݂܂��傤
������
- BootstrapDCN�̃T�C�g�ɂ���
- Font Awesome CSS���R�s�[����
- �R�s�[����CSS���w�b�_�[�Ƀy�[�X�g����
- �A�C�R����I�сA�L�q���R�s�[����
- �A�C�R���̋L�q���y�[�X�g����
BootstrapDCN�̃T�C�g�ɂ���
�܂���BootstrapDCN�֍s���܂��B�w�b�_�[���ɋL�q���镔�����Q�b�g���܂��B
Font Awesome CSS���R�s�[����
�T�C�g���ɏ���������܂��B�����A���̂�html�̋L�q���o�ĂȂ�������l�p�̂Ƃ�����N���b�N����ƁA���ꂼ��ɍ��킹���L�q������܂��B
�����html �ł̋L�q�Ȃ̂ŁA�I�����W�F�g���̋L�q���R�s�[���܂��B
�R�s�[����CSS���w�b�_�[�Ƀy�[�X�g����
html �t�@�C���ɖ߂�A��قǃR�s�[�����L�q���w�b�_�[��title�^�O�̒����Ƀy�[�X�g���܂��B
�A�C�R����I�сA�L�q���R�s�[����
����Font Awesome�̃y�[�W�ɍs���A���D�݂̃A�C�R����T���܂��B�A�C�R�������܂�����N���b�N���ďڍ׃y�[�W�ցc����̓J�����_�[�̃A�C�R�����g�p���܂�
�I�����W�F�g���̋L�q���R�s�[���܂��B
���Ȃ݂ɃA�C�R�����L�̃N���X�̌��fa-2x��NjL����ƃT�C�Y���ύX�ł��܂��B������傫������ƃA�C�R�����傫���Ȃ�d�g�݂ł��B
�A�C�R���̋L�q���y�[�X�g����
html�t�@�C���̔C�ӂ̏ꏊ�Ƀy�[�X�g���܂��B����Ŋ����ł�
Bootstrap��Font Awesome�̃A�C�R�����r���Ă݂܂���
���������Ɋ����ł��B
2017�N05��31��
Bootstrap�̃A�C�R����iOS�G�����ɂȂ�
Bootstrap�ł�iOS�G�����̕\�������
Bootstrap�̕������ĂċC�Â������c
iPad mini��iPhone��Texstastic�̃R�[�f�B���O�A�v�����g���A�C�R���}�����ăv���r���[���Ă݂��Ƃ���c
iPhone�ňٗl�ȊG������
�����ŁA�����Ƃ��Č������̂�Font-Awesome(�t�H���g�I�[�T��)
����Ȃ�iPhone�ł��V���v���ȃA�C�R�����\���ł��܂��B

Bootstrap�̕������ĂċC�Â������c
iPad mini��iPhone��Texstastic�̃R�[�f�B���O�A�v�����g���A�C�R���}�����ăv���r���[���Ă݂��Ƃ���c
 | iPad mini�ł͂����ƃA�C�R�����\������Ă��� |
iPhone�ňٗl�ȊG������

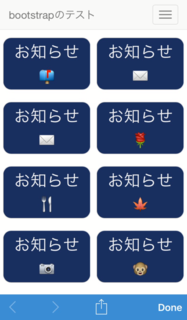 | �Ȃ�ƁAiPhone�Ńv���r���[����ƊG�������c �������G�����ɂ͊֘A�����Ȃ��������� |
�����ŁA�����Ƃ��Č������̂�Font-Awesome(�t�H���g�I�[�T��)
����Ȃ�iPhone�ł��V���v���ȃA�C�R�����\���ł��܂��B
2017�N04��10��
Google Analytics�̃t�B���^�ݒ�Ŏ����̃A�N�Z�X���J�E���g���Ȃ��I
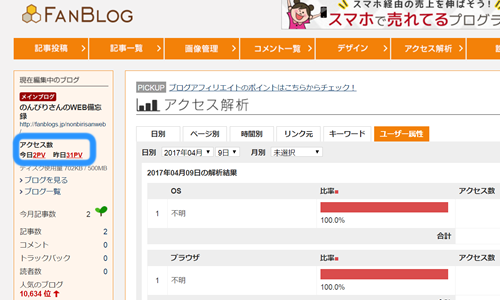
�����̃T�C�g�̃A�N�Z�X����m�肽�����ǁA�����ŃT�C�g�f�U�C�����̊m�F�����鎞�̃A�N�Z�X���͏��O����ݒ�
���O�ɏ��O����IP�A�h���X�͒��ׂĂ����܂���
������IP�A�h���X�ׂ�
�����A���g��Google Analytics�ɃA�N�Z�X���܂��B
���O�ɏ��O����IP�A�h���X�͒��ׂĂ����܂���
������IP�A�h���X�ׂ�
�����A���g��Google Analytics�ɃA�N�Z�X���܂��B
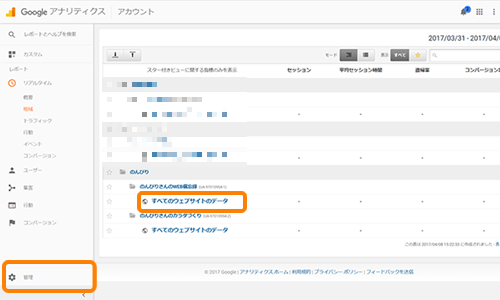
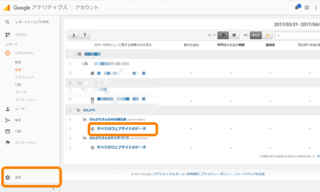 | �܂��͍����ɂ���Ǘ��}�[�N���N���b�N ����ɑΏۂ̃T�C�g�̂��ׂẴE�F�u�T�C�g�f�[�^���N���b�N���Ă����v�ł��B |
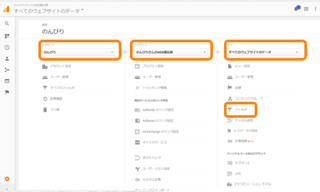 | �A�J�E���g�@�v���p�e�B�@�r���[��Ώۂ̂ɍ��킹�܂��B ���̌�A�r���[�̗��ɂ���t�B���^���N���b�N |
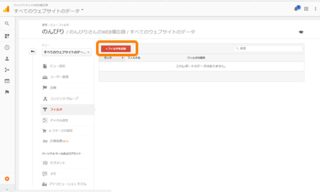 | +�t�B���^��lj��̐Ԃ��{�^�����N���b�N |
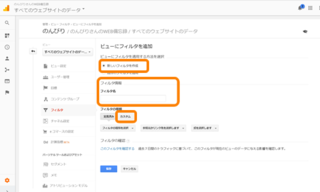 | �V�����t�B���^�̍쐬��I�����A�t�B���^���͕�����₷�����O��ݒ�(�Ⴆ�u����iPhone�v�Ȃ�) �t�B���^�̎�ނ́g�J�X�^���h���N���b�N |
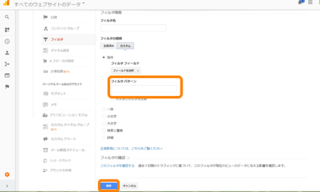 | �t�B���^�p�^�[����IP�A�h���X����͂�����ۑ����N���b�N |
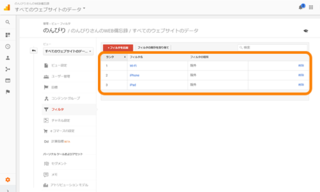 | �ݒ肪�������܂����B ���ɂ��ݒ肷��Ƃ����Ɉꗗ�Ƃ��ĕ\������܂��B |
������IP�A�h���X�ׂ�
Google Analytics�Ŏ����̃A�N�Z�X���J�E���g����Ȃ��ׂɂ��A������IP�A�h���X���������܂����B
���̑Ώۂ̃f�o�C�X�́c
 iPhone
 iPad
iPad
 Wi-Fi
Wi-Fi
�ȑO�ɂ�IP�A�h���X���������܂������A�@��ύX��Wi-Fi��ς����肵����O�ׁ̈A�ēx���������������������m��܂���B
�@��ύX�̍ۂ͊m�F���Ă݂����Ǝv���܂�
�������Ɂ@IP�A�h���X�@�m�F�Ɠ���ăg�b�v�Ɍ����Ǝv���܂��B
http://www.cman.jp/network/support/go_access.cgi
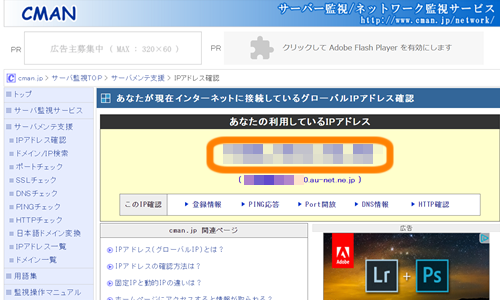
�����ɃA�N�Z�X����Ǝ����̎g�p���Ă���f�o�C�X��IP�A�h���X��������܂�
���̑Ώۂ̃f�o�C�X�́c
�ȑO�ɂ�IP�A�h���X���������܂������A�@��ύX��Wi-Fi��ς����肵����O�ׁ̈A�ēx���������������������m��܂���B
�@��ύX�̍ۂ͊m�F���Ă݂����Ǝv���܂�
�������Ɂ@IP�A�h���X�@�m�F�Ɠ���ăg�b�v�Ɍ����Ǝv���܂��B
http://www.cman.jp/network/support/go_access.cgi
�����ɃA�N�Z�X����Ǝ����̎g�p���Ă���f�o�C�X��IP�A�h���X��������܂�
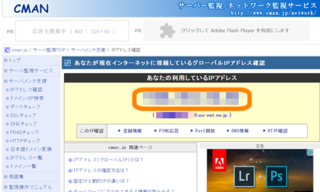 | �I�����W�̘g���ɏ�����܂��B ���ɂ��f�o�C�X�ɂ���ċ��ʂ̃��[�h������̂ŁA���ׂ�Ɗy�����Ȃ�܂��� |
Progate�ł���
WEB�̂������ł���Progate
�܂��܂��n�߂�����ł��B
���݂�Java�̕��K���Ă�g���C���Ă܂��B
�������Ԃɕ��ł��܂����AiPhone��iPad�ł̑��삪�C���b�Ƃ��鎞������܂�
���b�X���̎�ނ��L�x�ł��B
�����Ƃ��Ă͒m���Ă���̂���g���C���A���̌���̃��b�X���������Ă��������Ǝv���܂�
�܂��܂��n�߂�����ł��B
���݂�Java�̕��K���Ă�g���C���Ă܂��B
�������Ԃɕ��ł��܂����AiPhone��iPad�ł̑��삪�C���b�Ƃ��鎞������܂�
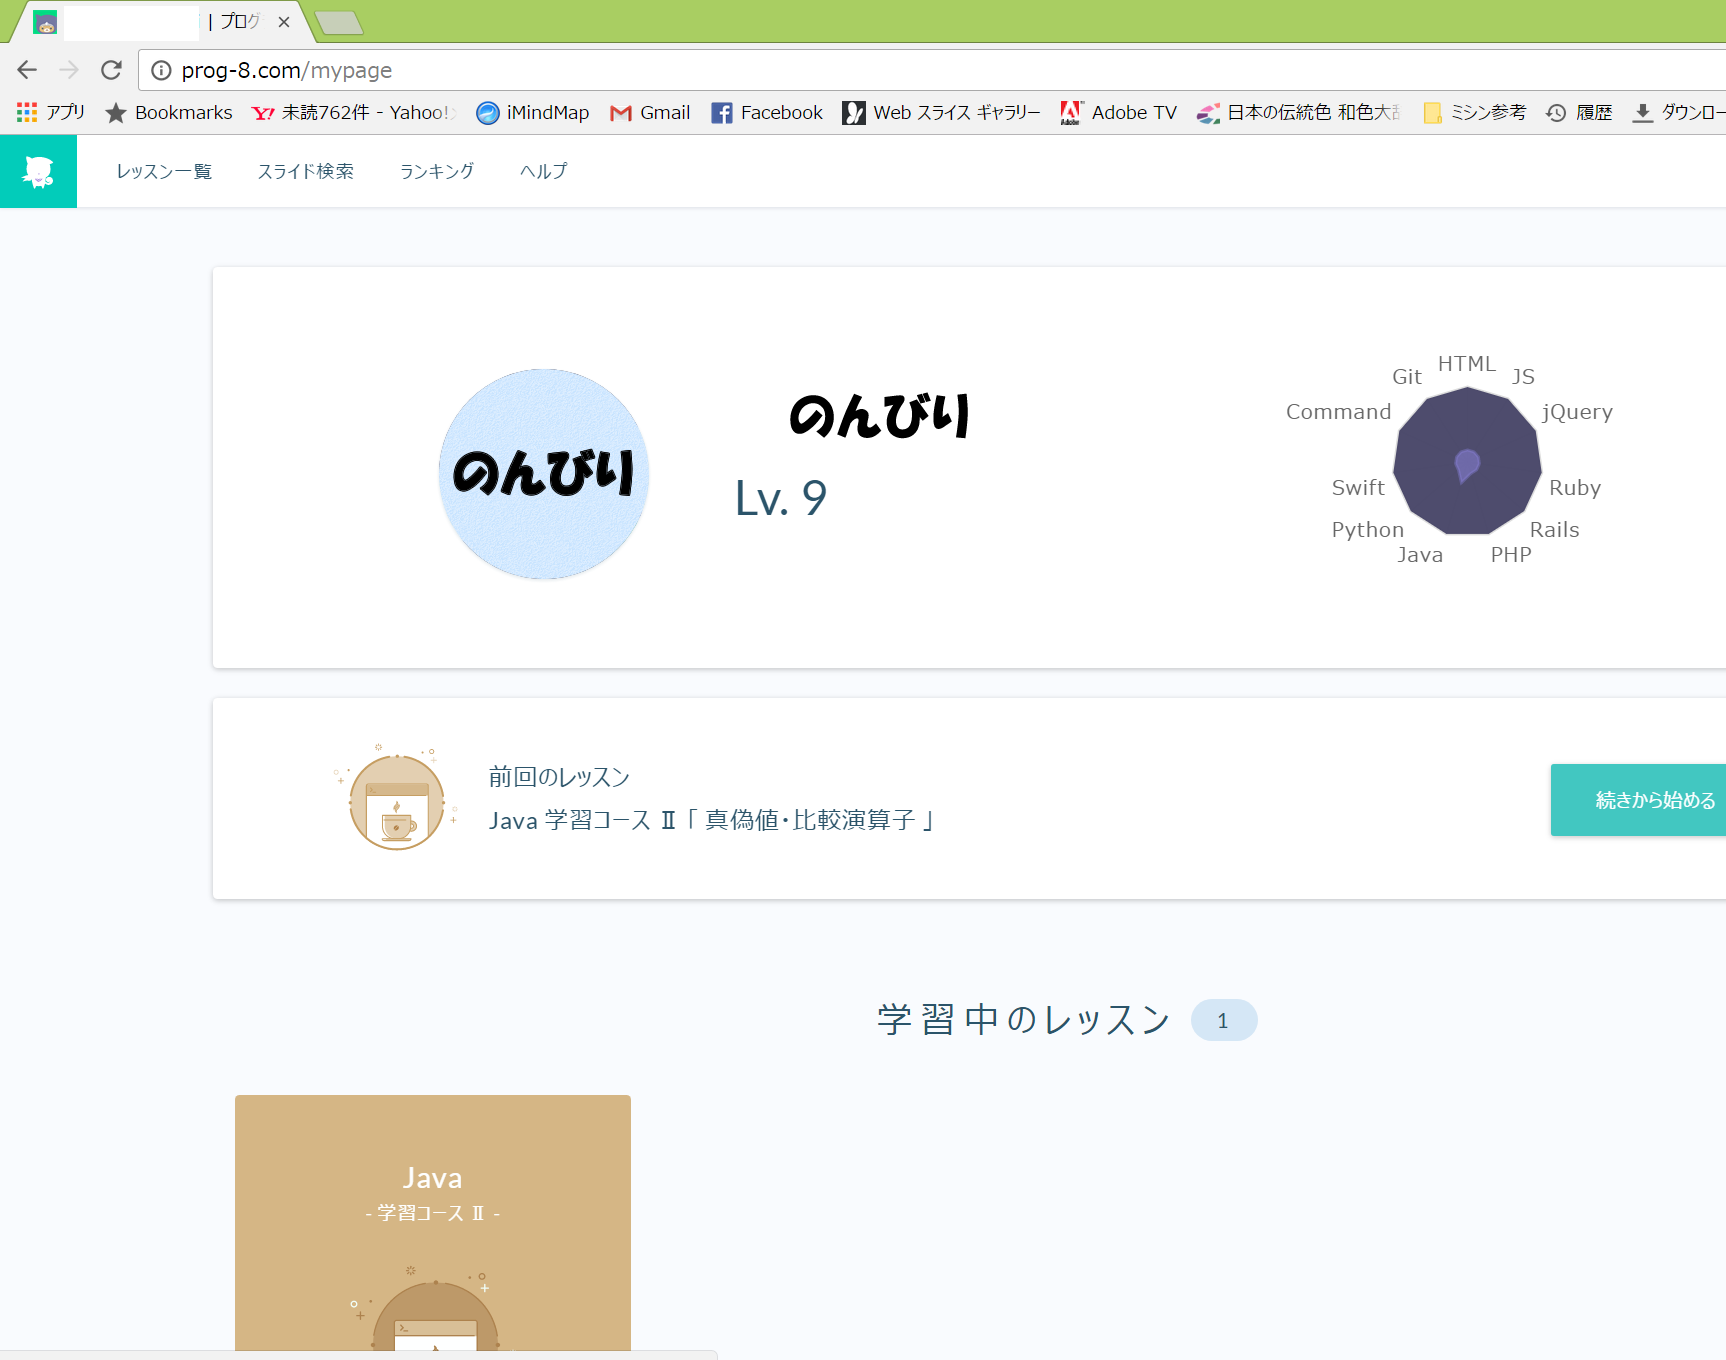
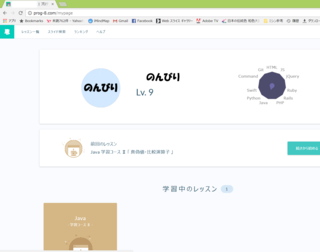 | �܂����x��9�ł��B �����̐i�����O���t�ɂȂ��Ă�̂ł킩��₷���B |
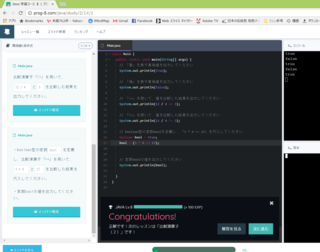 | Java�̎��ۂ̉�� �e�X�g�̑O�ɃX���C�h�ŗv�_���łĂ���B �P�����Z���̂Œi�K�I�ɐi�߂��܂��B |
���b�X���̎�ނ��L�x�ł��B
�����Ƃ��Ă͒m���Ă���̂���g���C���A���̌���̃��b�X���������Ă��������Ǝv���܂�

