新規記事の投稿を行うことで、非表示にすることが可能です。
2018年05月29日
《その395》画像ファイルの読み込み(2)
前回の MainPage.xaml.cpp のコードに、コメントを付け足しました。前回と同様に、エラー処理の記述は省いてありますが、今回は、処理を記述する箇所を明示してあります。
以下は、MainPage.xaml.cpp です。
//
// MainPage.xaml.cpp
// MainPage クラスの実装。
//

#include "pch.h"
#include "MainPage.xaml.h"
#include <fstream>

using namespace App13;

using namespace Platform;
using namespace Windows::Foundation;
using namespace Windows::Foundation::Collections;
using namespace Windows::UI::Xaml;
using namespace Windows::UI::Xaml::Controls;
using namespace Windows::UI::Xaml::Controls::Primitives;
using namespace Windows::UI::Xaml::Data;
using namespace Windows::UI::Xaml::Input;
using namespace Windows::UI::Xaml::Media;
using namespace Windows::UI::Xaml::Navigation;


MainPage::MainPage()
{
    InitializeComponent();
}


void App13::MainPage::
Button_Click(
    Platform::Object^ sender,
    Windows::UI::Xaml::RoutedEventArgs^ e)
{
    //  FileOpenPickerクラスオブジェクト fp を作成します。
    Windows::Storage::Pickers::FileOpenPicker^ fP =
        ref new Windows::Storage::Pickers::FileOpenPicker();

    // ViewMode を PickerViewMode::Thumbnail に設定すると、
    //      ファイル ピッカーで画像ファイルが縮小表示画像で表されます。
    fP->ViewMode
        = Windows::Storage::Pickers::PickerViewMode::Thumbnail;

    // 画像のある可能性が高いフォルダが表示されるように、
    //       PickerLocationId::PicturesLibrary を使って
    //       SuggestedStartLocation を Pictures に設定します。
    fP->SuggestedStartLocation
        = Windows::Storage::Pickers::PickerLocationId::PicturesLibrary;

    // 選択対象ファイルの拡張子を設定します。
    fP->FileTypeFilter->Append(".png");
    fP->FileTypeFilter->Append(".bmp");
    fP->FileTypeFilter->Append(".jpg");


    //  ひとつのファイルを選択するための ファイルピッカーを表示します。
    concurrency::create_task(fP->PickSingleFileAsync())
        .then([this](Windows::Storage::StorageFile^ file)
    {
        // ファイルの選択に成功した場合
        if (file) {

            // pickedFile : 選択ファイル名
            Platform::String^ pickedFile = file->Name;

            // 内部フォルダへのパスを取得します。
            Windows::Storage::StorageFolder^ localFolder
                = Windows::Storage::ApplicationData::Current->LocalFolder;


            // 内部フォルダにファイルをコピーします。
            //     NameCollisionOption::ReplaceExisting の指定で、
            //     既存のファイルがある場合は 置き換えます。
            concurrency::create_task(file->CopyAsync(
                localFolder,
                pickedFile,
                Windows::Storage::NameCollisionOption::ReplaceExisting))
                    .then([this](Windows::Storage::StorageFile^ copiedFile)
            {
                // ファイルのコピーに成功した場合
                if (copiedFile) {

                    // コピーしたファイルへのパスを取得します。
                    String^ Path2 = copiedFile->Path;

                    // パスを wstring型に変換
                    std::wstring filePath (Path2->Begin());

                    // in : 入力用ファイルストリーム(バイナリモード)
                    std::ifstream in(filePath, std::ios::binary);

                    // istreambuf_iterator を用いて、
                    //      ストリームからデータを読み込みます。
                    std::vector<char> data((std::istreambuf_iterator<char>(in)),
                        (std::istreambuf_iterator<char>()));

                    // BitmapImageクラスオブジェクト bitmapImage を作成します。
                    auto bitmapImage
                        = ref new Windows::UI::Xaml::Media::Imaging::
                          BitmapImage();

                    // InMemoryRandomAccessStreamクラスオブジェクト stream は、
                    //             メモリ領域からメモリ領域へのストリームです。
                    auto stream
                        = ref new Windows::Storage::Streams::
                            InMemoryRandomAccessStream();

                    // stream の GetOutputStreamAtメソッドを呼び出し、
                    //            出力ストリーム writer を取得します。
                    auto writer
                        = ref new Windows::Storage::Streams::
                            DataWriter(stream->GetOutputStreamAt(0));

                    // WriteBytesメソッドは、
                    //      ファイルストリームにバイトを書き込みます。
                    writer->WriteBytes(
                        ArrayReference<unsigned char>(
                            (unsigned char*)data.data(),
                            data.size()
                        )
                    );

                    Concurrency::create_task(writer->StoreAsync())
                        .then([=](unsigned bytesStored)
                    {
                        // ファイルストリームを
                        //     ビットマップ画像として設定します。
                        return bitmapImage->SetSourceAsync(stream);
                    });

                    // imgコントロールの Source を bitmapImage にします。
                    img->Source = bitmapImage;
                }
                // ファイルのコピーに失敗した場合
                else {
                    // エラー処理・・・省略してあります (;^ω^A
                }
            });
        }
        // ファイルの選択に失敗した場合
        else {
            // エラー処理・・・省略してあります (;^ω^A
        }

    });
}
2018年05月26日
《その394》画像ファイルの読み込み(1)
画像ファイルの読み込み(ファイルピッカーを用いた画像選択)
今回は、画像ファイルを読み込んで表示するアプリです。
読み込むファイルの拡張子は 「.png」「.bmp」「.jpg」の3種類だけです。
読み込むファイルの選択にはファイルピッカーを利用しています。
読込み・表示 だけの単純なアプリです。基本機能だけのプログラムなので、読込みエラー等については未対策です。
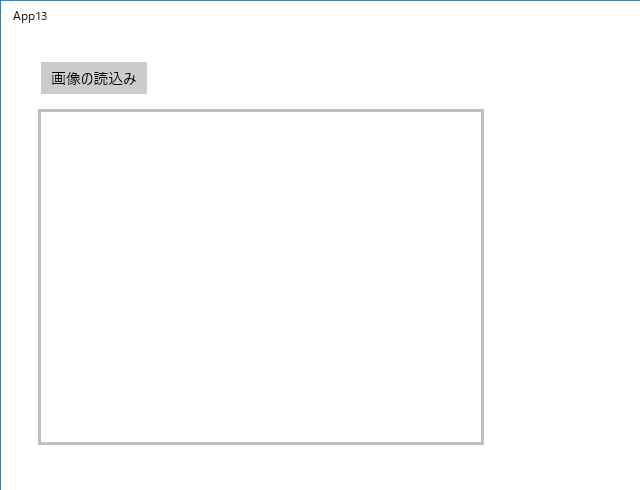
アプリの開始画面です。
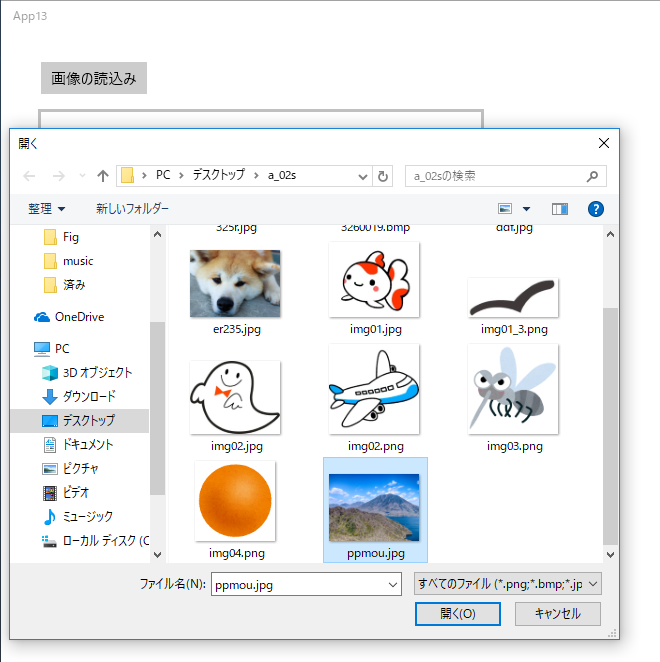
ボタンをクリックするとファイルピッカーが表示されます。
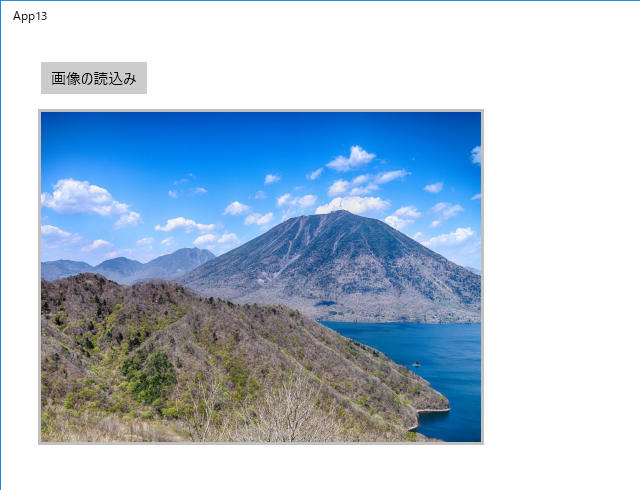
選択した画像が表示されます。
以下は、MainPage.xaml.cpp です。
//
// MainPage.xaml.cpp
// MainPage クラスの実装。
//

#include "pch.h"
#include "MainPage.xaml.h"
#include <fstream>

using namespace App13;

using namespace Platform;
using namespace Windows::Foundation;
using namespace Windows::Foundation::Collections;
using namespace Windows::UI::Xaml;
using namespace Windows::UI::Xaml::Controls;
using namespace Windows::UI::Xaml::Controls::Primitives;
using namespace Windows::UI::Xaml::Data;
using namespace Windows::UI::Xaml::Input;
using namespace Windows::UI::Xaml::Media;
using namespace Windows::UI::Xaml::Navigation;


MainPage::MainPage()
{
    InitializeComponent();
}


void App13::MainPage::
Button_Click(Platform::Object^ sender,
    Windows::UI::Xaml::RoutedEventArgs^ e)
{
    // ファイルピッカーを設定します。
    auto fP
        = ref new Windows::Storage::Pickers::FileOpenPicker();
    fP->ViewMode
        = Windows::Storage::Pickers::PickerViewMode::Thumbnail;
    fP->SuggestedStartLocation
        = Windows::Storage::Pickers::PickerLocationId::PicturesLibrary;
    fP->FileTypeFilter->Append(".png");
    fP->FileTypeFilter->Append(".bmp");
    fP->FileTypeFilter->Append(".jpg");

    // ファイル ピッカーを表示します。
    concurrency::create_task(fP->PickSingleFileAsync())
        .then([this](Windows::Storage::StorageFile^ file)
    {
        // pickedFile : 選択ファイル名
        Platform::String^ pickedFile = file->Name;

        // 内部フォルダへのパスを取得します。
        auto localFolder
            = Windows::Storage::ApplicationData::Current->LocalFolder;

        // 内部フォルダにファイルをコピーします。
        concurrency::create_task(file->CopyAsync(
            localFolder,
            pickedFile,
            Windows::Storage::NameCollisionOption::ReplaceExisting))
                .then([this](Windows::Storage::StorageFile^ copiedFile)
            {
                // コピーしたファイルへのパスを取得します。
                auto Path2 = copiedFile->Path;
                std::wstring filePath (Path2->Begin());

                // in : 入力用ファイルストリーム(バイナリモード)
                std::ifstream in(filePath, std::ios::binary);
                std::vector<char> data(
                    (std::istreambuf_iterator<char>(in)),
                    (std::istreambuf_iterator<char>())
                );

                auto bitmapImage
                    = ref new Windows::UI::Xaml::Media::Imaging::
                      BitmapImage();

                auto stream
                    = ref new Windows::Storage::Streams::
                      InMemoryRandomAccessStream();
                auto writer
                    = ref new Windows::Storage::Streams::
                      DataWriter(stream->GetOutputStreamAt(0));

                writer->WriteBytes(ArrayReference<unsigned char>(
                    (unsigned char*)data.data(), data.size())
                );

                Concurrency::create_task(
                    writer->StoreAsync()).then([=](unsigned bytesStored)
                {
                    return bitmapImage->SetSourceAsync(stream);
                });

                img->Source = bitmapImage;
            });
        }
    );
}
2018年05月24日
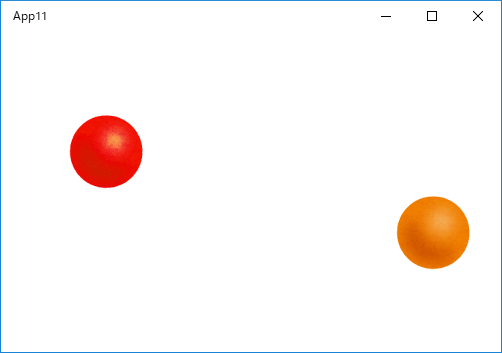
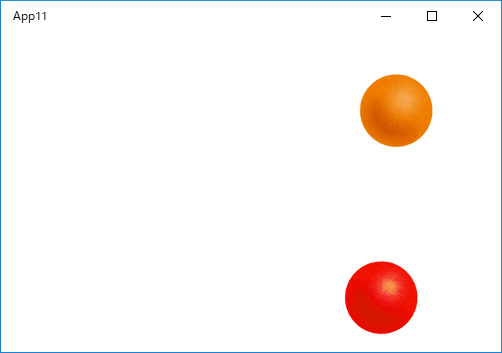
《その393》2つのボール間の距離・壁との位置関係
2つのボール間の距離・壁との位置関係
今回はのアプリは、前回とほとんど同じですが、球が2つある点が異なります。
球と球が衝突したときの はね返りについては、計算が難しそうなのでスルーして (*^▽^*)ゞ
適当にはね返るようにしてあります(お互いの速度を交換するだけ)が、実行してみるとそんなに不自然には見えません
球が2つになると、お互いの位置関係もチェックしなければなりません。
コスト削減のために、
(2球の x座標の差 < 半径の和) && (2球の y座標の差 < 半径の和)
のときだけ、2球の距離を計算しています。
球と壁との位置関係,球と床・天井との位置関係,2球の位置関係 といった個々の位置関係チェックだけでは対応できないような、複数の位置関係に起因するエラーが発生する可能性があります。
下記のプログラムでは、例えば、2球が衝突したときにお互いの x座標をいきなり 少しだけ拡げていますが、これがないと、ごく稀にですが 2球が合体してしまうエラーが発生します。
以下は、MainPage.xaml.cpp です。
//
// MainPage.xaml.cpp
// MainPage クラスの実装。
//

#include "pch.h"
#include "MainPage.xaml.h"

using namespace App11;

using namespace Platform;
using namespace Windows::Foundation;
using namespace Windows::Foundation::Collections;
using namespace Windows::UI::Xaml;
using namespace Windows::UI::Xaml::Controls;
using namespace Windows::UI::Xaml::Controls::Primitives;
using namespace Windows::UI::Xaml::Data;
using namespace Windows::UI::Xaml::Input;
using namespace Windows::UI::Xaml::Media;
using namespace Windows::UI::Xaml::Navigation;


double current_w = 0;   // ウィンドウ幅
double current_h = 0;   //           高さ
double x01 = 0;         // 橙色ボールの x座標
double y01 = 0;         //              y座標
double x02 = 0;         // 赤色ボールの x座標
double y02 = 0;         //              y座標

// 橙色ボールの初期速度
double vx01 = 4;        // x方向速度
double vy01 = 1;        // y方向速度

// 赤色ボールの初期速度
double vx02 = -5;       // x方向速度
double vy02 = -5;       // y方向速度


MainPage::MainPage()
{
    InitializeComponent();

    // 画面サイズを取得
    current_w = Window::Current->Bounds.Width;
    current_h = Window::Current->Bounds.Height;

    // 赤色ボールの最初の位置は ウィンドウの右下です。
    x02 = current_w - 80;
    y02 = current_h - 80;

    // ボールを動かし始めます。
    StartTimer();
}


void MainPage::StartTimer() {
    auto timer = ref new Windows::UI::Xaml::DispatcherTimer();
    TimeSpan span;
    span.Duration = 1000;
    timer->Interval = span;
    timer->Start();

    auto rcpt
        = timer->Tick +=
        ref new EventHandler<Object^>(this, &MainPage::OnTick);
}


void MainPage::OnTick(Object^ sender, Object^ e) {
    // 橙色ボールと右壁
    if (x01 > current_w - 80) {
        vx01 = -vx01; x01 = current_w - 80;
    }
    // 橙色ボールと床
    if (y01 > current_h - 80) {
        vy01 = -vy01; y01 = current_h - 80;
    }
    // 橙色ボールと左壁
    if (x01 < 0) {
        vx01 = -vx01; x01 = 0;
    }
    // 橙色ボールと天井
    if (y01 < 0) {
        vy01 = -vy01; y01 = 0;
    }

    // 橙色ボールの位置
    x01 += vx01;
    y01 += vy01;

    // 赤色ボールと右壁
    if (x02 > current_w - 80) {
        vx02 = -vx02; x02 = current_w - 80;
    }
    // 赤色ボールと床
    if (y02 > current_h - 80) {
        vy02 = -vy02; y02 = current_h - 80;
    }
    // 赤色ボールと左壁
    if (x02 < 0) {
        vx02 = -vx02; x02 = 0;
    }
    // 赤色ボールと天井
    if (y02 < 0) {
        vy02 = -vy02; y02 = 0;
    }

    // 赤色ボールの位置
    x02 += vx02;
    y02 += vy02;

    // 橙色ボールと赤色ボール
    if (x02 - x01 > 80 || x02 - x01 < -80)
        goto LABEL;
    if (y02 - y01 > 80 || y02 - y01 < -80)
        goto LABEL;

    // 橙色ボールと赤色ボール
    double d = sqrt((x02 - x01) * (x02 - x01) + (y02 - y01) * (y02 - y01));
    if (d < 80) {
            double temp = vx01;
            vx01 = vx02;
            vx02 = temp;
            temp = vy01;
            vy01 = vy02;
            vy02 = temp;

            if (x01 <= x02) {
                if (x01 > 10) x01 -= 5;
                else x02 += 5;
            }
            else {
                if (x02 > 10) x02 -= 5;
                else x01 += 5;
            }
    }

LABEL:;
    // 2球をそれぞれの位置に移動させます。
    img1->Margin = Windows::UI::Xaml::Thickness(x01, y01, 0, 0);
    img2->Margin = Windows::UI::Xaml::Thickness(x02, y02, 0, 0);
}


// ウィンドウサイズ変更時のイベントハンドラ
void App11::MainPage::
page_SizeChanged(Platform::Object^ sender,
    Windows::UI::Xaml::SizeChangedEventArgs^ e)
{
    current_w = Window::Current->Bounds.Width;
    current_h = Window::Current->Bounds.Height;

    // 以下は、
    //   ドラッグによるアプリウィンドウの急激な縮小が
    //   行われた場合の対策です。
    if (x01 > current_w - 80) {
        x01 = current_w - 80;
        if (sqrt((x02 - x01) * (x02 - x01) + (y02 - y01) * (y02 - y01)) < 80)
            x02 = x01 - 80;
    }
    if (x02 > current_w - 80) {
        x02 = current_w - 80;
        if (sqrt((x02 - x01) * (x02 - x01) + (y02 - y01) * (y02 - y01)) < 80)
            x01 = x02 - 80;
    }
    if (y01 > current_h - 80) {
        y01 = current_h - 80;
        if (sqrt((x02 - x01) * (x02 - x01) + (y02 - y01) * (y02 - y01)) < 80)
            y02 = y01 - 80;
    }
    if (y02 > current_h - 80) {
        y02 = current_h - 80;
        if (sqrt((x02 - x01) * (x02 - x01) + (y02 - y01) * (y02 - y01)) < 80)
            y01 = y02 - 81;
    }
}
2018年05月21日
《その392》はね返るボール(ウィンドウのサイズ取得)
はね返るボール(ウィンドウのサイズ取得)
最初に左上にあったボールが、右斜め下に 45度の角度でスタートします。
単純な直線運動ですが、壁や床にぶつかった場合には はね返ります。アプリは、現時点のウィンドウサイズを認識できるので、ドラッグでサイズ変更しても、ボールは壁や床で適切に はね返ります。
今回のプログラムは、前回までに出てきた内容しか使っていませんが、念のため、
下記の MainPage.xaml.cpp のコードに説明のためのコメントを詳しく入れました。
ボールがウィンドウ内を動き回ります(ボールの軌跡はあとから書き加えたものです)。

以下は、MainPage.xaml.cpp です。
//
// MainPage.xaml.cpp
// MainPage クラスの実装。
//

#include "pch.h"
#include "MainPage.xaml.h"

using namespace App10;

using namespace Platform;
using namespace Windows::Foundation;
using namespace Windows::Foundation::Collections;
using namespace Windows::UI::Xaml;
using namespace Windows::UI::Xaml::Controls;
using namespace Windows::UI::Xaml::Controls::Primitives;
using namespace Windows::UI::Xaml::Data;
using namespace Windows::UI::Xaml::Input;
using namespace Windows::UI::Xaml::Media;
using namespace Windows::UI::Xaml::Navigation;


float current_w = 0;    // 現在のウィンドウ幅
float current_h = 0;    // 現在のウィンドウ高さ
float x = 0;            // ボール位置の x座標
float y = 0;            // ボール位置の y座標
int vx = 3;             // x方向の速度
int vy = 3;             // y方向の速度


MainPage::MainPage()
{
    // フォームの初期化をします。
    InitializeComponent();

    // StartTimer関数を呼び出します。
    StartTimer();
}


// タイマーのスタート
void MainPage::StartTimer() {

    // タイマーオブジェクトを作成します。
    auto timer = ref new Windows::UI::Xaml::DispatcherTimer();

    // タイマーの設定
    TimeSpan span;
    span.Duration = 1000;
    timer->Interval = span;

    // タイマーのスタート
    timer->Start();

    // 定期的に OnTick関数を呼び出します。
    auto rcpt
        = timer->Tick +=
        ref new EventHandler<Object^>(this, &MainPage::OnTick);
}


// タイマーによって呼び出されたときの作業
void MainPage::OnTick(Object^ sender, Object^ e) {

    // ボールが右壁に達していたら x方向の速度を負にします。
    if (x > current_w - 80) vx = -vx;

    // ボールが床に達していたら y方向の速度を負にします。
    //                   ※ y方向は上が負の向きです。
    if (y > current_h - 80) vy = -vy;

    // ボールが左壁に達していたら x方向の速度を正に戻します。
    if (x < 0) vx = -vx;

    // ボールが天井に達していたら y方向の速度を正に戻します。
    if (y < 0) vy = -vy;

    x += vx;    // x座標を変更します。
    y += vy;    // y座標を変更します。

    // ボールの位置を指定します。
    img->Margin = Windows::UI::Xaml::Thickness(x, y, 0, 0);
}


// ウィンドウサイズ変更時のイベントハンドラ
void App10::MainPage::
Page_SizeChanged(Platform::Object^ sender,
    Windows::UI::Xaml::SizeChangedEventArgs^ e)
{
    // 変更後のウィンド幅を current_w に代入します。
    current_w = Window::Current->Bounds.Width;

    // 変更後のウィンド高さを current_h に代入します。
    current_h = Window::Current->Bounds.Height;

    // 以下は、
    //   ボールが範囲外に出てしまうような速さで
    //   ドラッグによるアプリウィンドウの縮小が
    //   行われた場合の対策です。
    if (x > current_w - 80)
        x = current_w - 80;
    if (y > current_h - 80)
        y = current_h - 80;
}
2018年05月20日
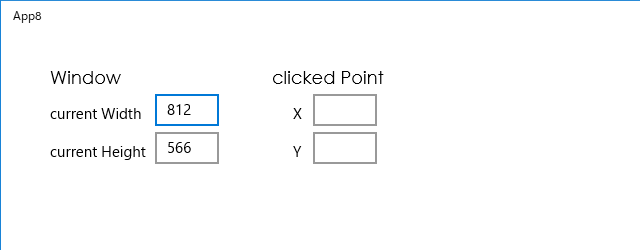
《その391》ウィンドウのサイズ取得
ウィンドウのサイズ取得
ウィンドウのサイズ取得は、特にゲームアプリなどを作成するときに必要になることが多いのではないでしょうか。
ウィンドウのサイズはドラッグで簡単に変更できるので、利用者がどんなウィンドウサイズでアプリを利用するのかを事前に知ることはできません。
例えば、ウィンドウ内をボールが飛び回るような場面では、壁(右端)や床(下端)の位置がわからないと、ボールの跳ね返り位置を決められません。
ウィンドウのサイズを固定する方法もありますが、そのようにはしたくない場合もあると思います。
アプリをスタートしました。
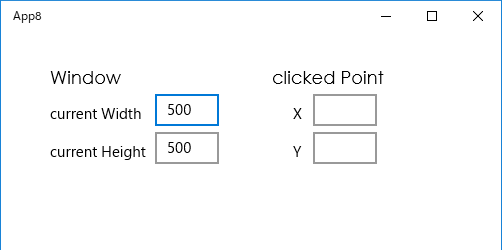
ドラッグしてウィンドウサイズを変更します。ドラッグ中もリアルタイムでサイズが表示されます。
ウィンドウの適当な位置をクリックしてみました。
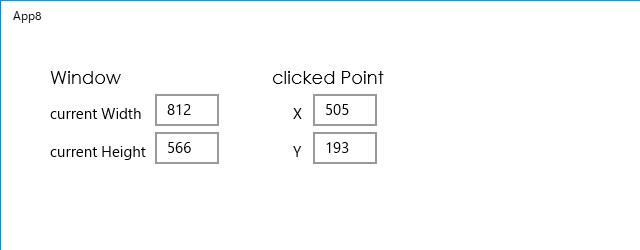
ドラッグしてウィンドウサイズを変更しています。

以下は、MainPage.xaml.cpp です。
//
// MainPage.xaml.cpp
// MainPage クラスの実装。
//

#include "pch.h"
#include "MainPage.xaml.h"

using namespace App8;

using namespace Platform;
using namespace Windows::Foundation;
using namespace Windows::Foundation::Collections;
using namespace Windows::UI::Xaml;
using namespace Windows::UI::Xaml::Controls;
using namespace Windows::UI::Xaml::Controls::Primitives;
using namespace Windows::UI::Xaml::Data;
using namespace Windows::UI::Xaml::Input;
using namespace Windows::UI::Xaml::Media;
using namespace Windows::UI::Xaml::Navigation;


MainPage::MainPage()
{
    InitializeComponent();
}


// Page_SizeChangedイベントハンドラ
void App8::MainPage::
Page_SizeChanged(Platform::Object^ sender,
    Windows::UI::Xaml::SizeChangedEventArgs^ e)
{
    // 現在のウィンドウサイズを取得します。
    auto current_w = Window::Current->Bounds.Width;
    auto current_h = Window::Current->Bounds.Height;
    box1->Text = current_w.ToString();
    box2->Text = current_h.ToString();
}


void App8::MainPage::
Page_PointerPressed(Platform::Object^ sender,
    Windows::UI::Xaml::Input::PointerRoutedEventArgs^ e)
{
    auto pt = e->GetCurrentPoint(this);
    float x = pt->Position.X;
    float y = pt->Position.Y;
    box3->Text = ((int)x).ToString();
    box4->Text = ((int)y).ToString();
}
2018年05月18日
《その390》ポインタ位置・マウスの動作 を取得
ポインタ位置・マウスの動作 を取得
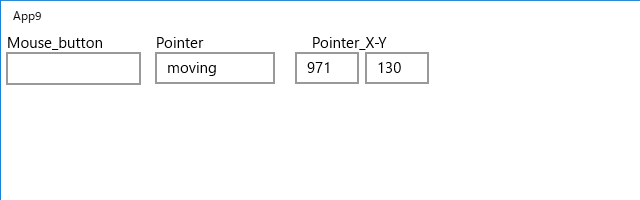
前回《389》は、マウスボタンの状態だけの取得でしたが、今回は、ポインタ位置の取得も行います。
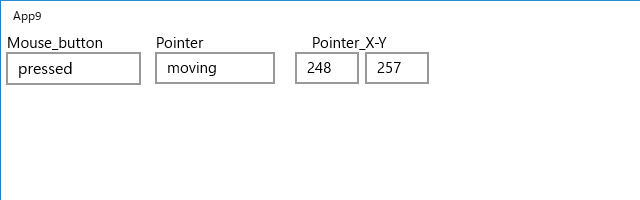
ポインタが「moving」か「stopped」かも表示するので、例えば、「pressed」と「moving」が同時に表示されていれば ドラッグ中ということになります。
アプリをスタートしました。

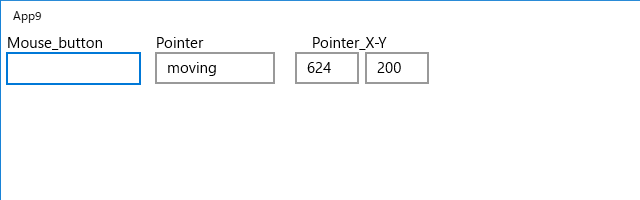
ポインタが Page 内を動いています。2つの数値は X-Y座標です。
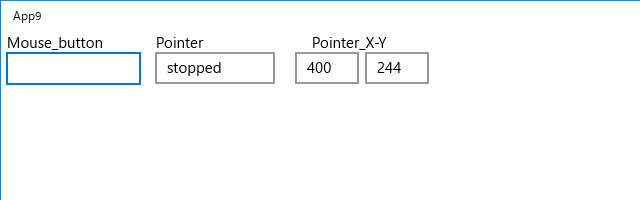
ポインタが停止しました。
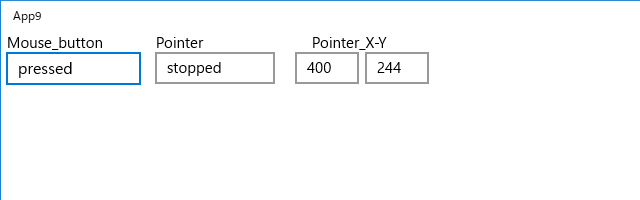
マウスボタンが押されています。
ドラッグ中です。
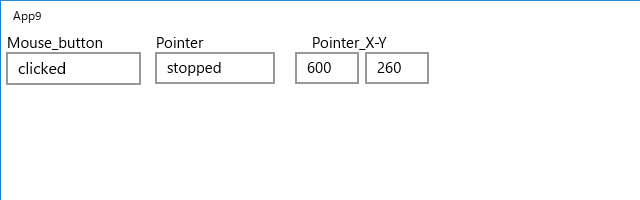
クリックしました。
クリックが成立したあと、ポインタが動いています。

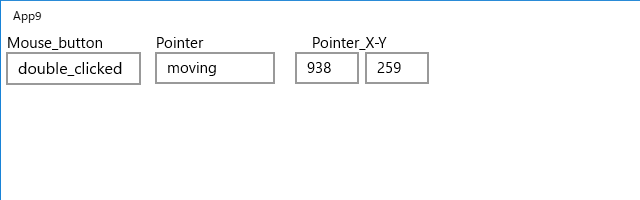
ダブルクリックしました。

ダブルクリックが成立したあと、ポインタが動いています。
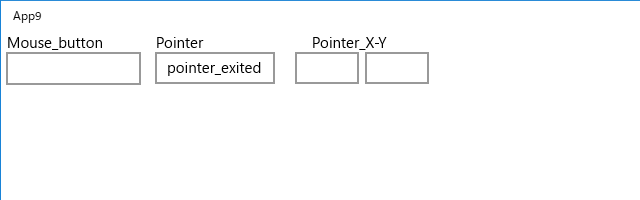
ポインタが Page外に出ました。
ポインタが Page内に入って、動いています。
以下は、MainPage.xaml.cpp です。
//
// MainPage.xaml.cpp
// MainPage クラスの実装。
//

#include "pch.h"
#include "MainPage.xaml.h"

using namespace App9;

using namespace Platform;
using namespace Windows::Foundation;
using namespace Windows::Foundation::Collections;
using namespace Windows::UI::Xaml;
using namespace Windows::UI::Xaml::Controls;
using namespace Windows::UI::Xaml::Controls::Primitives;
using namespace Windows::UI::Xaml::Data;
using namespace Windows::UI::Xaml::Input;
using namespace Windows::UI::Xaml::Media;
using namespace Windows::UI::Xaml::Navigation;


MainPage::MainPage()
{
    InitializeComponent();

    // タイマーのスタート
    StartTimer();
}


// click_interval
//  (click_intervalミリ秒以内ならばダブルクリックと判断)
const int click_interval = 500;     // millisecond

int double_clicked = 0;     // ダブルクリックのとき 1
int last_clicked_time = 0;  // 直前のクリック時刻

int pointer_exited = 0;     // ポインタが Page外のとき 1

// 位置
float x = 0;
float y = 0;


// マウスボタンが押されたときのイベントハンドラ
void App9::MainPage::
Page_PointerPressed(Platform::Object^ sender,
    Windows::UI::Xaml::Input::PointerRoutedEventArgs^ e)
{
    // マウスボタンが押された時刻の取得
    SYSTEMTIME syst;
    GetSystemTime(&syst);
    int current = syst.wSecond * 1000 + syst.wMilliseconds;

    // クリックの間隔が tsミリ秒より大きいなら
    //                ダブルクリックではありません。
    if (current - last_clicked_time > click_interval) {
        double_clicked = 0;
        // mouse-button pressed
        box1->Text = "pressed";
    }
    // クリックの間隔が tsミリ秒以下なら
    //                ダブルクリックです。
    else {
        double_clicked = 1;
        // mouse-button double-clicked
        box1->Text = "double_clicked";
    }
    last_clicked_time = current;
}


// マウスボタンが解放されたときのイベントハンドラ
void App9::MainPage::
Page_PointerReleased(Platform::Object^ sender,
    Windows::UI::Xaml::Input::PointerRoutedEventArgs^ e)
{
    // ダブルクリックでないときは、
    //            マウスボタンが解放された時点
    //            で クリック が成立します。
    if (!double_clicked) {
        // mouse-button clicked
        box1->Text = "clicked";
    }
}


// ポインタが動いているときのイベントハンドラ
void App9::MainPage::
Page_PointerMoved(Platform::Object^ sender,
    Windows::UI::Xaml::Input::PointerRoutedEventArgs^ e)
{
    box2->Text = "moving";

    auto pt = e->GetCurrentPoint(this);
    x = pt->Position.X;
    y = pt->Position.Y;
    box3->Text = ((int)x).ToString();
    box4->Text = ((int)y).ToString();
}


// タイマーのスタート
void MainPage::StartTimer() {
    auto timer = ref new Windows::UI::Xaml::DispatcherTimer();

    TimeSpan span;
    span.Duration = 10000;
    timer->Interval = span;

    timer->Start();
    auto rcpt
        = timer->Tick +=
        ref new EventHandler<Object^>(this, &MainPage::OnTick);
}


// タイマー ON のときの作業
void MainPage::OnTick(Object^ sender, Object^ e) {
    if (!pointer_exited)
        box2->Text = "stopped";
}


// ポインタが Page外に出たときのイベントハンドラ
void App9::MainPage::
Page_PointerExited(Platform::Object^ sender,
    Windows::UI::Xaml::Input::PointerRoutedEventArgs^ e)
{
    pointer_exited = 1;
    box1->Text = "";
    box2->Text = "pointer_exited";
    box3->Text = "";
    box4->Text = "";
}


// ポインタが Page内に入ったときのイベントハンドラ
void App9::MainPage::
Page_PointerEntered(Platform::Object^ sender,
    Windows::UI::Xaml::Input::PointerRoutedEventArgs^ e)
{
    pointer_exited = 0;
}
2018年05月17日
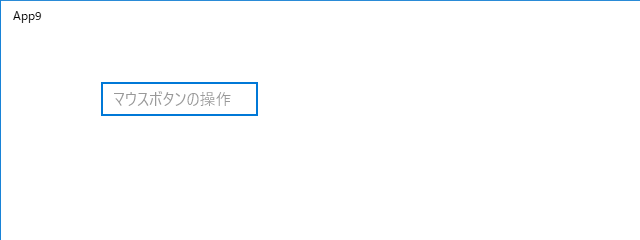
《その389》マウスボタンの状態取得
マウスボタンの状態取得
今回のアプリは、マウスボタンの状態を取得します。
・押されている状態
・クリック
・ダブルクリック
の区別ができれば、ユーザの意思を受け取るのに役立ちます。
画面上の特定の画像をダブルクリックすることでプログラムの流れを変えるなど、アプリの操作性の向上に役立つと思います。
今回のアプリでは、TextBox以外の任意の場所を、 クリック,ダブルクリック あるいは マウスボタンを押したまま にすると、その状態が TextBox に表示されます。
※ ボタンを押したままの時間が長くても、ボタンを解放した時点で クリック が成立します。
※ Windows では、ボタンの押下・解放・押下を連続して行った時点でダブルクリックが成立するので、その仕様に合わせました。押下したままで、解放しなくても ダブルクリックが成立します。
※ 押下・解放・押下・解放・押下・解放・・・の連続は、ダブルクリックになります。これも Windows の仕様と同じです。
アプリの開始画面です。
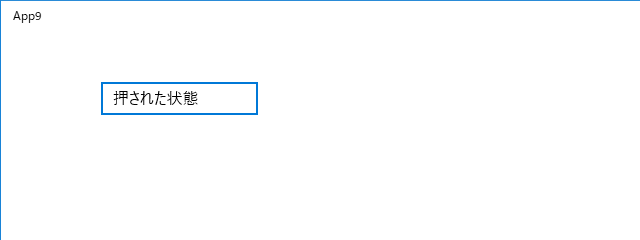
Page上で、マウスボタンを押したままにしている状態のときの画面です。
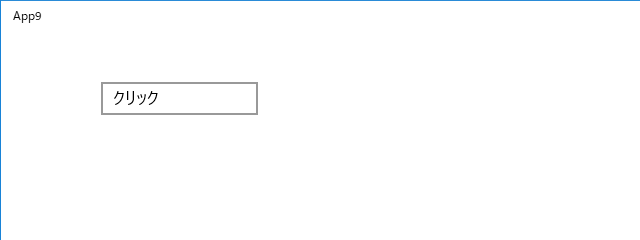
Page上を クリックしたときの画面です。
Page上を ダブルクリックしたときの画面です。
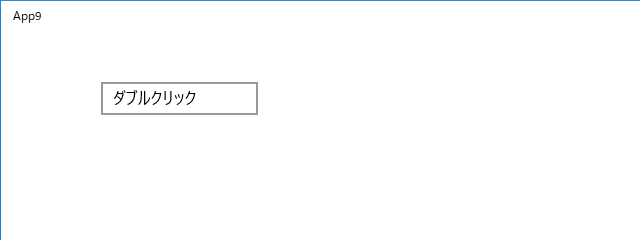
以下は、MainPage.xaml.cpp です。
//
// MainPage.xaml.cpp
// MainPage クラスの実装。
//

#include "pch.h"
#include "MainPage.xaml.h"

using namespace App9;

using namespace Platform;
using namespace Windows::Foundation;
using namespace Windows::Foundation::Collections;
using namespace Windows::UI::Xaml;
using namespace Windows::UI::Xaml::Controls;
using namespace Windows::UI::Xaml::Controls::Primitives;
using namespace Windows::UI::Xaml::Data;
using namespace Windows::UI::Xaml::Input;
using namespace Windows::UI::Xaml::Media;
using namespace Windows::UI::Xaml::Navigation;


MainPage::MainPage()
{
    InitializeComponent();
}


// click-interval
//  (tsミリ秒以内ならばダブルクリックと判断)
const int ts = 500;

int f = 0;      // ダブルクリックのとき f = 1
int time0 = 0;  // 直前のクリック時刻


void App9::MainPage::
Page_PointerPressed(Platform::Object^ sender,
    Windows::UI::Xaml::Input::PointerRoutedEventArgs^ e)
{
    // クリック時刻の取得
    SYSTEMTIME syst;
    GetSystemTime(&syst);
    int tim = syst.wSecond * 1000 + syst.wMilliseconds;

    // クリックの間隔が tsミリ秒より大きいなら
    //                ダブルクリックではありません。
    if (tim - time0 > ts) {
        f = 0;
        // mouse-button pressed
        box->Text = "押された状態";
    }
    // クリックの間隔が tsミリ秒以下なら
    //                ダブルクリックです。
    else {
        f = 1;
        // mouse-button double-clicked
        box->Text = "ダブルクリック";
    }
    time0 = tim;
}


void App9::MainPage::
Page_PointerReleased(Platform::Object^ sender,
    Windows::UI::Xaml::Input::PointerRoutedEventArgs^ e)
{
    // ダブルクリックでないときは、
    //            マウスボタンが解放された時点
    //            で クリック が成立します。
    if (!f) {
        // mouse-button clicked
        box->Text = "クリック";
    }
}
2018年05月16日
《その388》ドラッグによる描画(2)
ドラッグによる描画(2)
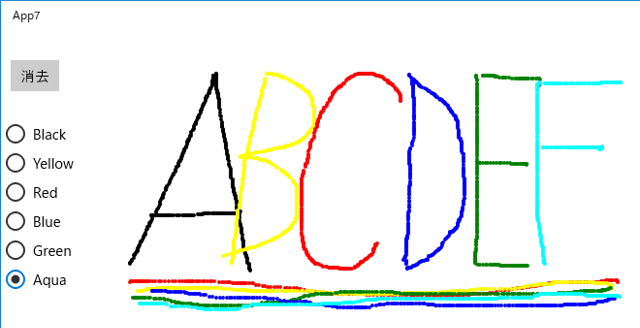
今回も 前回《387》と同じく、ドラッグによる描画ですが、ペンの色を選択できるようにしました。
ラジオボタンで色を選択できるようにしたこと以外は、ほぼ 前回と同様です。
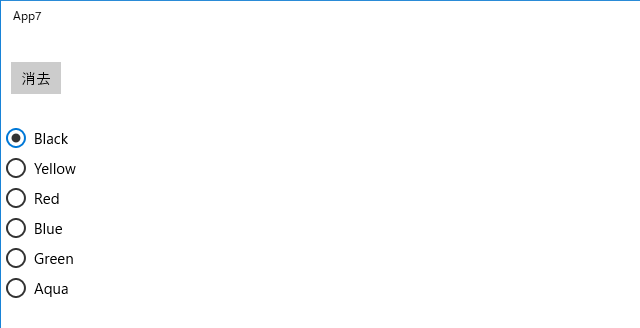
スタート画面です。最初は 黒色ペンが選択状態になっています。
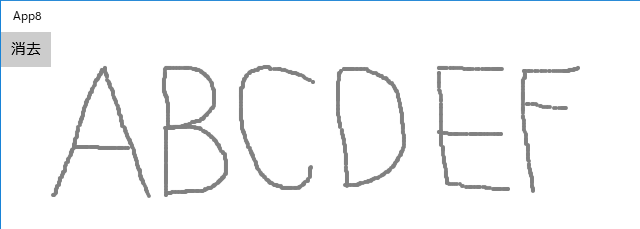
6色で描画してみました。
以下は、MainPage.xaml のコードです。
自動で作成されるコードなので、小さいフォントにしました (^^;)
確認が必要な場合は、コピペしてください m(_ _ )m
<Page x:Name="page"
    x:Class="App7.MainPage"
    xmlns="http://schemas.microsoft.com/winfx/2006/xaml/presentation"
    xmlns:x="http://schemas.microsoft.com/winfx/2006/xaml"
    xmlns:local="using:App7"
    xmlns:d="http://schemas.microsoft.com/expression/blend/2008"
    xmlns:mc="http://schemas.openxmlformats.org/markup-compatibility/2006"
    mc:Ignorable="d" PointerPressed="page_PointerPressed" PointerMoved="page_PointerMoved" PointerReleased="page_PointerReleased" Background="Beige">

    <Grid Background="{ThemeResource ApplicationPageBackgroundThemeBrush}">
        <Canvas x:Name="canvas" HorizontalAlignment="Left" Height="768" VerticalAlignment="Top" Width="894" Canvas.ZIndex="4" Margin="130,0,0,0"/>
        <Button x:Name="button" Content="消去" HorizontalAlignment="Left" Margin="10,30,0,0" VerticalAlignment="Top" Click="button_Click"/>
        <RadioButton x:Name="radio1" Content="Black" HorizontalAlignment="Left" Margin="5,90,0,0" VerticalAlignment="Top" Checked="radio1_Checked" IsChecked="True" Height="32" Width="60"/>
        <RadioButton x:Name="radio2" Content="Yellow" HorizontalAlignment="Left" Margin="5,120,0,0" VerticalAlignment="Top" Checked="radio2_Checked" Width="60"/>
        <RadioButton x:Name="radio3" Content="Red" HorizontalAlignment="Left" Margin="5,150,0,0" VerticalAlignment="Top" Checked="radio3_Checked" Width="60"/>
        <RadioButton x:Name="radio4" Content="Blue" HorizontalAlignment="Left" Margin="5,180,0,0" VerticalAlignment="Top" Checked="radio4_Checked" Width="60"/>
        <RadioButton x:Name="radio5" Content="Green" HorizontalAlignment="Left" Margin="5,210,0,0" VerticalAlignment="Top" Checked="radio5_Checked" Width="60"/>
        <RadioButton x:Name="radio6" Content="Aqua" HorizontalAlignment="Left" Margin="5,240,0,0" VerticalAlignment="Top" Checked="radio6_Checked" Width="60"/>

    </Grid>
</Page>
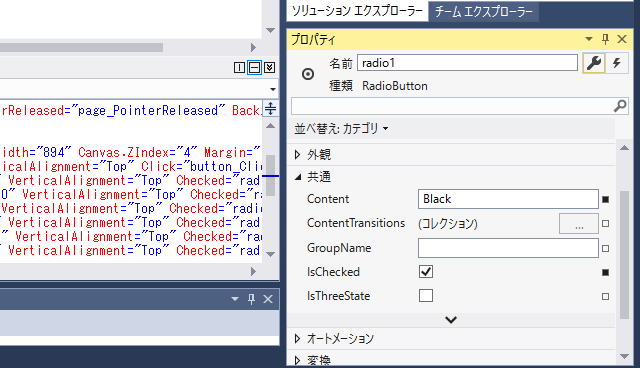
複数個 配置されたラジオボタンは、アプリ実行時に 必ず1つのみが選択状態になるようになっています。配置するだけで簡単に その機能を利用できるので非常に便利です。
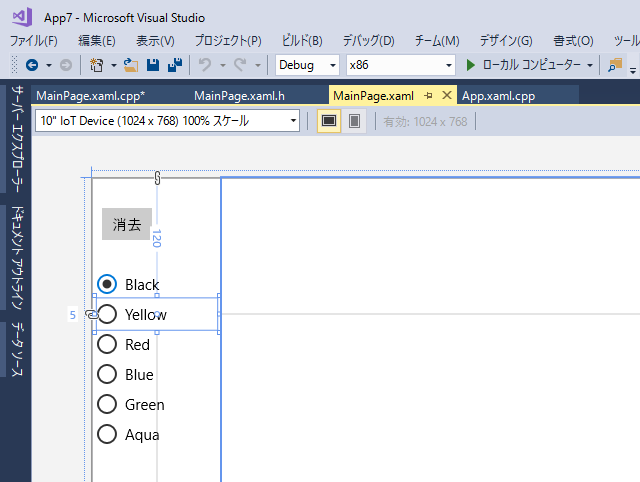
黒色用のラジオボタンのプロパティです。IsChecked にチェックを入れてあるので、黒色ペンがアプリのデフォルトペンになります。
以下は、MainPage.xaml.cpp です。
//
// MainPage.xaml.cpp
// MainPage クラスの実装。
//

#include "pch.h"
#include "MainPage.xaml.h"

using namespace App7;

using namespace Platform;
using namespace Windows::Foundation;
using namespace Windows::Foundation::Collections;
using namespace Windows::UI::Xaml;
using namespace Windows::UI::Xaml::Controls;
using namespace Windows::UI::Xaml::Controls::Primitives;
using namespace Windows::UI::Xaml::Data;
using namespace Windows::UI::Xaml::Input;
using namespace Windows::UI::Xaml::Media;
using namespace Windows::UI::Xaml::Navigation;


MainPage::MainPage()
{
    InitializeComponent();
}

// ポインタが押されていれば 1
//           押されていなければ 0
int f = 0;

// ペンの色
auto color = Windows::UI::Colors::Black;


void App7::MainPage::
page_PointerPressed(Platform::Object^ sender,
    Windows::UI::Xaml::Input::PointerRoutedEventArgs^ e)
{
    // ポインタが押されたので f を 1 にします。
    f = 1;
}


void App7::MainPage::
page_PointerMoved(Platform::Object^ sender,
    Windows::UI::Xaml::Input::PointerRoutedEventArgs^ e)
{
    if (f) {
        // ポインタの位置取得
        auto pt = e->GetCurrentPoint(this);
        float x = pt->Position.X;     // x座標
        float y = pt->Position.Y;     // y座標

        // ペンの仕様
        Shapes::Ellipse^ pen;
        pen = ref new Shapes::Ellipse();
        pen->Width = 4;  pen->Height = 4; // ペンの太さ
        // ペンの色を color にします。
        pen->Fill
            = ref new SolidColorBrush(color);
        // 点の中心がクリック位置になるように調整します。
        pen->Margin = Thickness(x - 132, y - 2, 0, 0);
        // 点を連続して配置することで、線を描きます。
        if (x > 132)
            canvas->Children->Append(pen);
        else
            f = 0;
    }
}


void App7::MainPage::
page_PointerReleased(Platform::Object^ sender,
    Windows::UI::Xaml::Input::PointerRoutedEventArgs^ e)
{
    // ポインタが解放されたので f を 0 にします。
    f = 0;
}


void App7::MainPage::
radio1_Checked(Platform::Object^ sender,
    Windows::UI::Xaml::RoutedEventArgs^ e)
{
    color = Windows::UI::Colors::Black; f = 0;
}


void App7::MainPage::
radio2_Checked(Platform::Object^ sender,
    Windows::UI::Xaml::RoutedEventArgs^ e)
{
    color = Windows::UI::Colors::Yellow; f = 0;
}


void App7::MainPage::
radio3_Checked(Platform::Object^ sender,
    Windows::UI::Xaml::RoutedEventArgs^ e)
{
    color = Windows::UI::Colors::Red; f = 0;
}


void App7::MainPage::
radio4_Checked(Platform::Object^ sender,
    Windows::UI::Xaml::RoutedEventArgs^ e)
{
    color = Windows::UI::Colors::Blue; f = 0;
}


void App7::MainPage::
radio5_Checked(Platform::Object^ sender,
    Windows::UI::Xaml::RoutedEventArgs^ e)
{
    color = Windows::UI::Colors::Green; f = 0;
}


void App7::MainPage::
radio6_Checked(Platform::Object^ sender,
    Windows::UI::Xaml::RoutedEventArgs^ e)
{
    color = Windows::UI::Colors::Aqua; f = 0;
}


void App7::MainPage::
button_Click(Platform::Object^ sender,
    Windows::UI::Xaml::RoutedEventArgs^ e)
{
    // ボタンが押されたので、キャンバスをクリアします。
    canvas->Children->Clear();
}
《その387》ドラッグによる描画(1)
ドラッグによる描画(1)
今回のアプリは、ドラッグで線を描きます。
Page と同じサイズの Canvas上に描画する仕様です。「消去」ボタンで、画面をクリアします。
以下は、MainPage.xaml.cpp です。
//
// MainPage.xaml.cpp
// MainPage クラスの実装。
//

#include "pch.h"
#include "MainPage.xaml.h"

using namespace App8;

using namespace Platform;
using namespace Windows::Foundation;
using namespace Windows::Foundation::Collections;
using namespace Windows::UI::Xaml;
using namespace Windows::UI::Xaml::Controls;
using namespace Windows::UI::Xaml::Controls::Primitives;
using namespace Windows::UI::Xaml::Data;
using namespace Windows::UI::Xaml::Input;
using namespace Windows::UI::Xaml::Media;
using namespace Windows::UI::Xaml::Navigation;


MainPage::MainPage()
{
    InitializeComponent();
}


// ポインタが押されていれば 1
//           押されていなければ 0
int f = 0;


void App8::MainPage::
page_PointerPressed(Platform::Object^ sender,
    Windows::UI::Xaml::Input::PointerRoutedEventArgs^ e)
{
    // ポインタが押されたので f を 1 にします。
    f = 1;
}


void App8::MainPage::
page_PointerMoved(Platform::Object^ sender,
    Windows::UI::Xaml::Input::PointerRoutedEventArgs^ e)
{
    if (f) {
        // ポインタの位置取得
        auto pt = e->GetCurrentPoint(this);
        float x = pt->Position.X;     // x座標
        float y = pt->Position.Y;     // y座標

        // ペンの仕様
        Shapes::Ellipse^ pen;
        pen= ref new Shapes::Ellipse();
                pen->Width = 4;  pen->Height = 4; // ペンの太さ
        // ペンを Gray にします。
        pen->Fill
            = ref new SolidColorBrush(Windows::UI::Colors::Gray);
        // 点の中心がクリック位置になるように調整します。
        pen->Margin = Thickness(x - 2, y - 2, 0, 0);
        // 点を連続して配置することで、線を描きます。
        canvas->Children->Append(pen);
    }
}


void App8::MainPage::
page_PointerReleased(Platform::Object^ sender,
    Windows::UI::Xaml::Input::PointerRoutedEventArgs^ e)
{
    // ポインタが解放されたので f を 0 にします。
    f = 0;
}


void App8::MainPage::
button_Click(Platform::Object^ sender,
    Windows::UI::Xaml::RoutedEventArgs^ e)
{
    // ボタンが押されたので、キャンバスをクリアします。
    canvas->Children->Clear();
}
《その386》クリックによる点(Point)の描画
点(Point)の描画
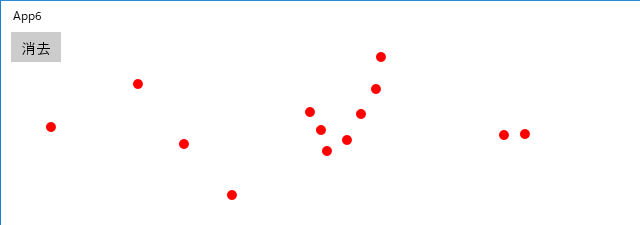
今回のアプリは、クリックした位置に点を描画します。
Page と同じサイズの Canvas上に描画する仕様です。「消去」ボタンで、画面をクリアします。
以下は、MainPage.xaml.cpp です。
//
// MainPage.xaml.cpp
// MainPage クラスの実装。
//

#include "pch.h"
#include "MainPage.xaml.h"

using namespace App6;

using namespace Platform;
using namespace Windows::Foundation;
using namespace Windows::Foundation::Collections;
using namespace Windows::UI::Xaml;
using namespace Windows::UI::Xaml::Controls;
using namespace Windows::UI::Xaml::Controls::Primitives;
using namespace Windows::UI::Xaml::Data;
using namespace Windows::UI::Xaml::Input;
using namespace Windows::UI::Xaml::Media;
using namespace Windows::UI::Xaml::Navigation;


MainPage::MainPage()
{
    InitializeComponent();
}


void App6::MainPage::
page_PointerPressed(Platform::Object^ sender,
    Windows::UI::Xaml::Input::PointerRoutedEventArgs^ e)
{
    // クリック位置の取得
    auto pt = e->GetCurrentPoint(this);
    float x = pt->Position.X;     // x座標
    float y = pt->Position.Y;     // y座標

    // 点の仕様
    Shapes::Ellipse^ point;
    point = ref new Shapes::Ellipse();
    point->Width = 10;            // 点の幅
    point->Height = 10;           // 点の高さ
    // 点を Red にします。
    point->Fill
        = ref new SolidColorBrush(Windows::UI::Colors::Red);
    // 点の中心がクリック位置になるように調整します。
    point->Margin = Thickness(x - 5, y - 5, 0, 0);
    canvas->Children->Append(point);    // 点を配置
}


void App6::MainPage::
button_Click(Platform::Object^ sender,
    Windows::UI::Xaml::RoutedEventArgs^ e)
{
    canvas->Children->Clear();  // Canvas をクリア
}